An illustrated analytical study of Andrew Webb-Mitchell’s Piano Concerto, Op. 7: form, harmony, thematic transformation and symphonic unity.
Download the illustrated analysis (PDF)
Introduction: Themes, time and transformation
This study approaches Andrew Webb-Mitchell’s Piano Concerto, Op. 7, through a question that runs across all three movements: how does the return of familiar musical material change its meaning? The concerto combines melodies with immediately recognisable profiles and a harmonic language that frequently interrupts expected resolutions. Its structure is not exhausted by naming its formal sections. The interaction of theme, harmony, rhythm and orchestral texture determines whether a return sounds like recollection, argument, release or renewal.
The work belongs to the series the composer has called the Philosopher Concertos. Completed in 2023 and dedicated to Richard Dawkins, it developed from sketches associated with the isolation of 2020. The names Waldeinsamkeit and Hero, attached by the composer to contrasting ideas in the first movement, offer a point of entry into its expressive world. They should not, however, turn the score into a fixed narrative in which every chord or instrumental gesture is assigned a philosophical meaning. The musical transformations remain the primary evidence.
The first movement places an extended introduction before a large modified sonata argument. A melody associated with solitude returns within the recapitulation, where the formerly isolated piano is answered by a flute. The Canzonetta provides a contrasting middle movement in which thematic recall depends on transposition, changing orchestral roles and striking differences in harmonic pace. In the finale, short scherzo episodes and a lyrical second subject undergo further recombination; the first movement’s two central ideas return only after the second subject has acquired several different characters.
The analysis distinguishes observations that can be checked in the score—bar boundaries, melodic intervals, instrumentation, harmonic collections and recurring figures—from expressive readings that depend partly on the composer’s stated intentions and on listening. The chord symbols are selective reductions rather than exhaustive transcriptions of every passing note. References to earlier composers describe stylistic affinities or acknowledged textural inspirations unless a direct quotation is specified. In this sense, the analysis offers a route through the music, not a substitute for hearing it performed.
First Movement
A modified sonata argument, harmonic mobility and returning themes
1. Formal architecture
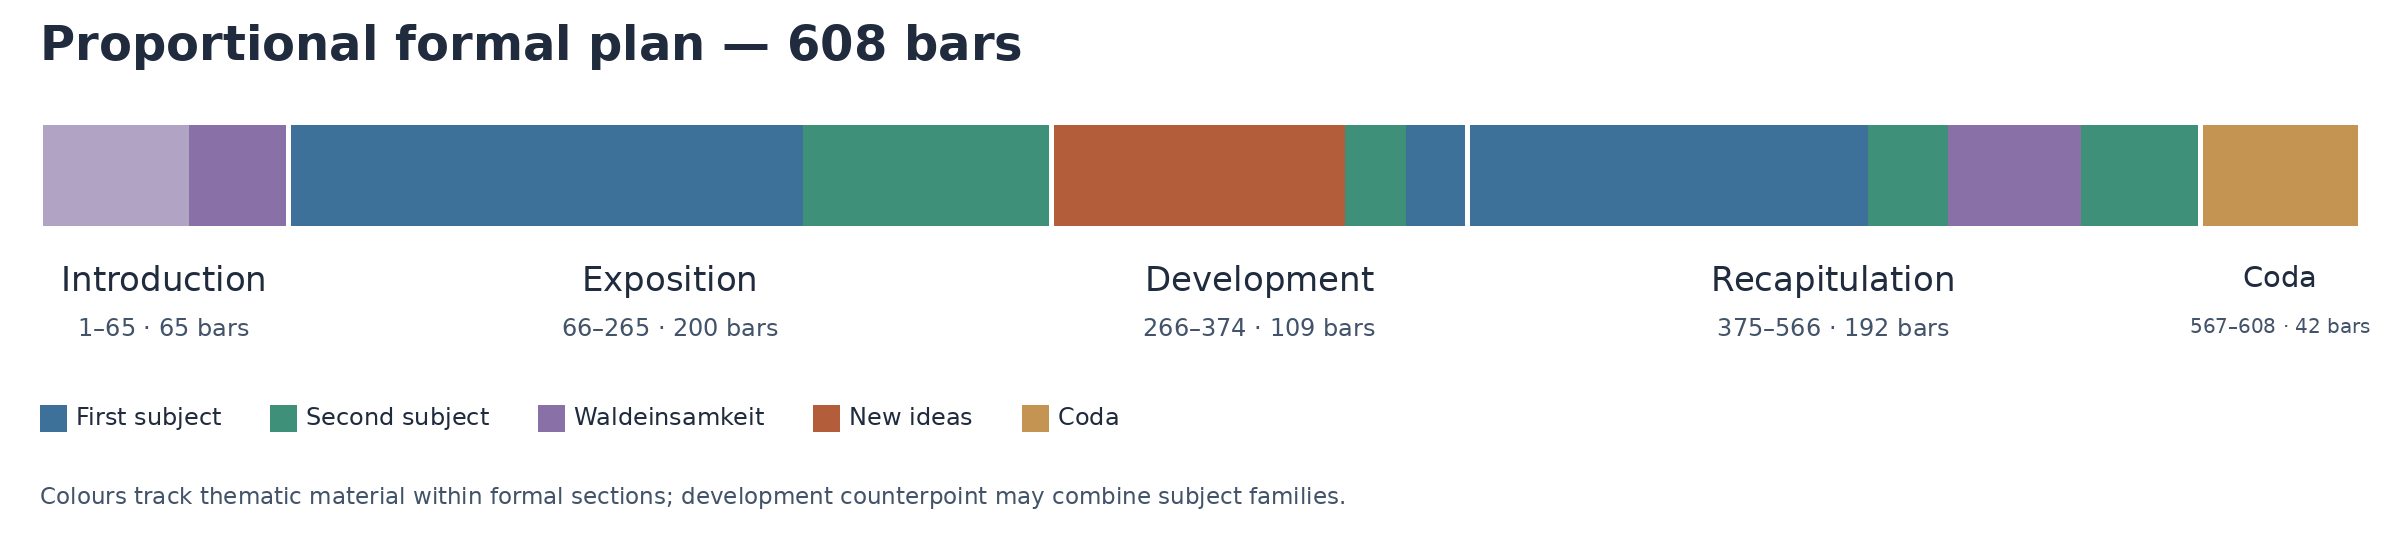
Diagram key: blue denotes first-subject material; green, second-subject material; purple, Waldeinsamkeit; terracotta, new developmental material and climaxes; ochre, codettas, transitions and coda. Overlapping themes are represented by the predominant layer. The recapitulation occupies bars 375–566 and the coda bars 567–608.
Section | Bars | Length | Character |
Introduction | 1–65 | 65 | D pedal; chromatic tonal ambiguity; first Waldeinsamkeit at 40–52 |
Exposition | 66–265 | 200 | First-subject themes 1A/1B/1C; second-subject themes 2A/2B |
Development | 266–374 | 109 | New plagal theme, triplets, imitation, thematic superimposition |
Recapitulation | 375–566 | 192 | First-subject reprise in D; 2A and 2B return; Waldeinsamkeit intervenes; climax and 2A return |
Coda | 567–608 | 42 | Lead-in at 567–574; main coda from 575; 2A-derived material, then new closing material; final A-major harmony |
2. Introduction: Waldeinsamkeit and the Hero
The movement opens over an extended D pedal, whose sustained foundation supports chromatically unsettled wind and string writing. At bars 40–52 the solo piano introduces Waldeinsamkeit, a theme the composer associates with solitude and adversity. The first-subject exposition begins at bar 66; the contrasting Hero theme enters on the final quaver of bar 67. The opposition is thus established first by musical character—isolated lyricism against assertive motion—and subsequently by the themes’ different treatment within the form.
Waldeinsamkeit begins with a ten-note idea, including its two-note anacrusis. Its final three notes are extended sequentially downwards, and the longer melody ends with four rising gestures. In the latter, a recurring A alternates with successively higher pitches, producing widening intervals. These two components—the recognisable ten-note opening and a more readily detachable intervallic pattern—are treated differently when the theme returns: one invites complete imitation; the other can be recast in an apparently unrelated context.
Example 1 — Waldeinsamkeit: first appearance first movement, bars 40–52.
|
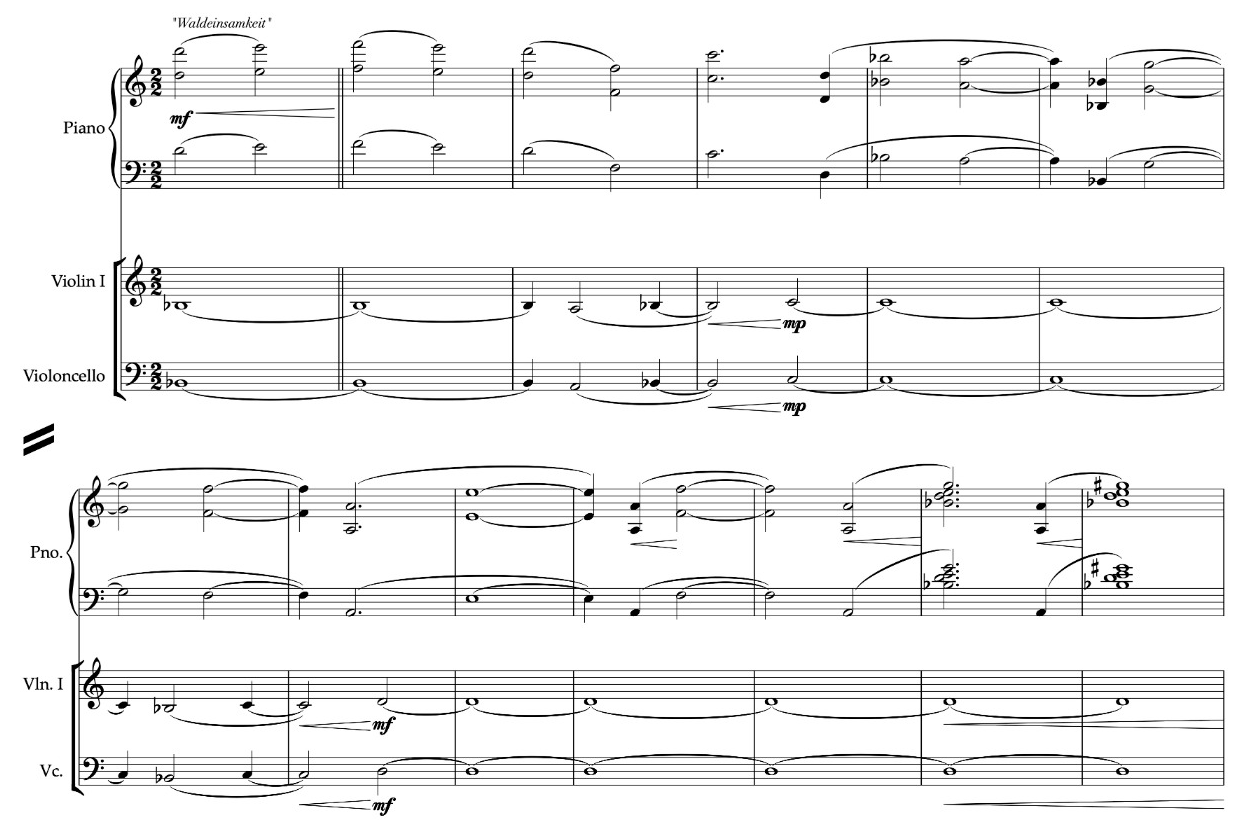
The orchestral outburst in bars 53–65 passes through A♭ (53–54), D7 (55–58), B7 (59–61) and G augmented seventh (62–65). Its emphatic arrival contrasts with the preceding piano melody; the harmonic deflections prepare an exposition that begins in C major without the conventional dominant preparation.
3. Exposition: themes and harmonic mobility
First-subject exposition (bars 66–200)
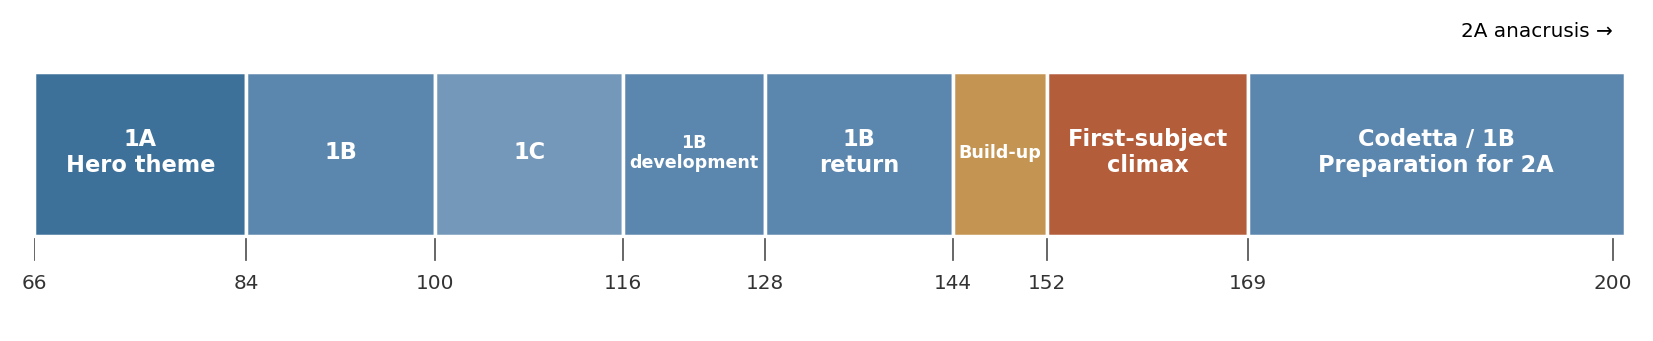
Figure 1. Exposition — first-subject group (bars 66–200)
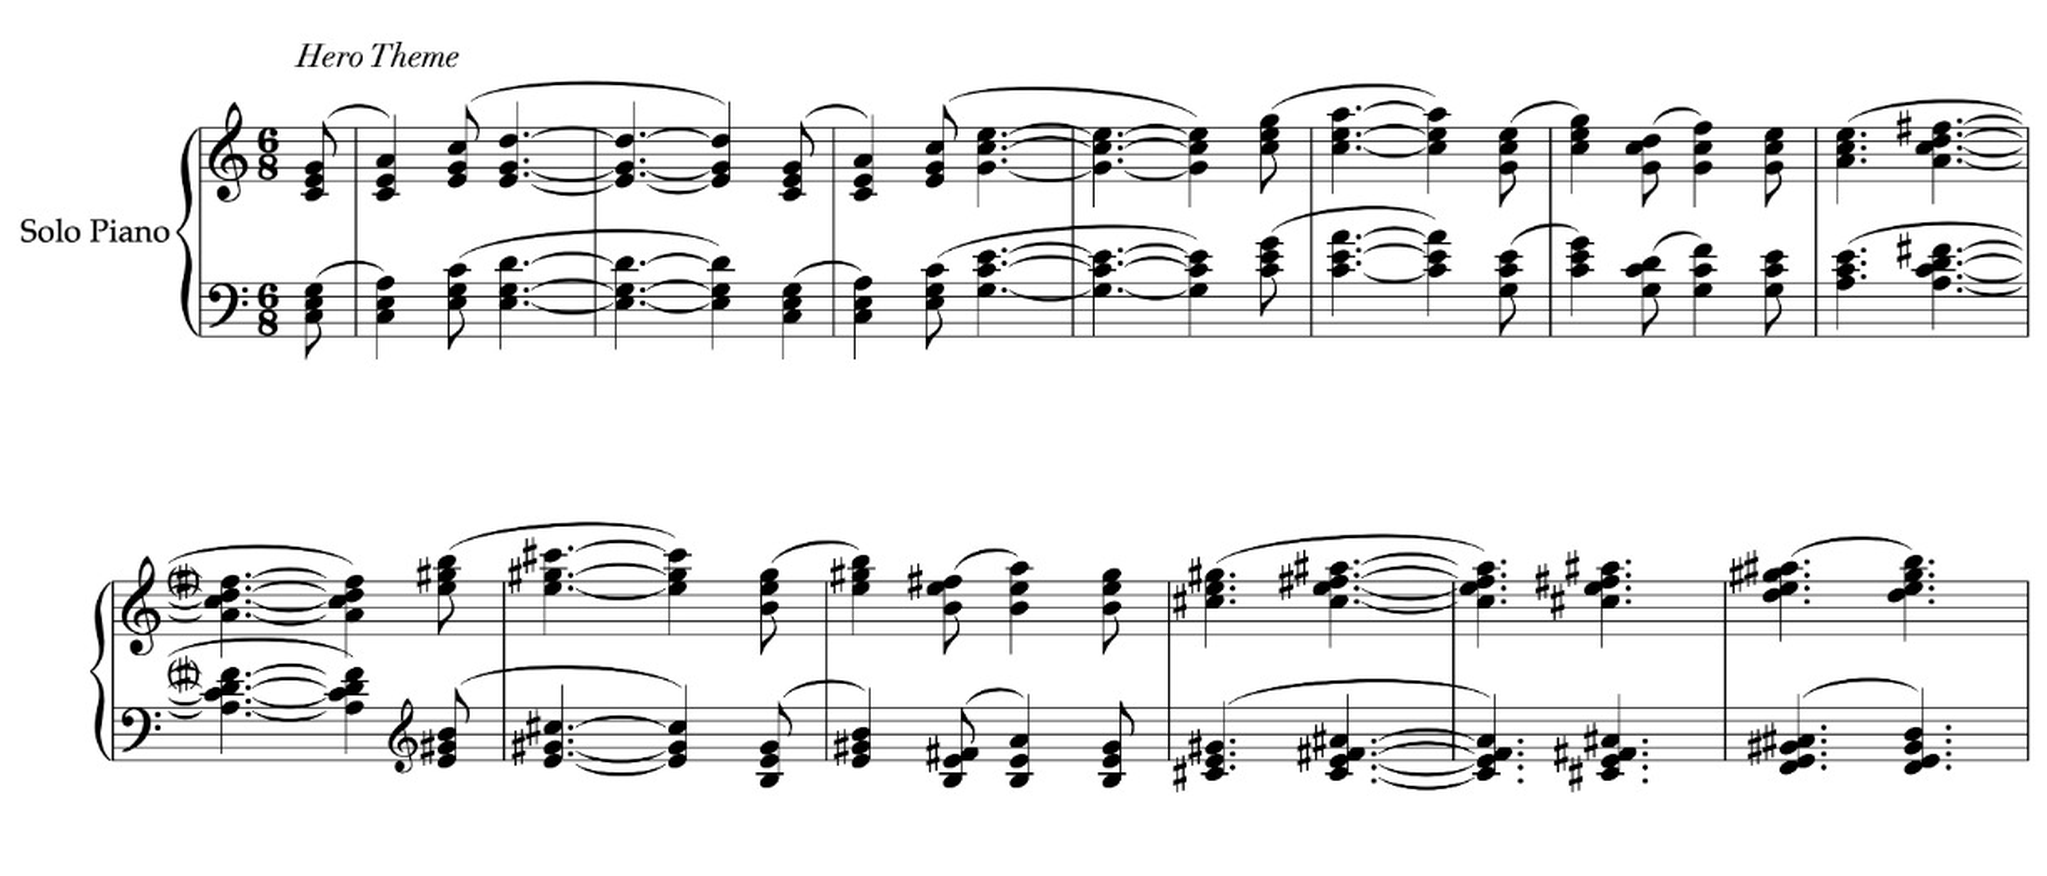
Theme 1A, the Hero, enters in the solo piano on the final quaver of bar 67. An eight-bar statement is followed by an extension derived from its concluding four bars, transposed to bring the phrase to a close at bar 80. A horn countermelody accompanies the piano. The A minor–D7 succession (72–75), C♯ minor–F♯ (76–79) and E7 (80–83) repeatedly suggest, then defer, tonal destinations: the theme’s forward drive is supported by the refusal to settle.
Example 2 — Theme 1A — Hero bars 67–80, beginning on the last quaver of bar 67.
|
Theme 1B occupies bars 84–99. Its harmonic sequence includes C, F♯ major seventh, A♭ and E; a subsequent statement transfers the pattern upwards by a fourth. The juxtaposition of distant tonal regions is presented as recognisable, recurring material rather than as a passing chromatic event.
Example 3 — Theme 1B bars 84–99.
|
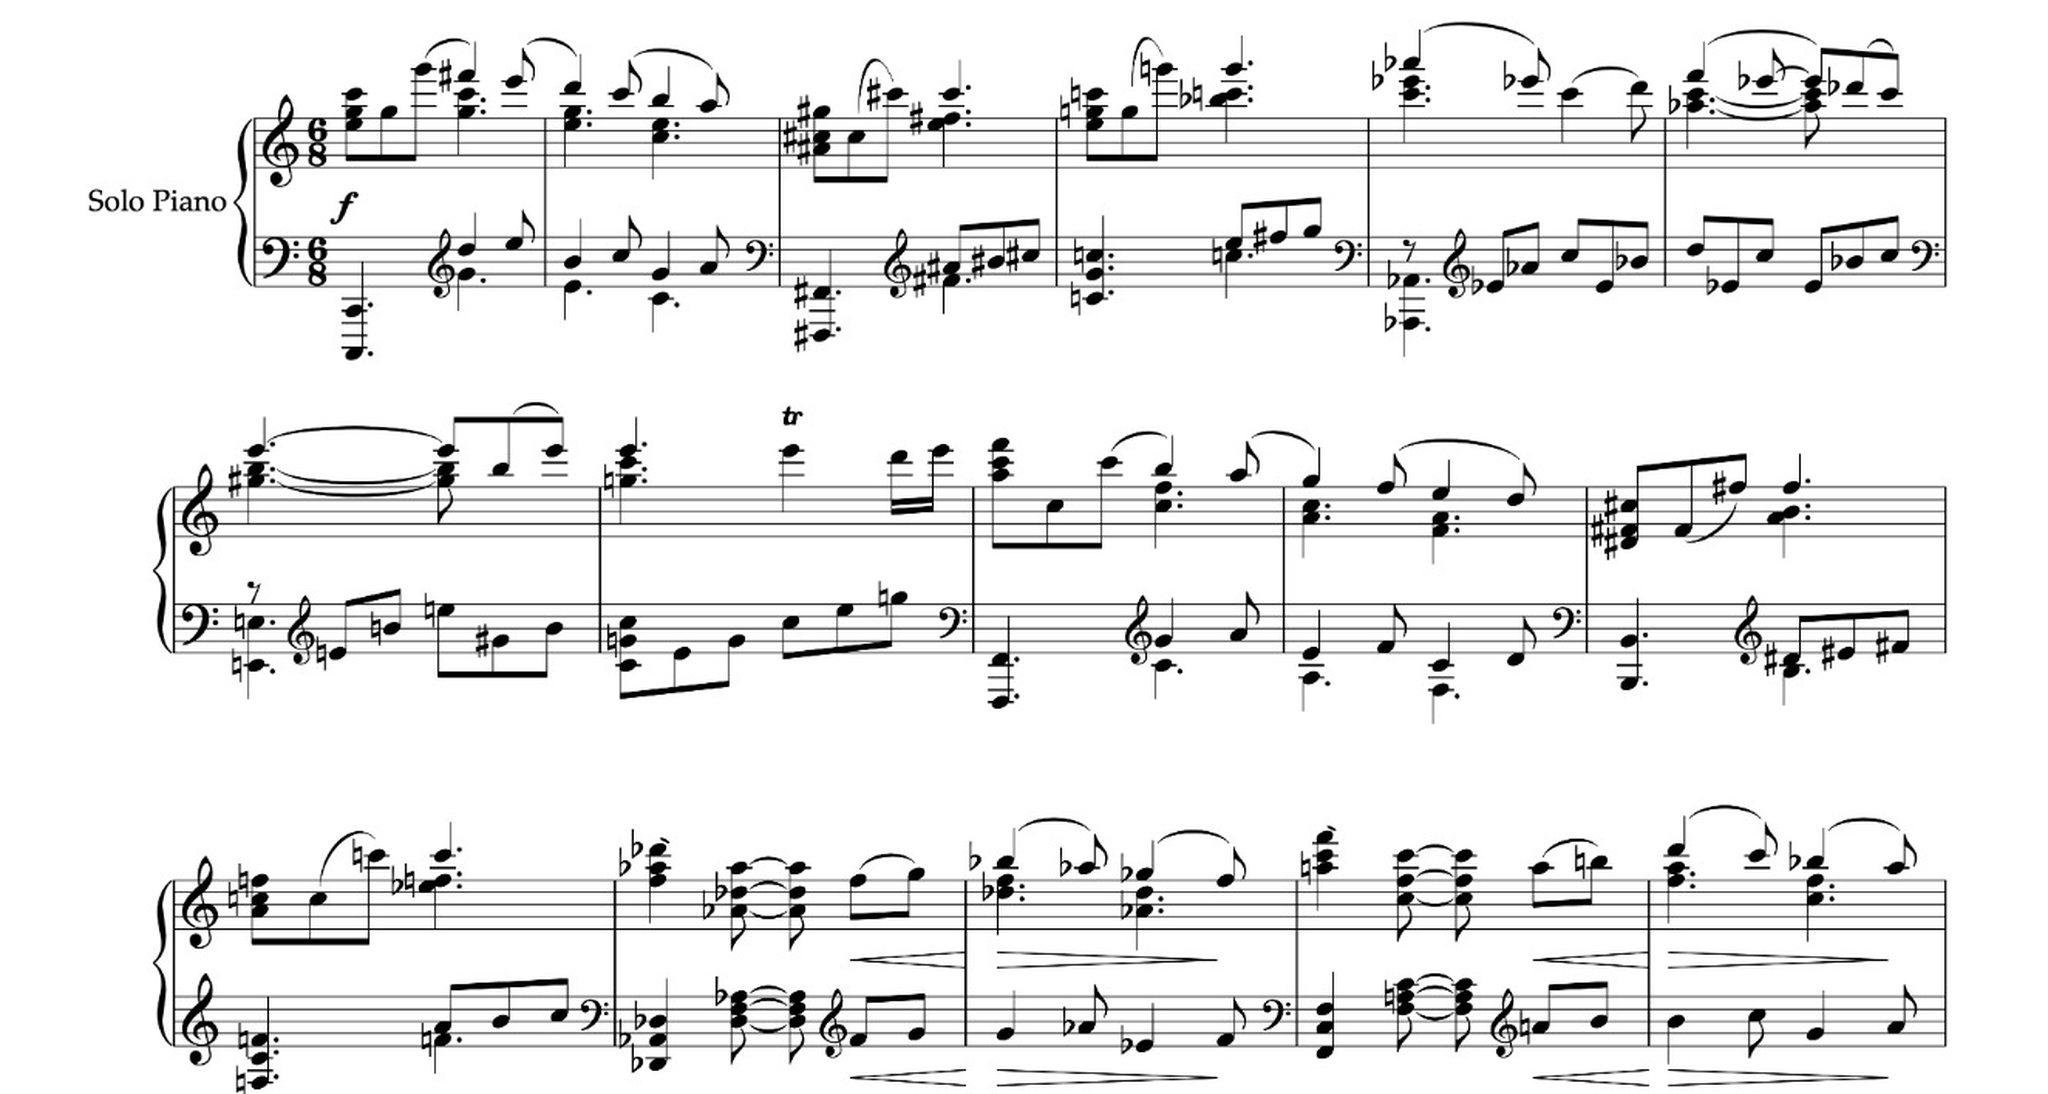
Theme 1C enters in the piano on the second dotted-crotchet beat of bar 100 and continues through bar 115, moving from D♭ towards E. Its distinct rhythmic profile allows it to reappear later in counterpoint with Theme 1B.
Example 4 — Theme 1C bars 100–115, beginning on the second dotted-crotchet beat of bar 100.
|
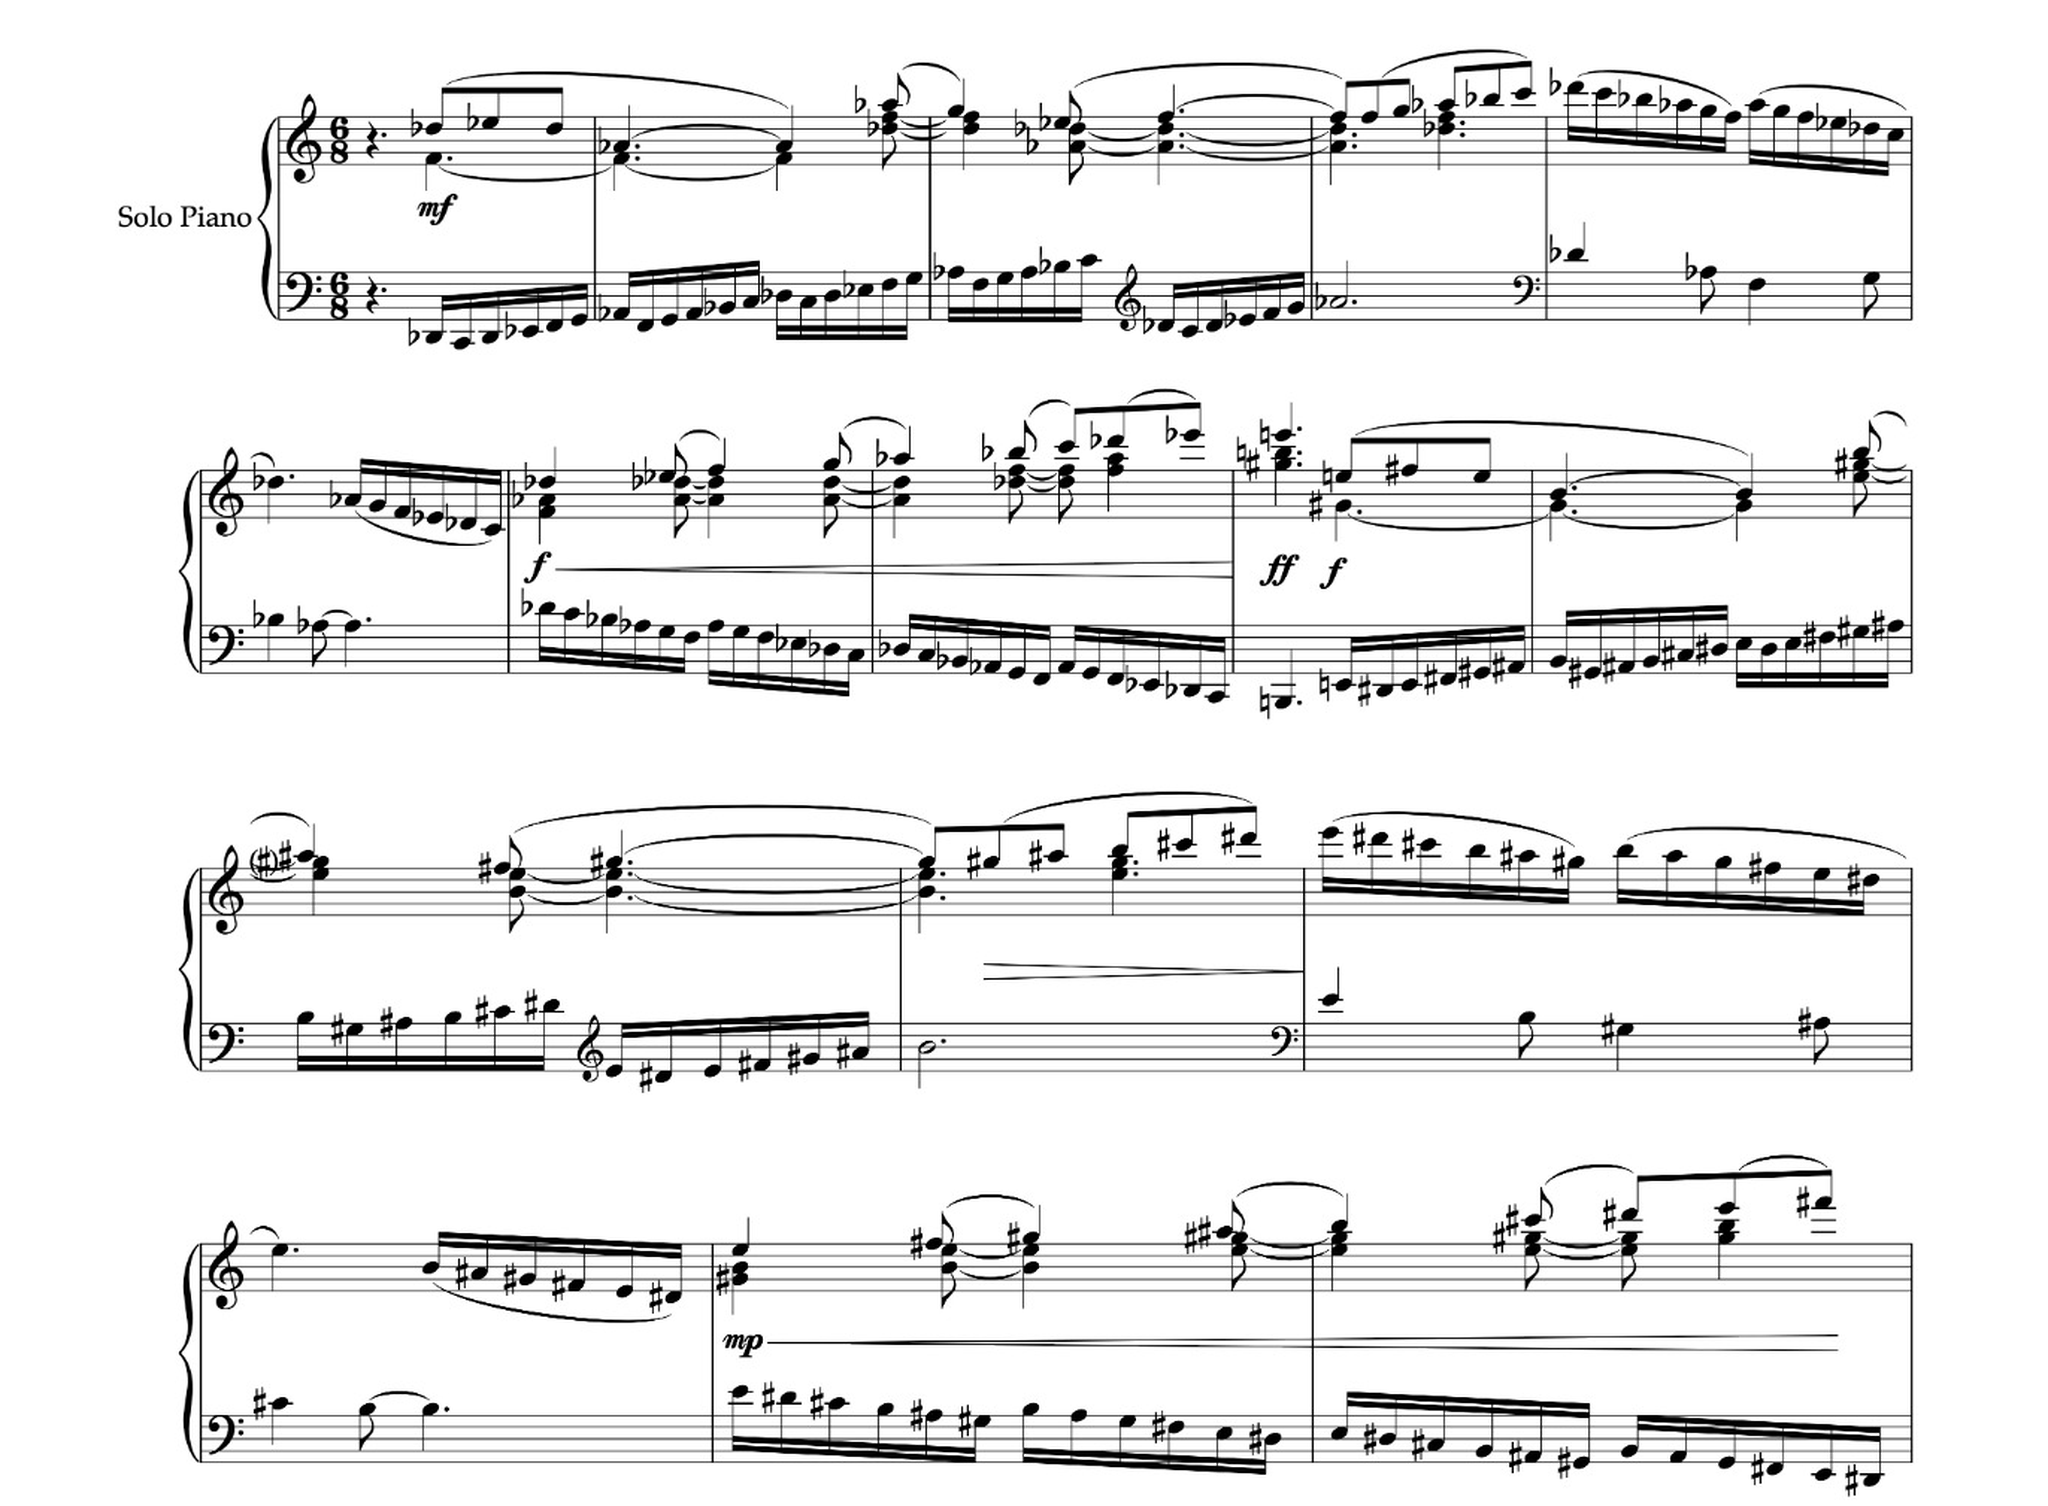
In bars 116–127 the woodwinds develop Theme 1B against burlesque piano and string figuration; Theme 1C is not simply prolonged. Theme 1B then returns at bar 128 a minor third higher, continuing to bar 143.
The ascending minor-third cycle C–E♭–F♯–A in bars 144–151 intensifies the first-subject group towards a powerful orchestral outburst at bar 152, its principal climax. The chromatic continuation passes through an augmented D sonority at bars 165–168 before reaching G at bar 169, where the codetta begins. Material associated with Theme 1B continues within the codetta, while the flutes begin to anticipate the second subject before its piano anacrusis at bar 200.
Second-subject exposition (anacrusis in bar 200; bars 201–265)
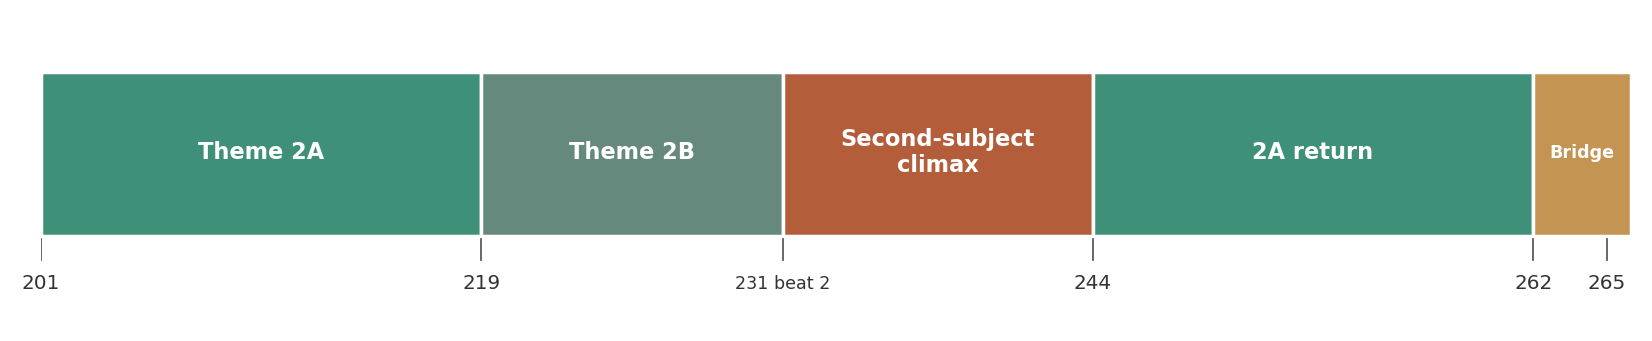
Figure 2. Exposition — second-subject group (anacrusis in bar 200; bars 201–265).
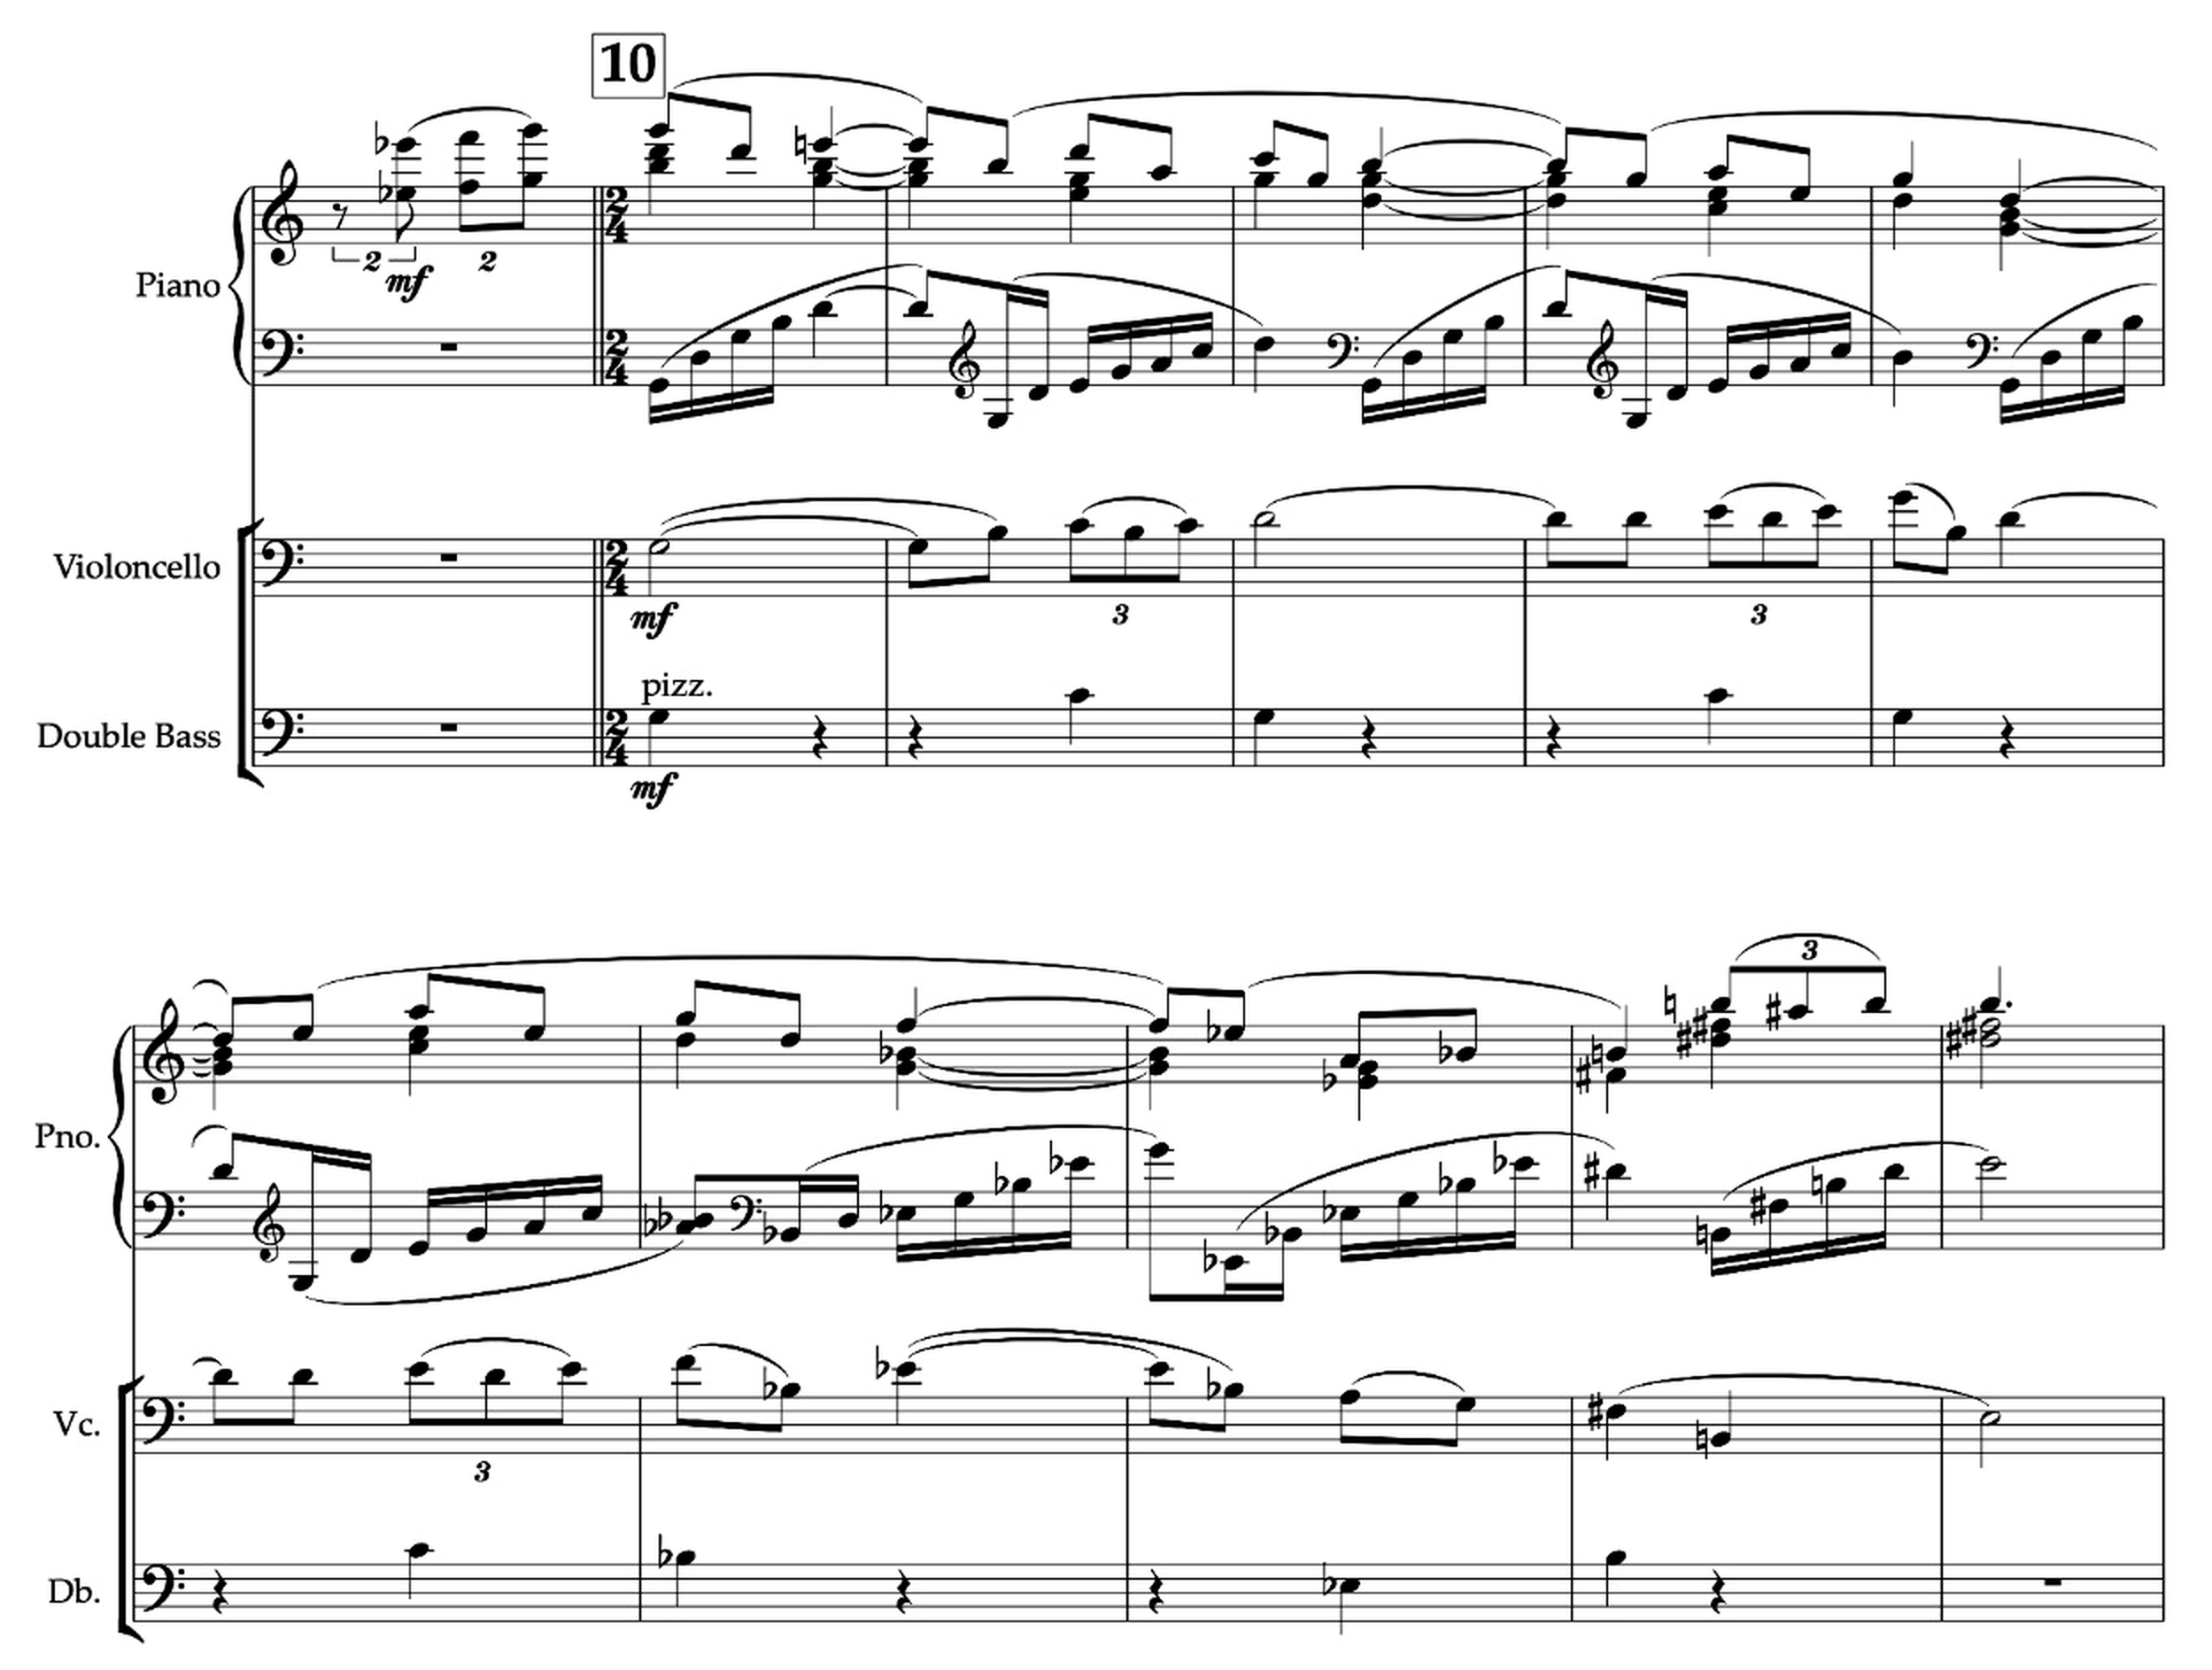
The flutes anticipate Theme 2A with an ascending E♭–F–G figure in octaves at bar 198. The solo piano takes up the figure as an anacrusis in bar 200; the first full bar of the theme is therefore 201, not its actual point of entry. The opening combines G/C plagal alternation with falling perfect-fourth intervals. The flute answers in bars 211–214, followed by a piano response in bars 215–218. The overlapping flute and piano gestures make the passage a transition between subject groups rather than an isolated new beginning.
Example 5 — Theme 2A, with cello counter-theme bars 200–210.
|
Theme 2B emerges in the new 3/4 character: two false entries in the violins, at bars 219 and 220, precede the principal piano statement at bar 221. The delayed arrival makes the new theme audible as a distinct event within the second-subject group.
Example 6 — Theme 2B bars 221–231, ending after the first beat of bar 231.
|
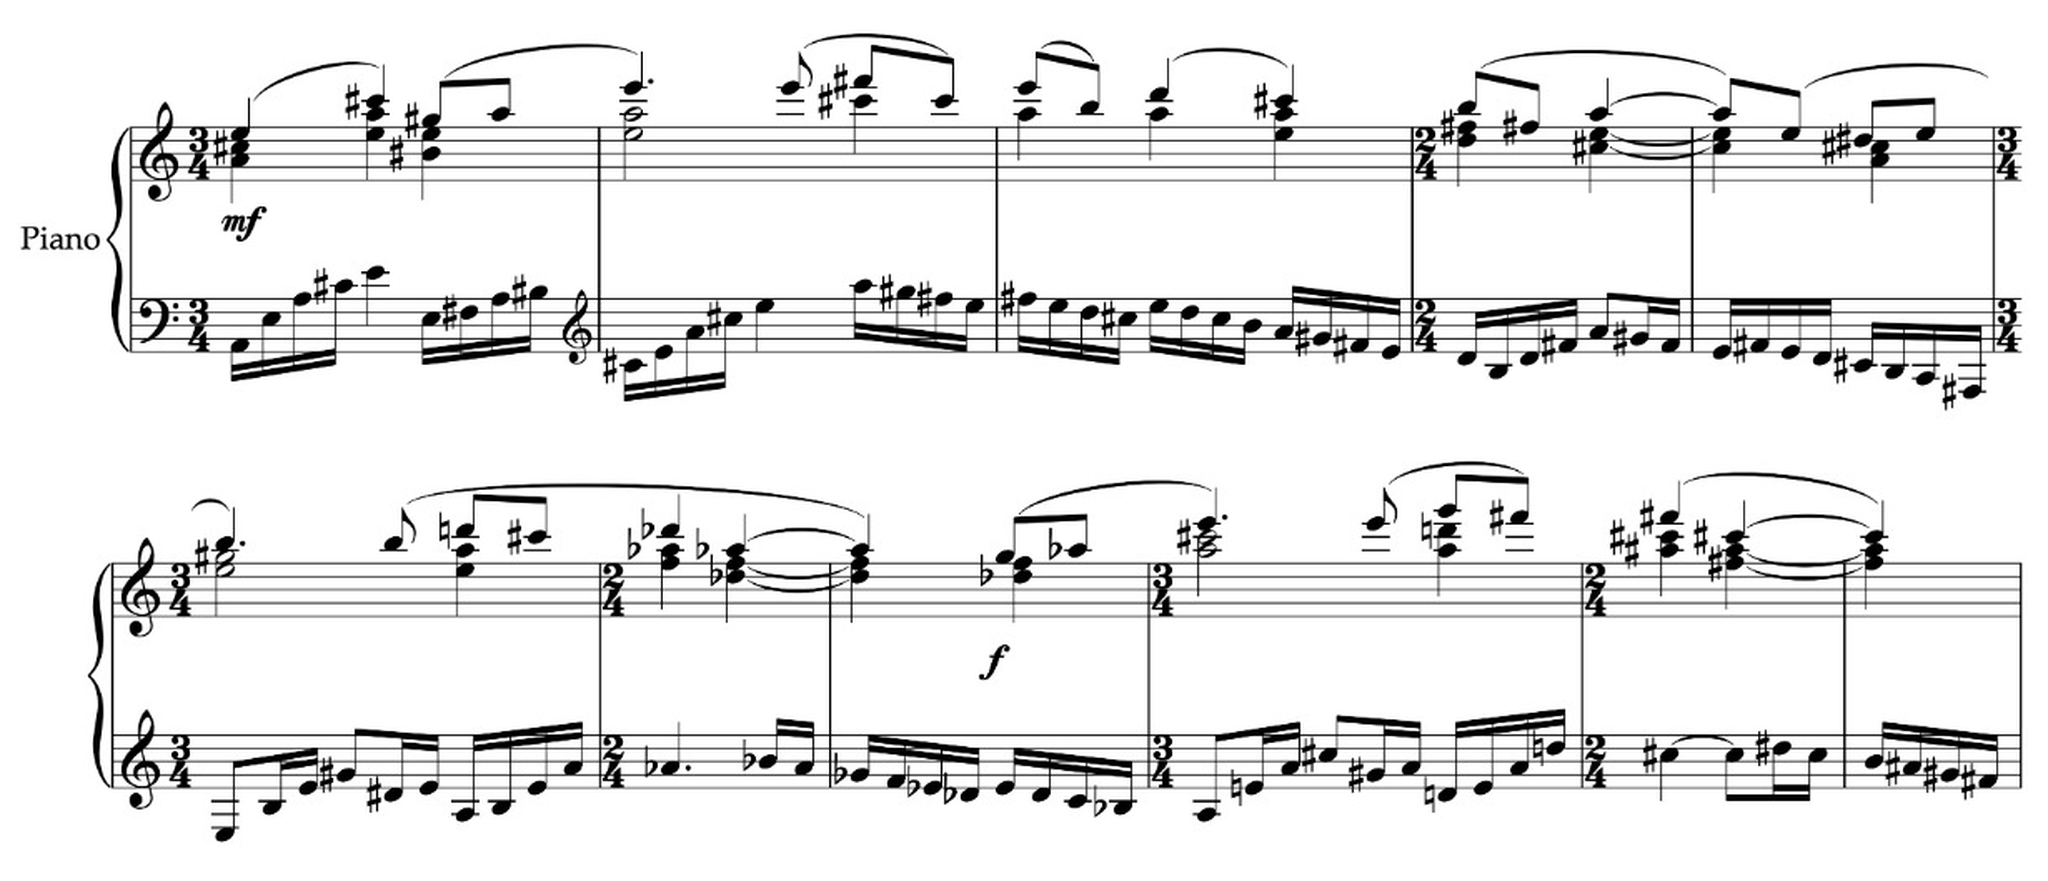
Themes 2A and 2B form the contrasting second-subject group. Their difference from the more assertive 1A–1C complex lies in musical character, phrase design and orchestration. Theme 2A returns in bars 244–261, and the bridge at bars 262–265 closes the 200-bar exposition (bars 66–265).
4. Development: transformation and contrapuntal integration
Development, Part I (bars 266–318)
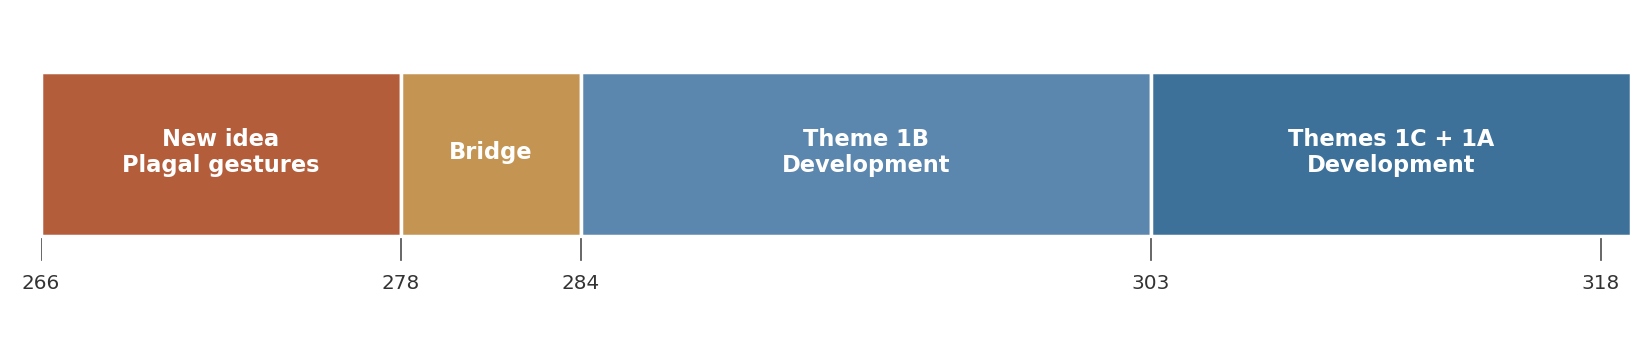
Figure 3. Development — Part I (bars 266–318)
Bars 266–277 introduce development theme D1, a six-bar piano idea stated twice. A series of plagal gestures moves from F major into its parallel minor at bars 270–271 and again around bars 276–277; the trombones articulate the first such change. The shift between parallel major and minor recurs elsewhere in the concerto. A bridge at bars 278–283 leads to triplet figuration in Violin I and bassoons at bar 284. From bar 287 the piano develops Theme 1B above a half-diminished harmonic field, with imitation in the cellos and double basses.
At bars 303–306 Theme 1C appears in Violin I and is imitated by the first trumpet. At bars 307–310 the clarinets and bassoons, doubled by violas and cellos, take part in a canonic treatment of Theme 1A with the piano. Across bars 303–318 these subjects and their transpositions are redistributed over ninth chords and half-diminished sevenths. The development thus brings material originally separated in the exposition into closer contrapuntal contact.
Development, Part II (bars 319–374)
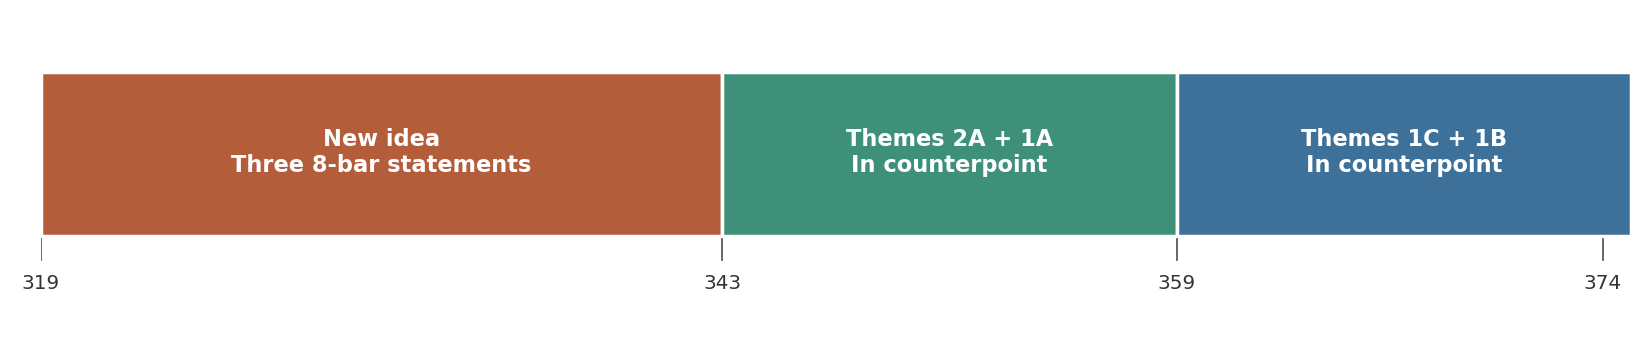
Figure 4. Development — Part II (bars 319–374)
Development theme D2 enters at bar 319 as a descending, minor-mode scale melody with antiphonal violin writing. It is heard in three eight-bar statements: first principally in the piano, then with increasing participation by the horns. Parallel major–minor changes recall D1. The tonal sequence passes through F♯ minor, A minor and C minor, reaching G major at bars 341–342. The turn to A♭ at bar 343 diverts the expected resolution to C: the effect is a chromatic evasion rather than a conventional dominant–submediant interrupted cadence.
Bars 343–350 combine Themes 2A and 1A in relatively quiet counterpoint: Violin I, violas, cellos and piano participate in the first four bars, followed by flutes, oboes and piano. The combination is transposed at bars 351–358. At bars 359–374 the texture expands: trumpet, piano and upper woodwinds combine Themes 1C and 1B above string figuration and rapid scales. An A pedal helps direct this accumulation towards the D-major recapitulation.
The composer conceived this culmination in relation to the Golden Section of the movement. At roughly 0.618 of 608 bars, the proportional point falls near bar 376, adjacent to the recapitulation at bar 375. The calculation does not by itself demonstrate an audible division, but it accords with the crescendo of rhythmic activity, thematic superimposition and orchestral weight in bars 359–374. The return to recognisable exposition material immediately afterwards marks the structural change more clearly than the numerical proportion alone.
5. Recapitulation: transformation rather than repetition
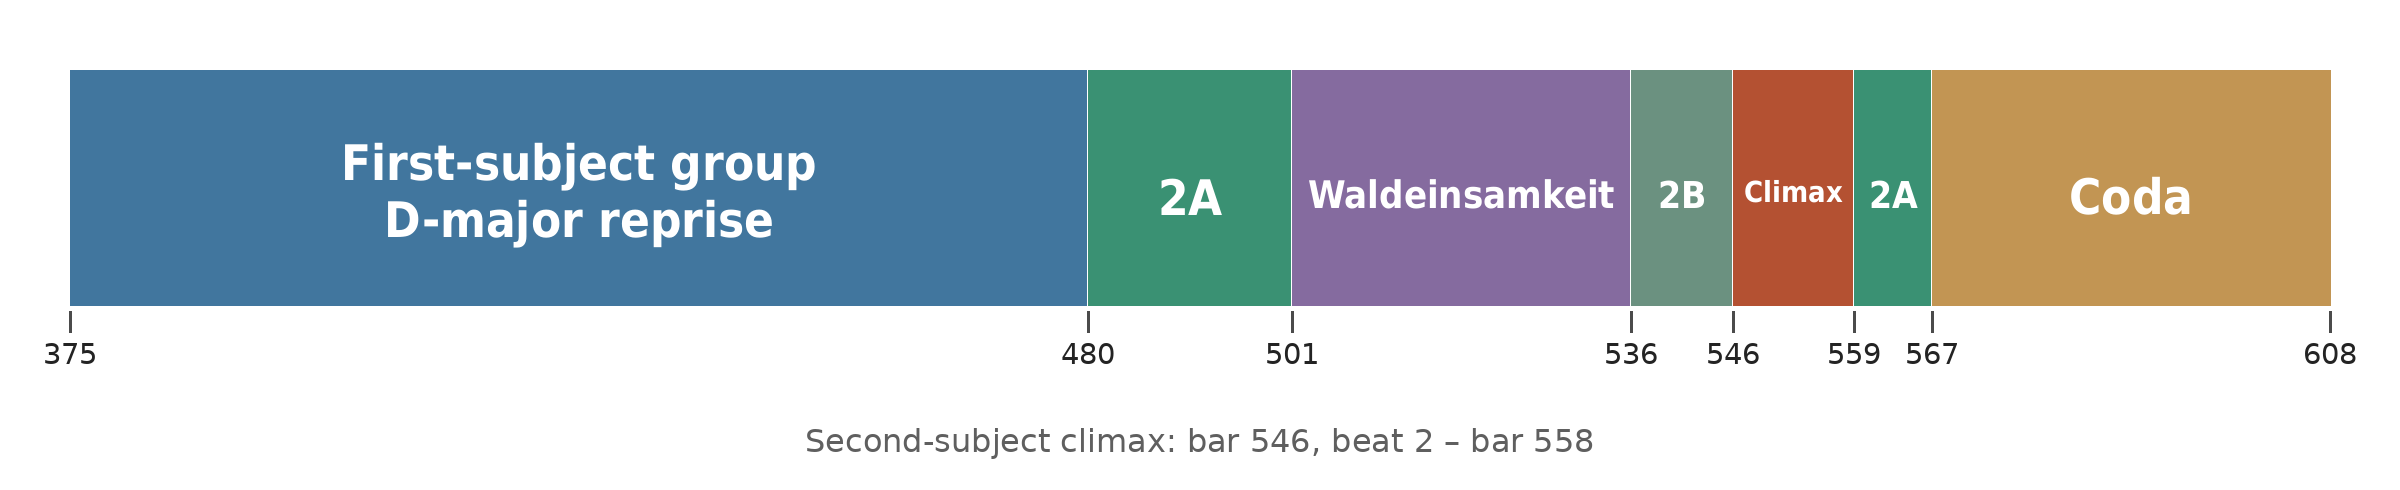
Figure 5. Recapitulation and coda (bars 375–608).
The recapitulation begins at bar 375 in D major. Bars 377–479 broadly restate exposition bars 66–168 a major second higher, with changes of orchestration. Instead of continuing into the loud codetta, the music stops at a general pause in bar 480, with the tam-tam resonance abruptly choked. This silence interrupts the renewed assertion of the Hero theme. A quiet horn lead-in precedes a subdued piano statement of Theme 2A over strings, answered by horn and flute figures; the recapitulation changes direction rather than merely completing a transposition of the exposition.
Waldeinsamkeit returns at bar 501. The piano’s solitary melody is now answered by Flute I, a dialogue the composer associates with companionship in adversity. The effect arises from the instrumental exchange itself rather than requiring a predetermined narrative. The reappearance of introductory material inside a later sonata-form section has a formal parallel in the return of the Grave introduction in the opening movement of Beethoven’s Pathétique Sonata, Op. 13, although the expressive functions of the two passages differ.
From bar 501 the piano presents Waldeinsamkeit’s ten-note opening twice, initially transposed from its original D starting note to F; the second statement introduces variation before the melodic span broadens. The flute twice imitates the final four-note cell of the ten-note idea, then moves into freer counterpoint with the piano. The result is neither a literal reprise of bars 40–52 nor a new subject: it is a sustained re-examination of the opening melody within the recapitulation.
Example 7 — Waldeinsamkeit: second incarnation and flute dialogue first movement, bars 501–535.
|
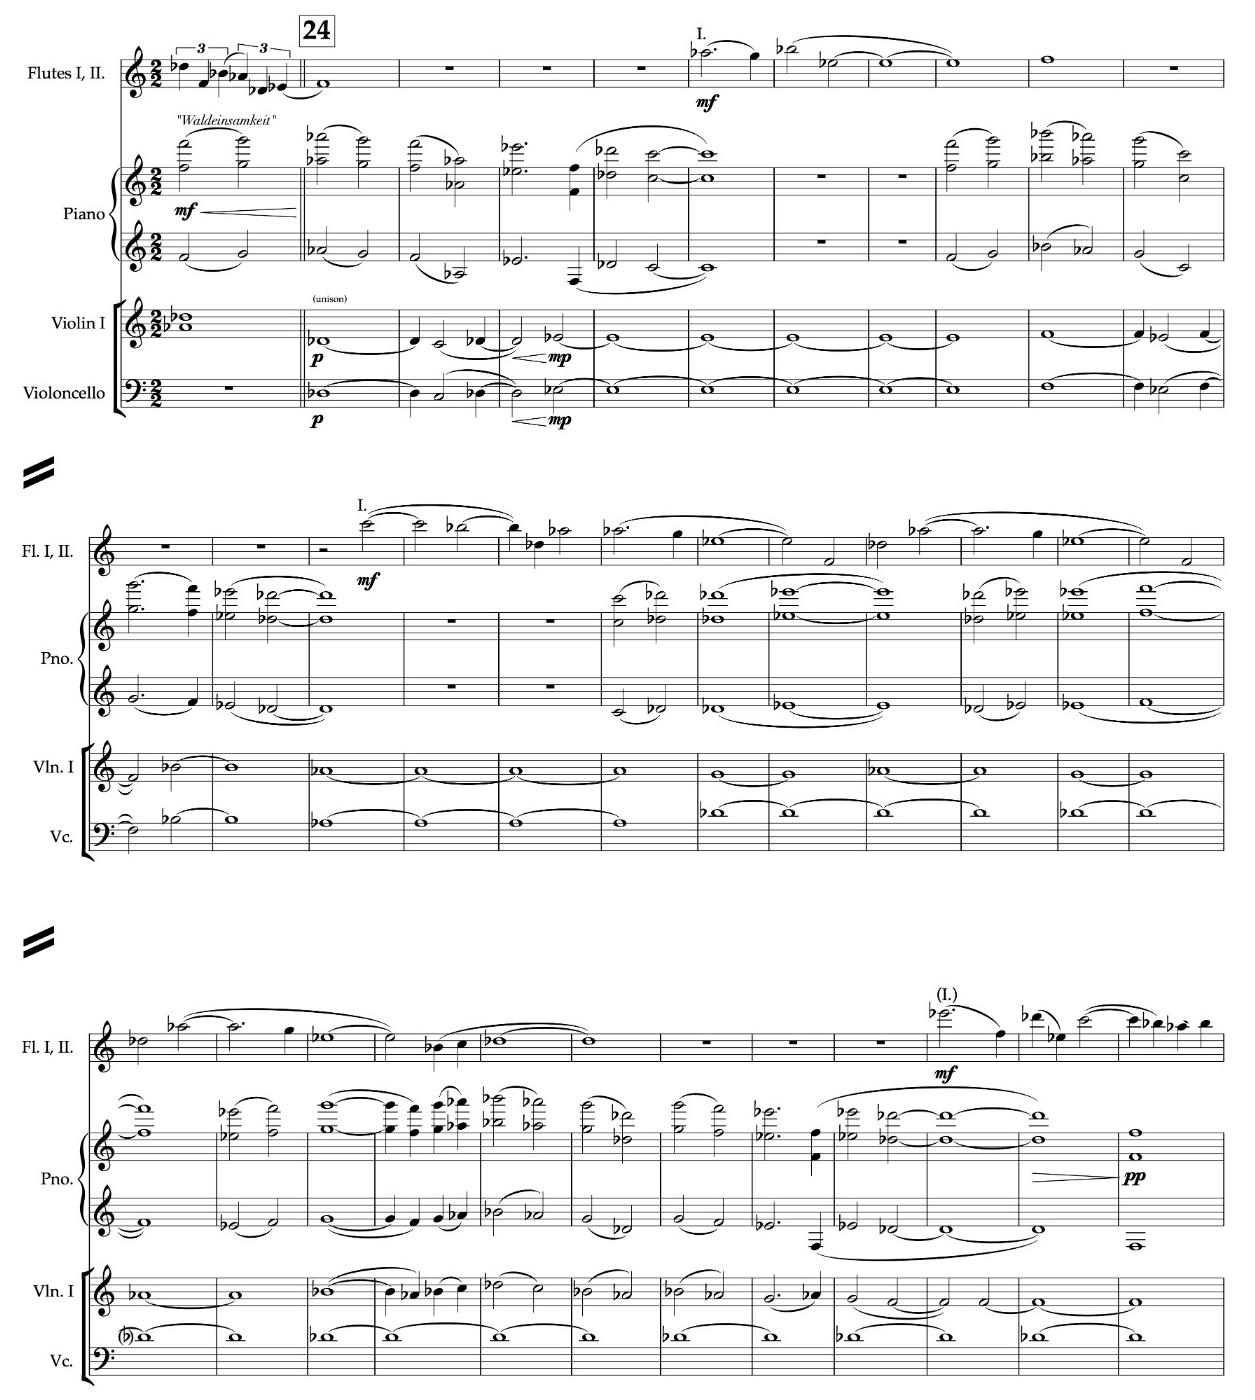
Theme 2B returns at bar 536 and reaches the first beat of bar 546; the second-subject climax follows from the second beat of bar 546 through bar 558. Theme 2A returns at bar 559. The coda begins at bar 567 over a B♭ pedal, initially suggesting E♭; G♭ enters at bar 575 while B♭ remains as a common tone. The ensuing pages of music develop material associated with 2A before introducing new closing ideas.
6. Coda: three stages and an open tonal horizon
The substantial coda spans bars 567–608 in three stages: a B♭-pedal opening (567–574), a passage drawing on Theme 2A (575–594) and new closing material (595–608). The cycle A–C–E♭–F♯–A in bars 595–598 recalls the symmetrical minor-third progression C–E♭–F♯–A at bars 144–151. A persistent A pedal and the final A-major sonority point towards D without resolving to that tonic. The movement thus reaches an affirmative local conclusion while leaving the concerto’s larger tonal and expressive argument open.
7. Formal synthesis
The movement’s modified sonata design encompasses an introduction (bars 1–65), a 200-bar exposition (66–265), development (266–374), recapitulation (375–566) and substantial coda (567–608). The coda’s three stages lead from the B♭ pedal through a transformation of Theme 2A towards new closing material. Unconventional features arise less from the overall ordering of sections than from their internal behaviour: the exposition contains two distinct thematic families; the development combines them in counterpoint; and the recapitulation is interrupted by the reappearance of Waldeinsamkeit before the second-subject return is completed.
8. The first movement in the concerto
A central contrast is established between the solitary Waldeinsamkeit melody and the outwardly assertive Hero theme. Their later encounters complicate that opposition: the pause at bar 480 arrests an anticipated culmination, and the flute’s response to Waldeinsamkeit gives the earlier melody a different instrumental and expressive context. The return of this material is therefore an essential part of the sonata argument, not an extraneous reminiscence.
The piano is alternately the bearer of the principal themes, a participant in orchestral counterpoint and an interlocutor with a single wind instrument. These functions are audible at the openings of Waldeinsamkeit (bar 40) and Theme 1A (bar 67), in the combination of subject groups at bars 343–358, and in the piano–flute dialogue at bar 501. Concerto writing and sonata development are connected through these changes of responsibility between soloist and ensemble.
The coda’s A-major ending supplies local confirmation without the D-major resolution implied by its dominant relationship. The first movement can therefore close decisively while postponing a wider sense of arrival. When Waldeinsamkeit and the Hero return in the finale, they carry the memory of an opposition that has already been modified through silence, dialogue and contrapuntal recombination.
Canzonetta
Second movement · Lyric poise, chromatic inflection and expressive transformation
The movement at a glance
The 153-bar Canzonetta is organised around three themes (A, B and C), presented in an ABCAB pattern with a concluding return of A. The first theme is substantially retained when it reappears; the second undergoes canonic development and rhythmic augmentation; and the third reaches the movement’s principal climax before disappearing from the later formal argument.
The changing relationship between stable and mobile harmony is as important as the thematic returns. Two codettas are related through systematic transposition, and the two general pauses articulate the movement’s larger divisions. These relationships give the lyrical surface an internal structure that is not always obvious on first hearing.
1. Formal design and expressive trajectory
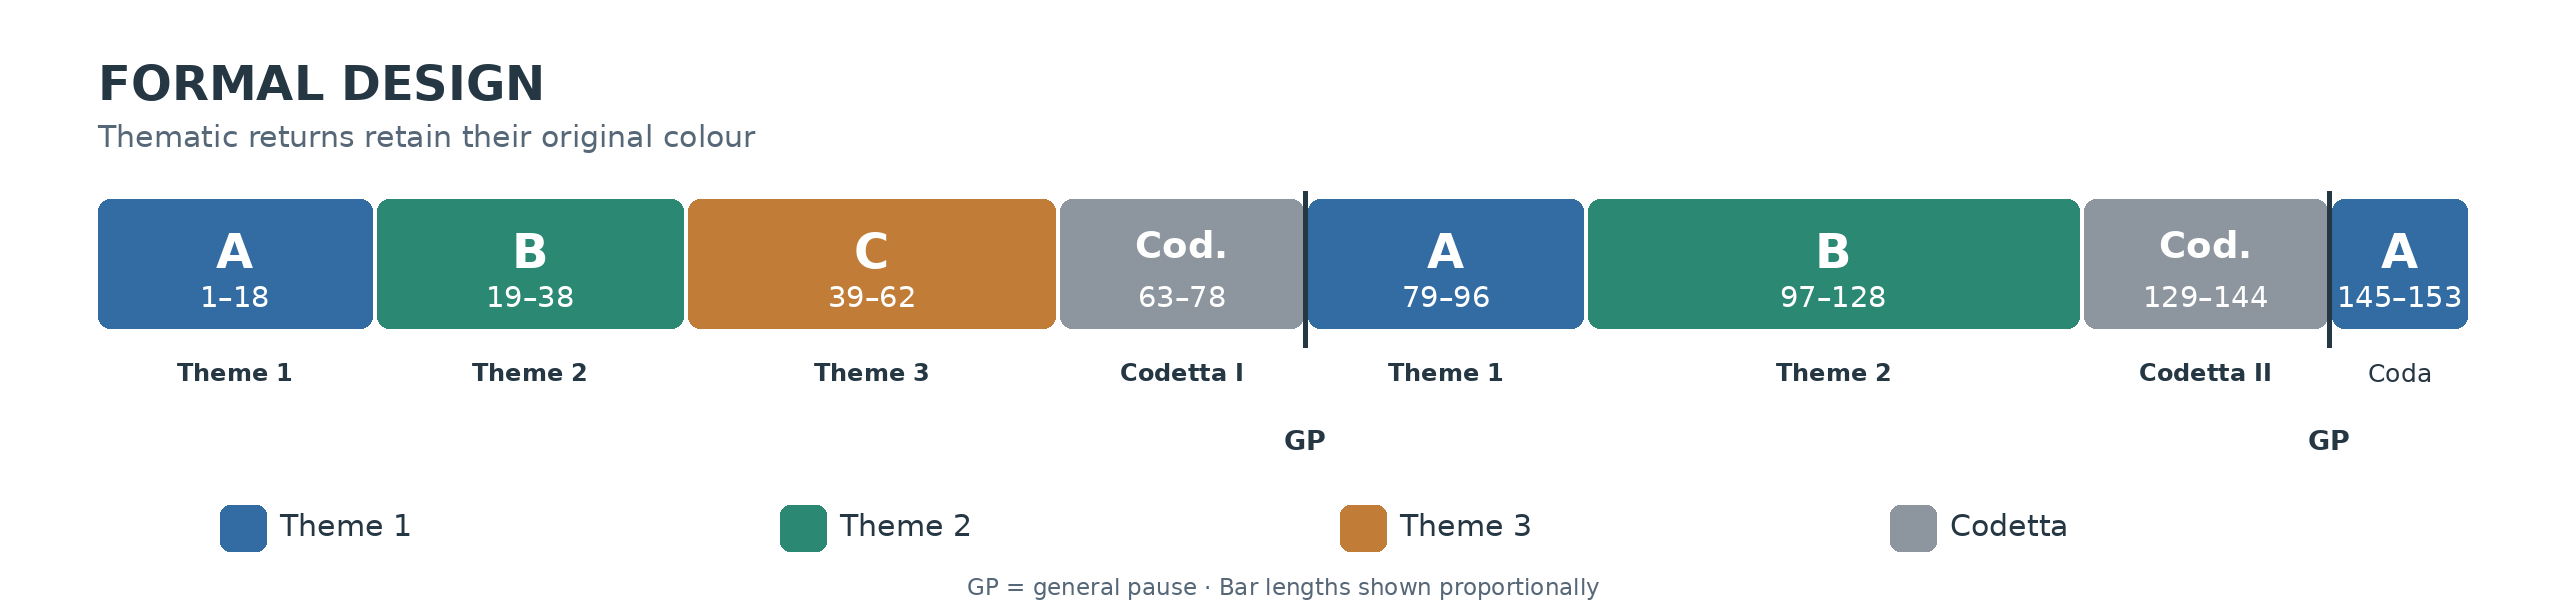
Figure 1. Formal plan of the 153-bar Canzonetta. GP identifies the general pauses at bars 78 and 144. Diagram lengths represent bars, not elapsed time.
The opening rotation (bars 1–78) presents Themes A, B and C, culminating in the second statement of Theme C (51–62). After the first codetta and general pause at bar 78, Theme A returns at bar 79 a minor third higher. Theme B is then developed extensively before a second codetta and pause at bar 144 prepare the final return of A (145–153). The two silences articulate corresponding formal points without making the intervening sections identical.
2. Theme 1: lyric poise and chromatic mobility (bars 1–18)
The opening piano theme establishes an intimate, classically inflected character. Its first two-bar phrase, built around B♭ major and F7, is answered by the orchestra at bar 3. A second phrase begins with G♭ major and A♭7 at bar 4, moves to D♭ minor and A♭7 at bar 5, and receives a corresponding orchestral response at bar 6. Although 3/4 predominates, the changes to 5/4 at bars 3 and 6, and to 4/4 at bar 12, allow the musical phrases to expand naturally while preserving their lyrical character.
Bars | Harmonic progression and thematic detail |
1–3 | B♭ major → F7; piano bars 1–2, answered by orchestra in bar 3 |
4–6 | 4: G♭ major → A♭7; 5–6: D♭ minor → A♭7; orchestral response in bar 6 |
7 | A major → B7 |
8 | G major → A7 |
9 | F major → G7 |
10 | E♭ major → A♭ major (beat 3) |
11–13 | 11: D7 → G major; 12: C7 → F major; 13: B7 → E major |
14–18 | 14: A7; 15: F major; 16: E7; 17: F major; 18: E7 → G7 |
19 | C major; resolution of G7 as Theme B enters |
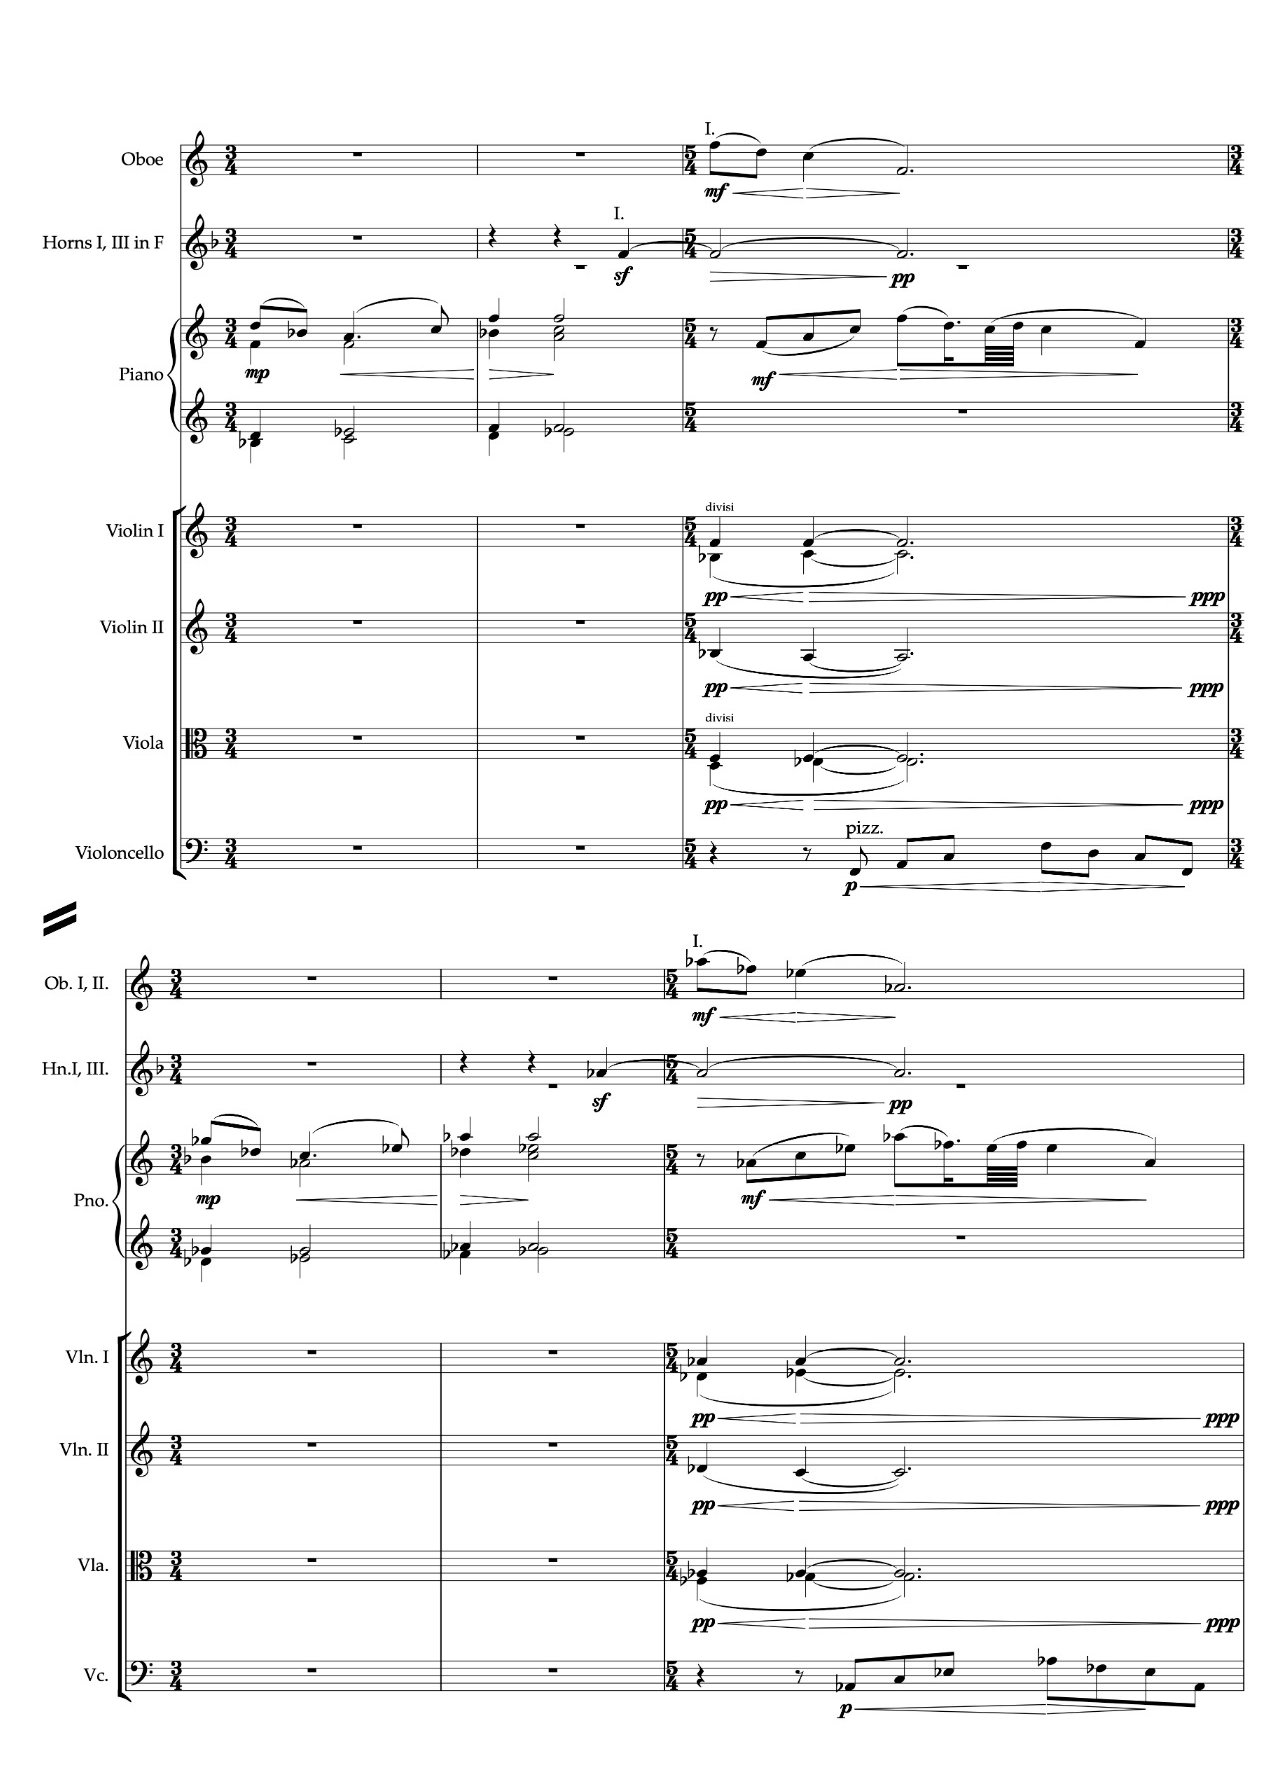
Score example 1. Theme A, bars 1–6: opening piano melody and orchestral responses.
The opening theme is characterised by considerable harmonic mobility, much of it shaped by common-tone voice-leading. In bars 7–10, successive chords form the progression A major–B7–G major–A7–F major–G7–E♭ major–A♭ major. In the first six chords, the root of each major triad is retained as the seventh of the following dominant-seventh chord; the root of that dominant seventh, in turn, becomes the third of the next major triad. This interconnected pattern produces a descending whole-tone succession of major triads—A, G, F and E♭—as a result of the common-note relationships. The phrase closes with E♭ major moving to A♭ major, retaining E♭ as a common tone. Bars 11–13 then present three successive dominant–tonic resolutions: D7–G major, C7–F major and B7–E major. After A7 at bar 14, the alternation of F major and E7 in bars 15–18 leads to G7 at the end of bar 18, which resolves to C major at bar 19 as Theme B enters.
3. Theme 2: phrase, turn figure and expanded continuation (bars 19–38)
Theme B comprises an eight-bar melody and an expanded continuation. In bars 19–22 the flute presents two two-bar phrases over piano figuration coloured by the flattened submediant. At bar 20 its B natural falls to A rather than resolving upwards, giving the phrase a sense of suspended arrival. In bars 23–26 flute and oboe share the continuation, while a piano turn figure passes to clarinets and bassoons. Violin I recalls the opening in bars 27–30 before the melody and orchestration broaden towards Theme C. The first four bars later provide the material for canonic development at bar 97.
Bars | Thematic process | Harmonic plan |
19–22 | Flute: two two-bar phrases over flattened-mediant piano figuration | C–Cm–C–D7; A♭ colours the C-major bars |
23–26 | Answering continuation: flute then oboe; piano turn figure imitated by clarinets and bassoons | A♭–D7–A♭–D7 |
27–30 | Violin I: recognisable restatement of the opening, broadening towards Theme 3 | G–Gm–G–A; E♭ colours the G-major bars |
31–34 | First extension phrase: violin ascent over descending bass | E♭–A♭7–D♭–A |
35–38 | Second extension phrase: corresponding sequence a semitone lower | D–G7–C–A♭ |
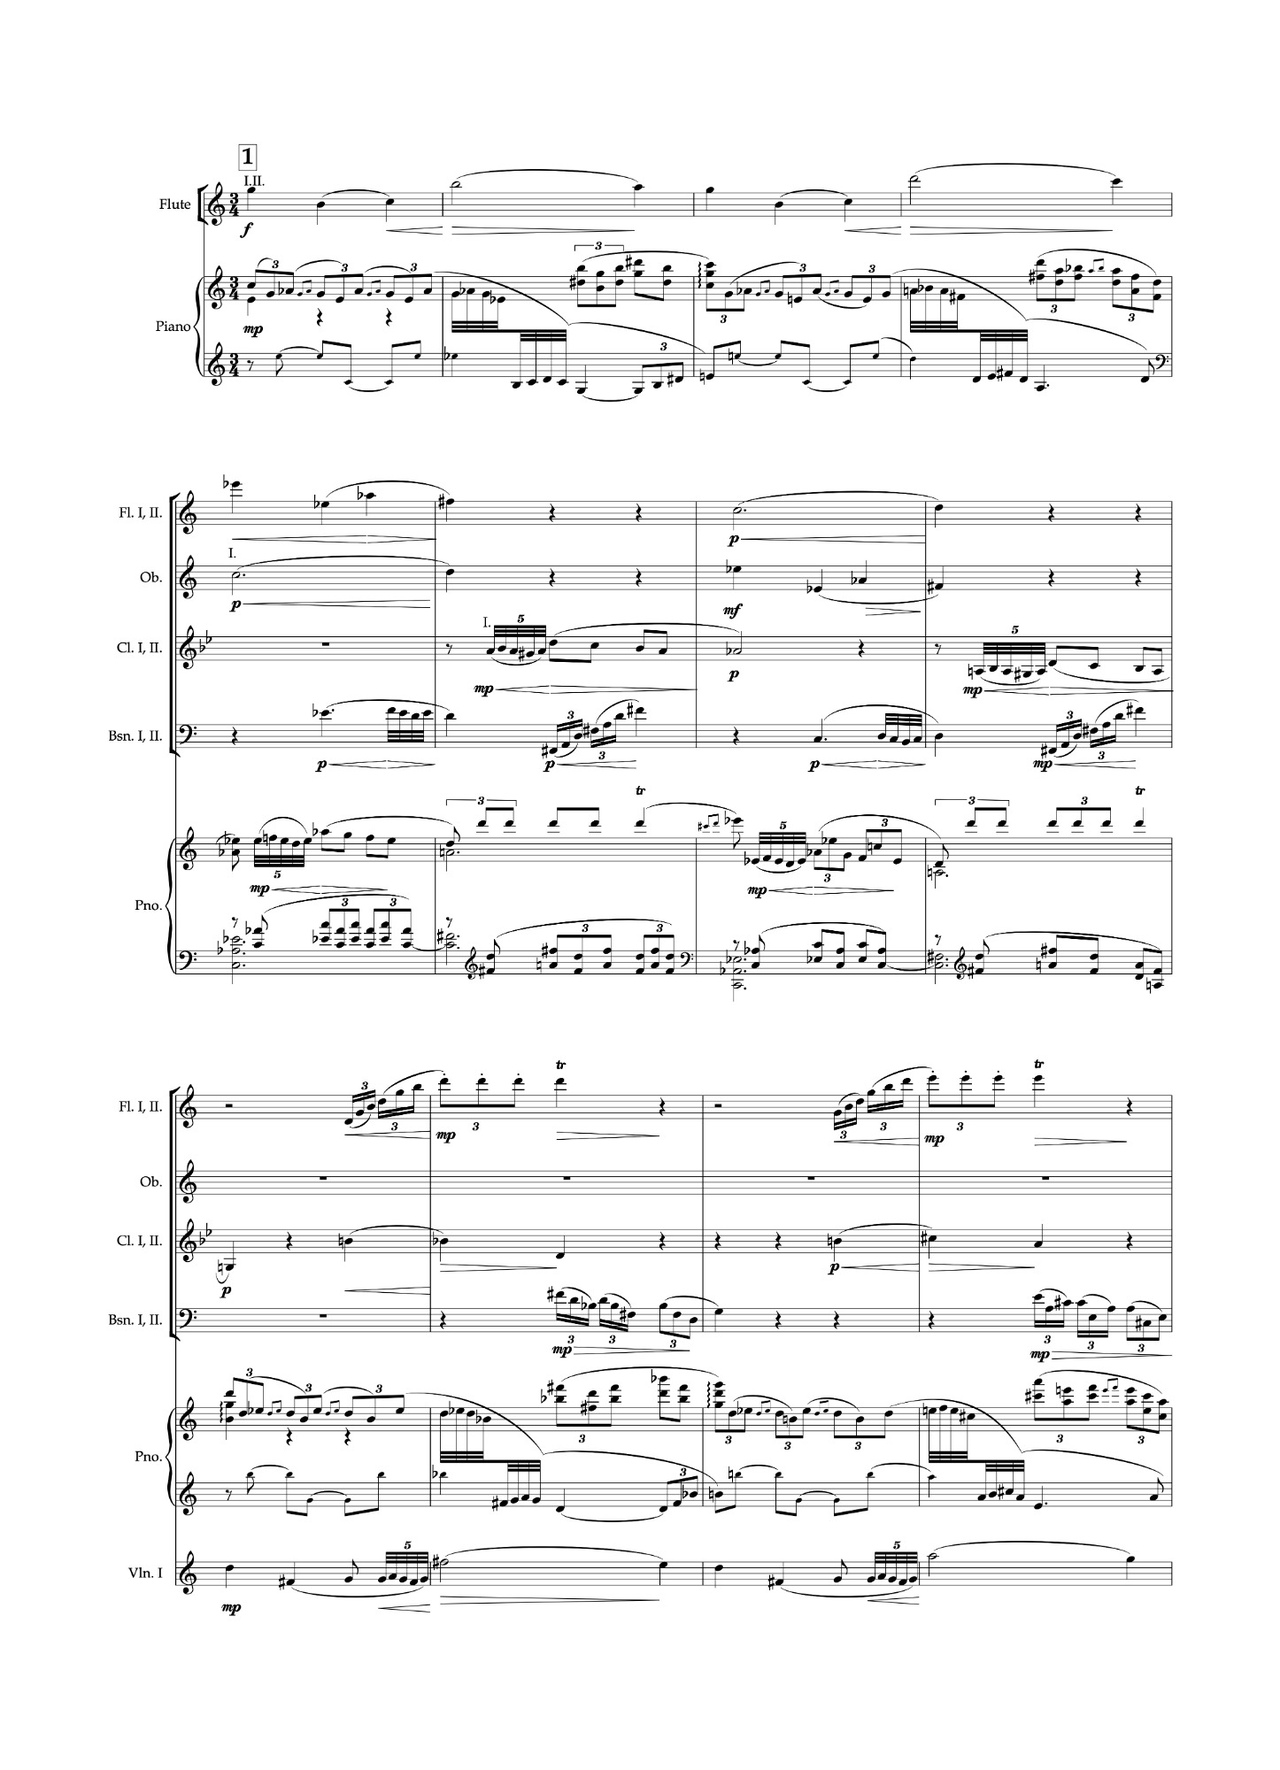
Score example 2. Theme 2, bars 19–30: flute statement, imitative turn figure and violin restatement.
Bars 31–38 provide the upward momentum that leads towards Theme 3. The violins take over a rising line above a chromatically descending bass, while the piano supplies increasingly virtuosic embellishment. The bass descent is articulated in two four-bar spans, the second repeating the first a semitone lower. Harmonically, the first phrase moves through E♭ major, A♭7, D♭ major and A major; the second reproduces the same pattern a semitone lower as D major, G7, C major and A♭ major. A brief ritardando at bar 38 releases the accumulated tension and prepares the contrasting entrance of Theme 3.
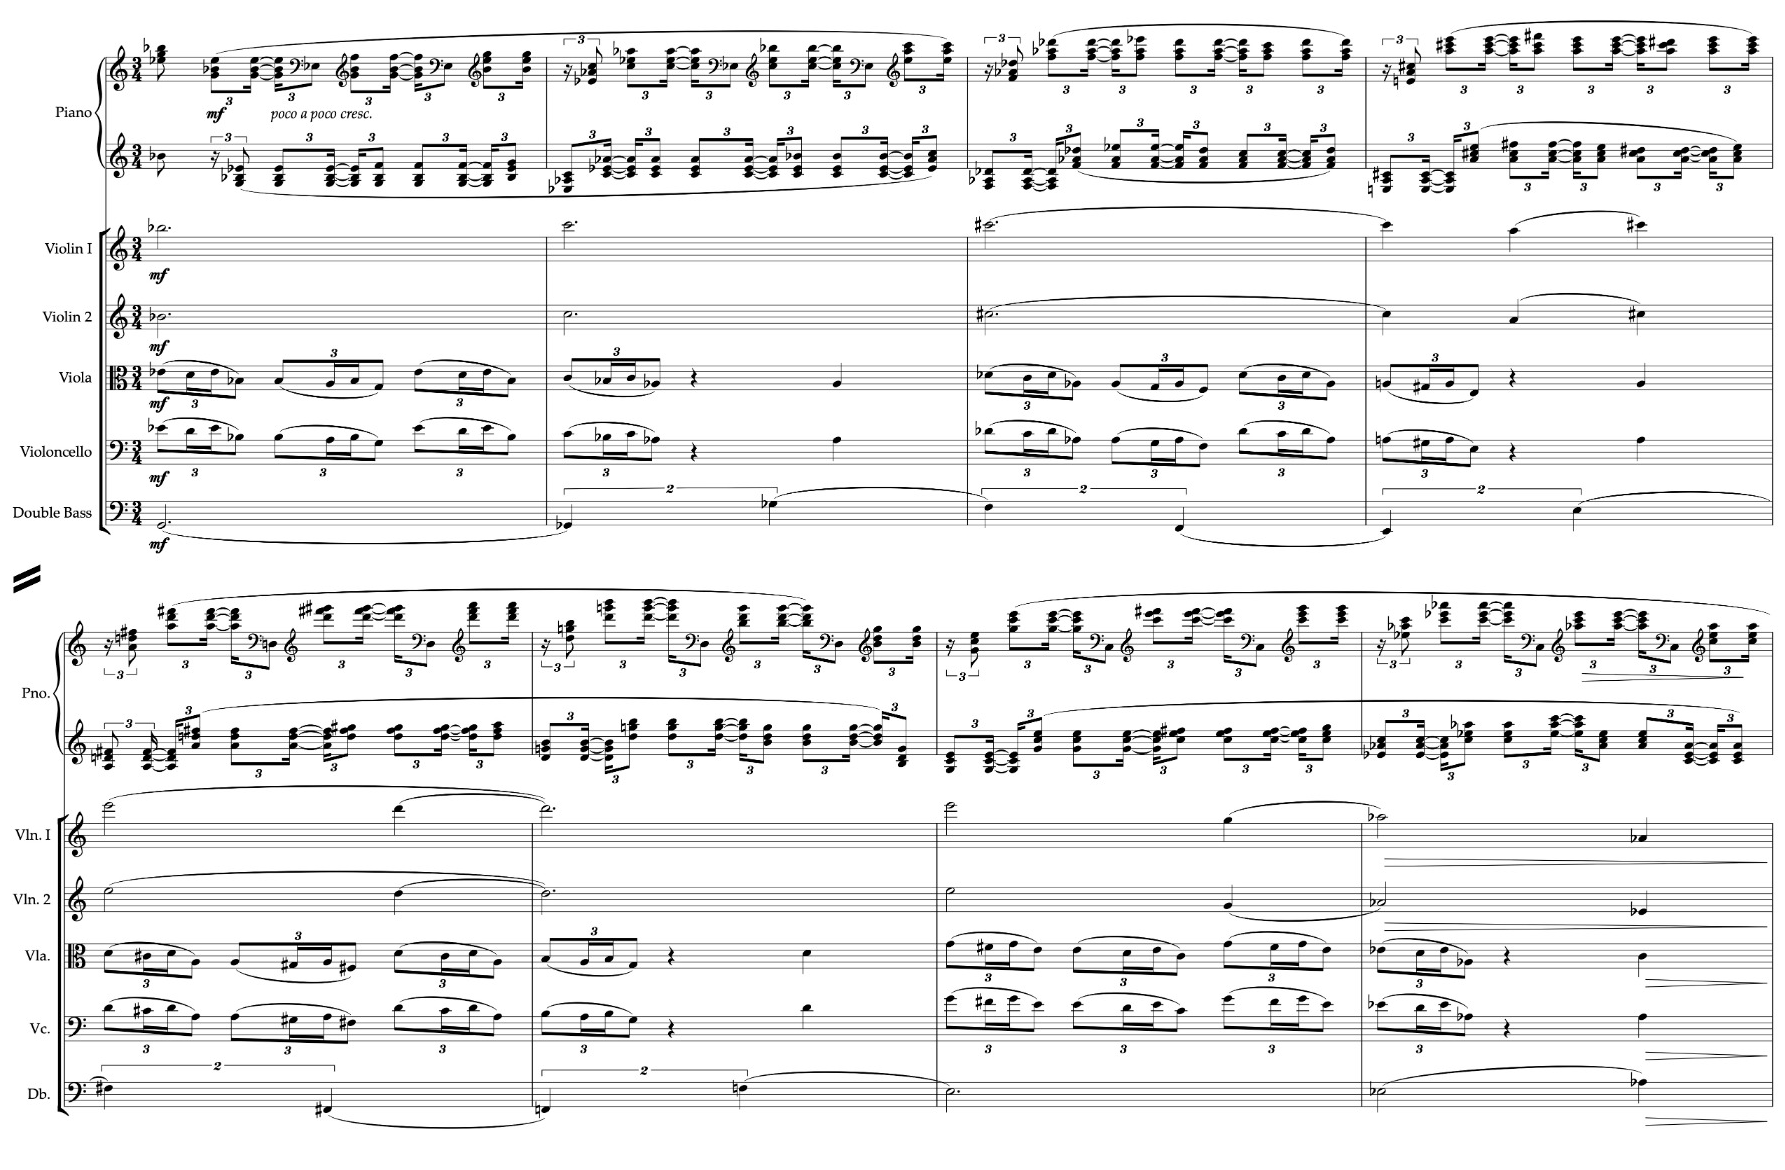
Score example 3. Theme 2, bars 31–38: expanded continuation, rising violin line, descending bass and virtuosic piano figuration.
4. Theme 3: expressive transformation and the principal climax (bars 39–62)
Theme C enters quietly at bar 39. Delicate woodwind ornamentation, restrained strings and an independent two-part horn countermelody accompany its first twelve-bar statement. The texture gives the melody room to unfold without heavy harmonic or instrumental emphasis.
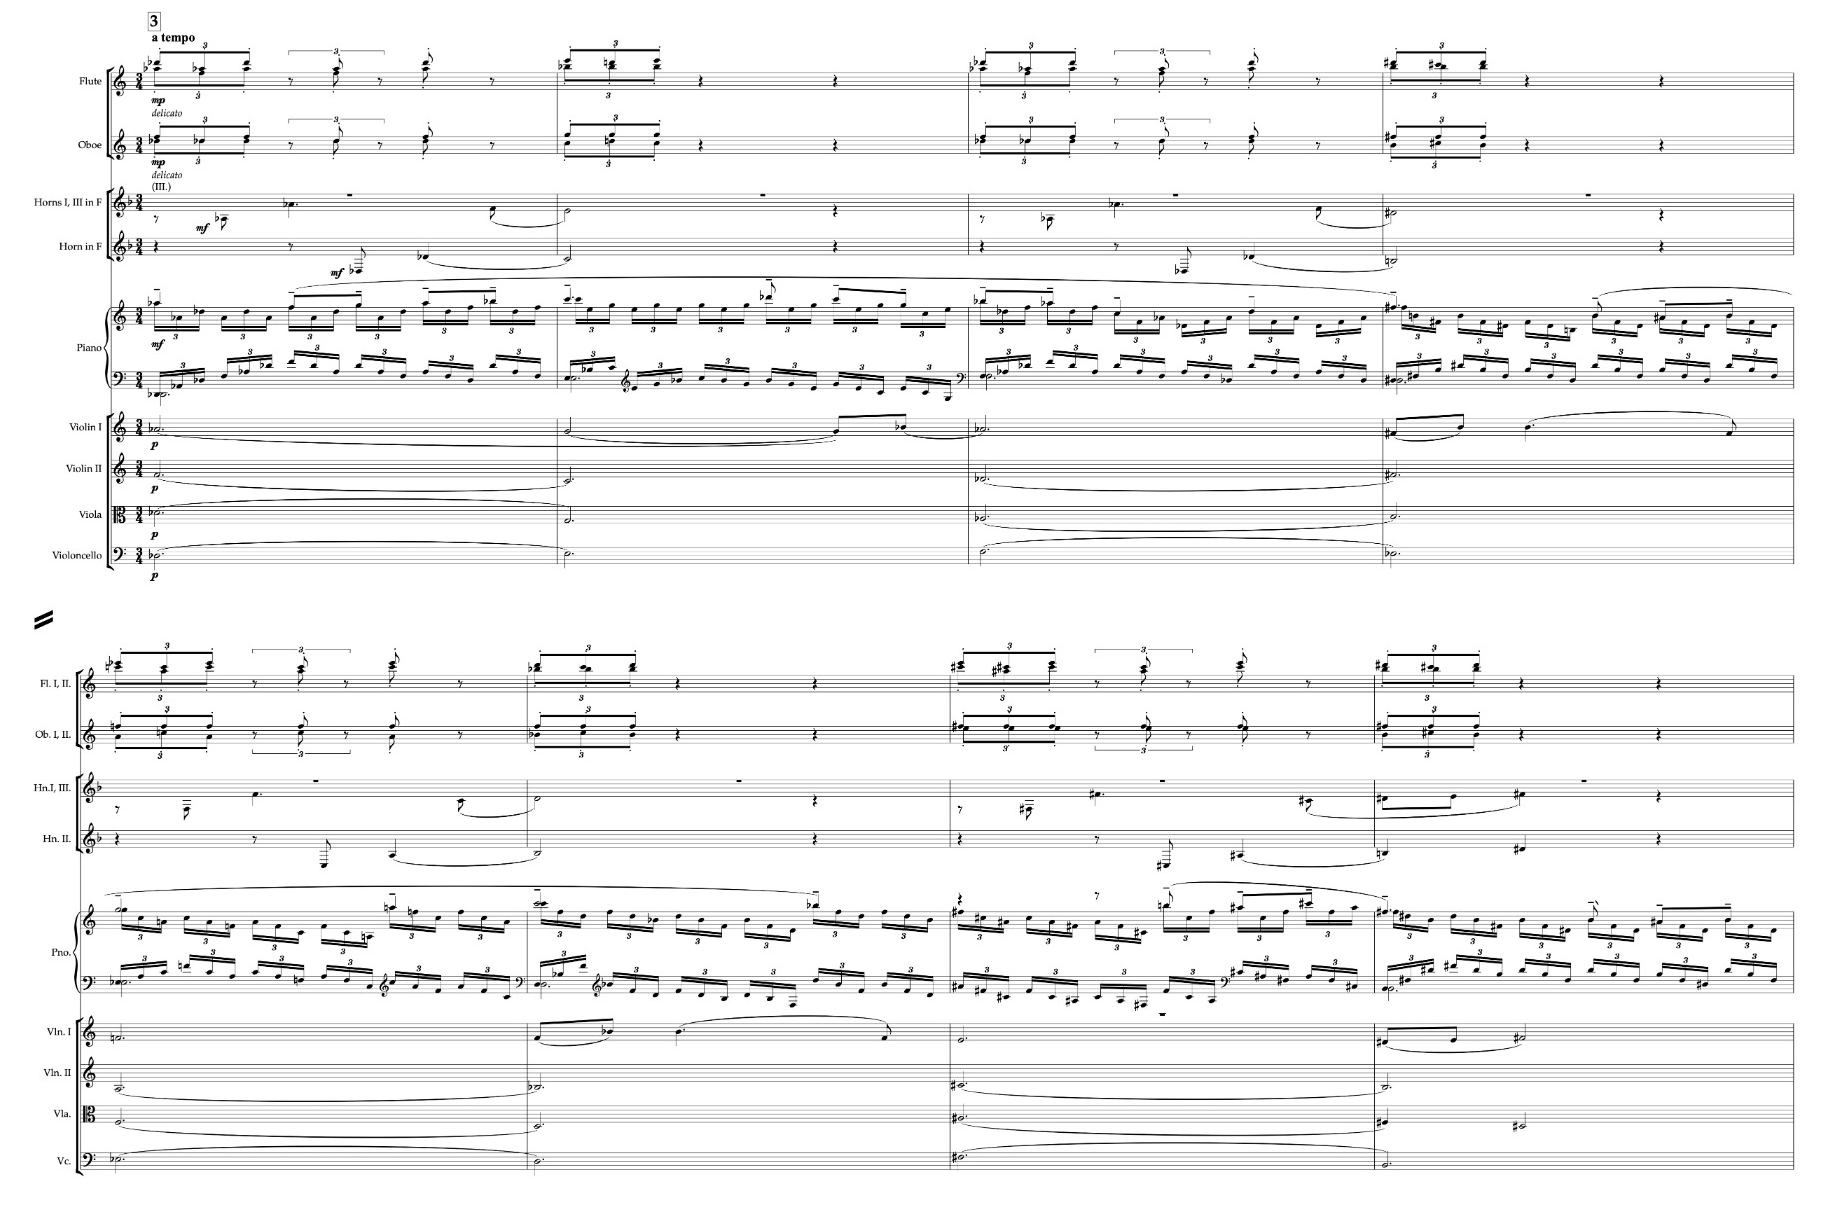
Score example 4. Theme 3, bars 39–46: first statement, delicate orchestral texture and two-part horn countermelody.
At bar 51 the same theme acquires a markedly different weight. Violas and cellos take the melody in octaves, while the piano introduces an increasingly animated countermelody. The underlying harmonic outline remains substantially intact, but register, texture and contrapuntal activity alter the character of the second statement; bars 51–62 form the movement’s principal climax.
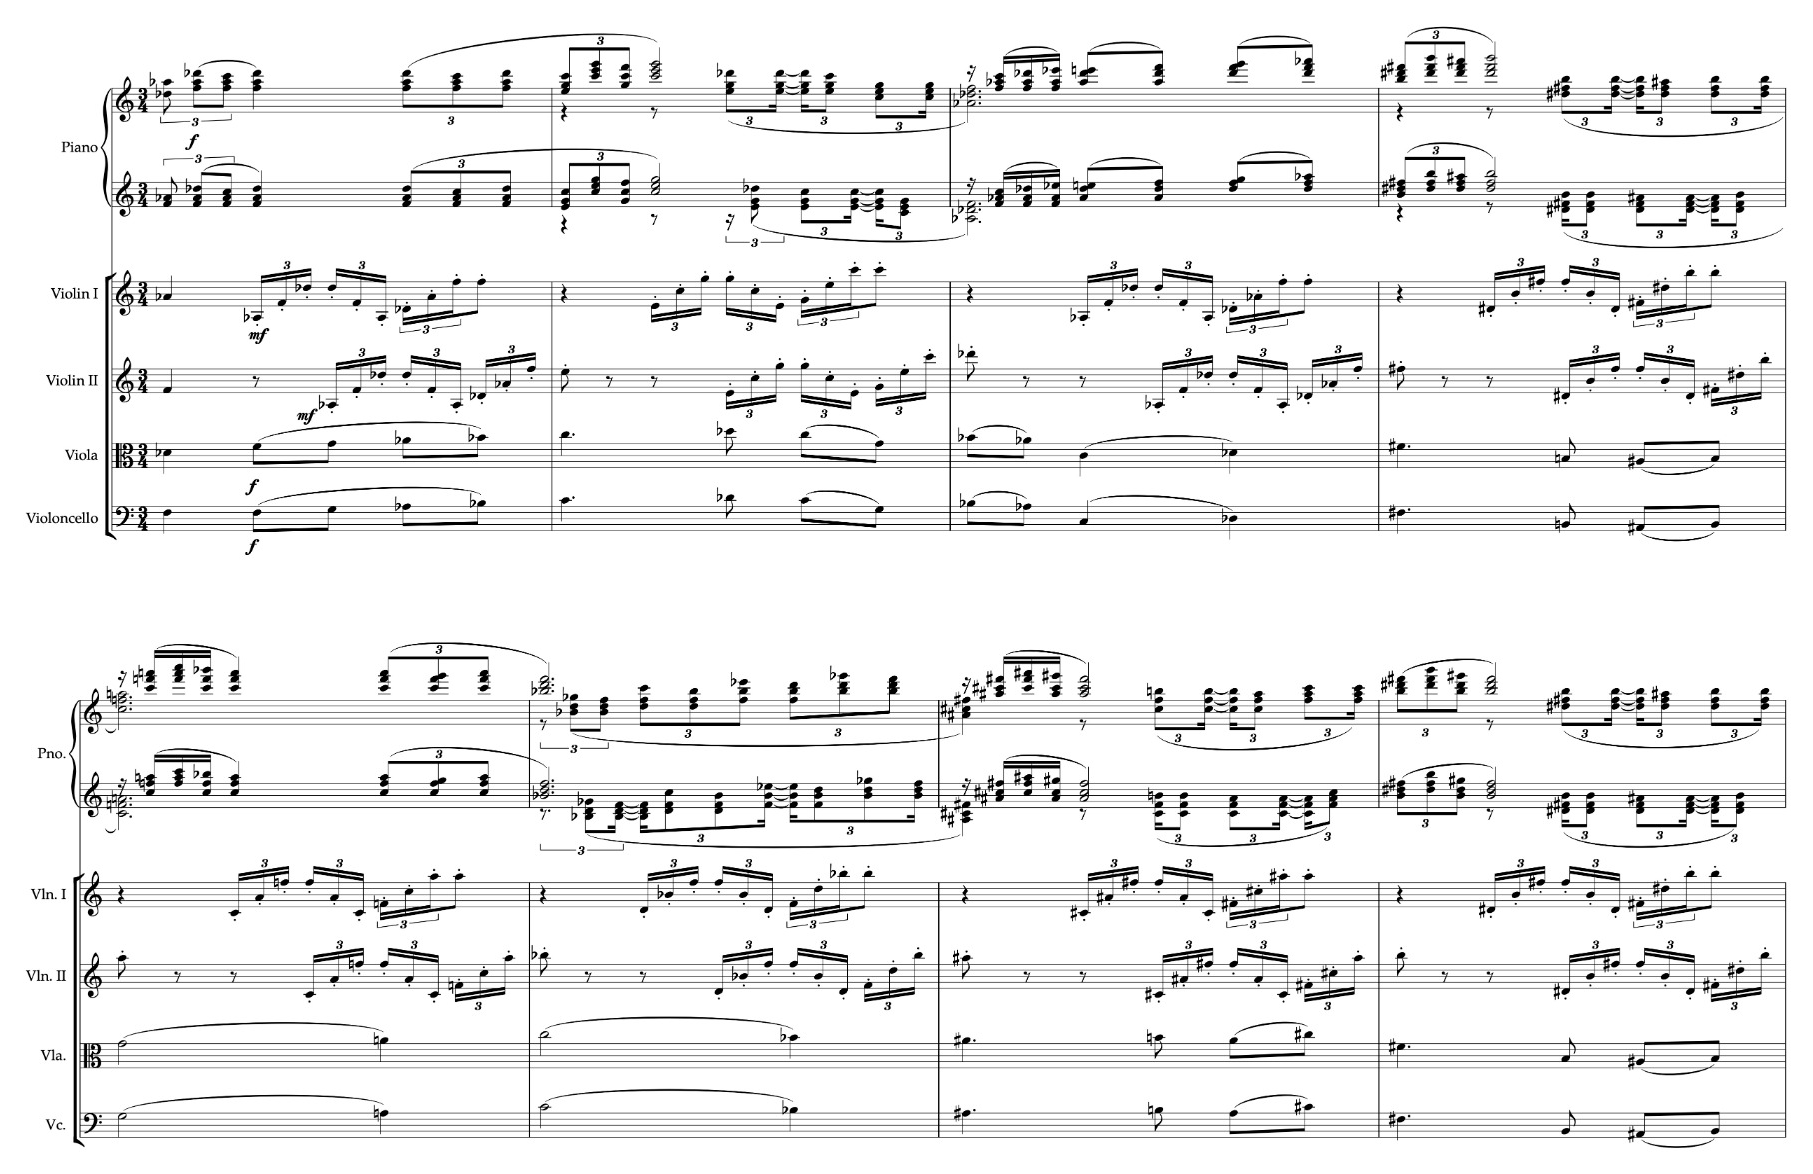
Score example 5. Theme 3, bars 51–58: lower-string presentation of the principal melody against the piano’s new contrapuntal figure.
The piano’s new countermelody also has a structural afterlife: elements of it reappear in the subsequent codettas. The climactic restatement of Theme C is therefore linked to later passages even though Theme C itself does not return.
5. First codetta: thematic recollection and the general pause (bars 63–78)
The first codetta brings together material associated with both Themes 2 and 3. The piano countermelody introduced against Theme 3's more passionate second statement reappears in the closing passage. The chromatic neighbouring-note figure prominent in the piano at bar 51 (including D♭–C–D♭) finds a related expression in the trumpet at bar 69 and subsequently in the piano at bars 72–77. At bars 73 and 76 the piano elaborates the trumpet's earlier phrase, with the later presentation displaced down an octave.
Bars | Harmony |
63–66 | C♯ → A♯ø7 → C♯ → A7 |
67–71 | Corresponding progression repeated; A7 extended over 70–71 |
72–77 | C♯ → A (73–74) → C♯ (75) → A (76–77) |
78 | General pause |
The flute recalls the piano figuration that accompanied Theme B’s opening four bars, but without its earlier flattened-submediant inflection. The codetta thus assembles earlier melodic and accompanimental material in a different harmonic setting. It begins in C♯ major, repeatedly turns to A♯ half-diminished seventh and A7, and from bar 72 reduces its harmonic language largely to an alternation between C♯ and A major. The general pause at bar 78 separates this first rotation from Theme A’s return at bar 79.
6. Theme 1 revisited (bars 79–96)
Bars 79–96 reprise Theme A a minor third higher, retaining most of the piano melody while varying chordal voicing, orchestration and some phrase details. After the climax of Theme C and the general pause, this close return places familiar material in a fresh tonal position.
The relatively literal return also sharpens the contrast with the more extensive development of Theme B that follows: the two reprises fulfil different formal functions.
7. Theme 2 developed: canon, pedals and extended harmony (bars 97–128)
At bars 97–104 the piano expands Theme B’s opening four bars into two four-bar phrases, each containing five principal melodic notes and the characteristic turn figure. Their outlines are E♭–G–A♭–G–F and E♭–G–A♭–B♭–A♭. Sustained notes and shorter turns give the line a measured pace; the canonic entries, rather than rapid harmonic change, produce much of the passage’s motion.
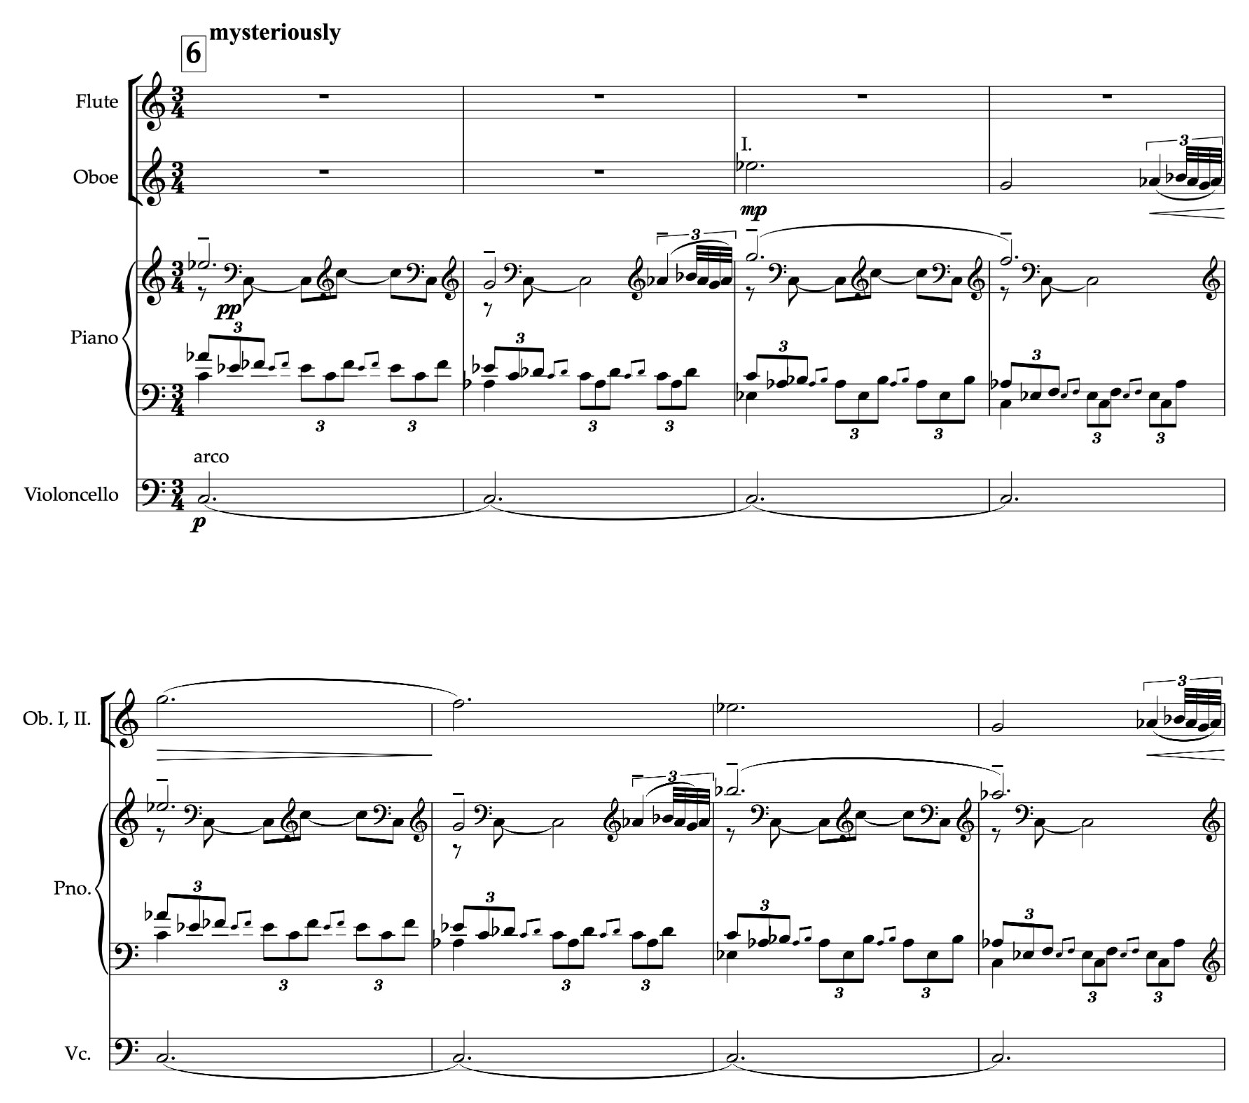
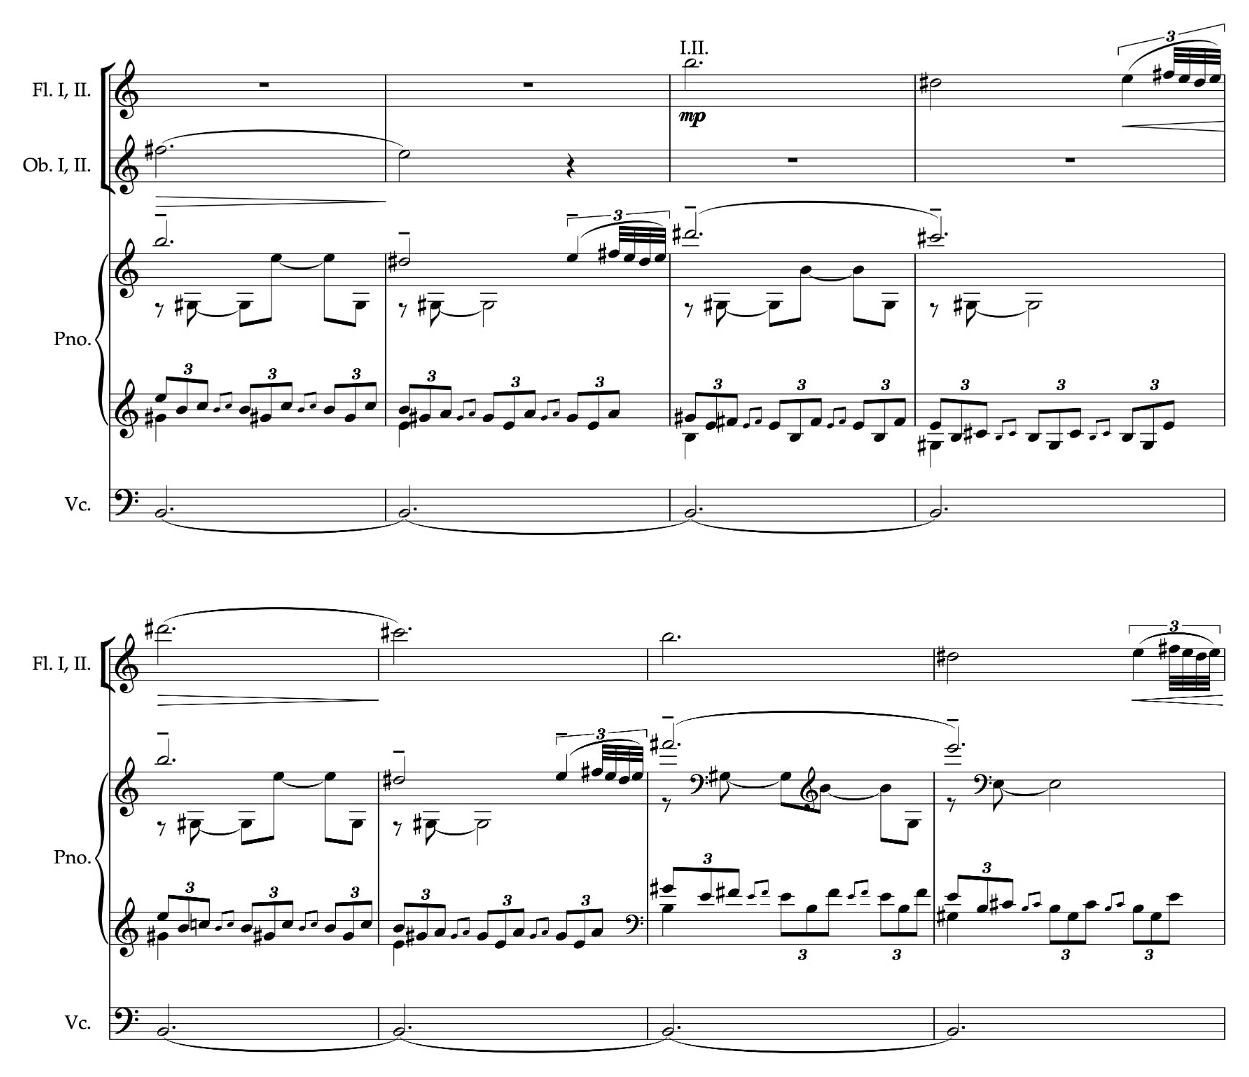
Score example 6. Theme 2 in canon, bars 97–112: piano melody and oboe imitation over a C pedal (upper extract), followed by the transposed piano statement and flute imitation over a B pedal (lower extract).
The oboe enters canonically two bars after the first piano statement, modifying its final two principal notes to F♯–E at the harmonic change. At bar 105 the piano begins the eight-bar outline a further eight semitones higher; the corresponding imitation passes to the flute.
Bars | Underlying harmonic field | Thematic process |
97–104 | A♭ major over C pedal | Piano melody and oboe canon |
105–112 | E major over B pedal | Transposed piano statement and flute imitation |
113–120 | G → C7 → F → D♭; two bars per chord | Original extension returns in octave violins |
121–128 | F♯ → B7 → E → C7; two bars per chord | Second expanded phrase; C7 anticipates F |
Harmony remains largely static: A♭ major over C occupies bars 97–104, followed by E major over B for bars 105–112. The shift between the two long harmonic fields is chromatic, while the instrumental exchanges and canonic motion prevent the texture from becoming static.
Bars 113–128 reverse this relationship. The original harmonic extension from bars 31–38 returns transposed upwards by a major third and augmented in duration: each earlier one-bar chord now occupies two bars. A significant adjustment occurs at the end, where the C-major equivalent of the original A♭ chord is sharpened functionally into C7, allowing a clear resolution to F major at bar 129. The recurring flattened-sixth piano decorations—E♭ in G major, D♭ in F major, D natural in F♯ major and C natural in E major—preserve Theme 2’s characteristic parallel-major/minor coloration.
8. Second codetta: transposed formal counterpart (bars 129–144)
The second codetta repeats the first codetta’s essential harmonic succession a major third higher. The correspondence extends beyond individual chords to their placement, phrase lengths, gradual simplification of harmony and final general pause. Its opening F major is also the expected resolution of the C7 at bars 127–128.
In the second codetta, the primary alternation is F major–Dø7–F major–D♭7, repeated with ornamental modifications. From bar 138, the texture and harmonic language simplify to F and D♭ major; progressive slowing prepares the complete silence of bar 144. The F–D♭ relationship is a chromatic-mediant pairing with the common tone F, corresponding to the C♯–A pairing of the earlier codetta.
The second codetta consequently recalls the first through more than a similarity of surface: transposition preserves its phrase placement, harmonic rhythm and preparation for silence, even though it follows a different thematic process.
9. Coda: concluding synthesis (bars 145–153)
After the second general pause, Theme 1 returns in a final reimagined form. The underlying harmony is remarkably concentrated: F major at bar 145, an extended G half-diminished seventh (G–B♭–D♭–F) through bars 146–150, and F major again at bars 151–153. The Gø7 imports a recognisable minor-mode colour into an otherwise major-mode conclusion, while close voice-leading allows the final tonic to emerge without an emphatic conventional dominant cadence.
The last three bars add a particularly telling point of thematic synthesis: the piano recalls Theme 2’s established figuration. The pattern at bar 151 closely matches the figuration of bar 117, complete with D♭ as the flattened sixth within F major; bar 152 recalls bar 118 with slight alteration. Hence Theme 1 furnishes the closing melodic identity while Theme 2 contributes an identifiable accompanimental fingerprint.
10. Performance and structural considerations
Thematic economy and harmonic pace
The movement draws several types of continuity from a small body of material: near-literal reprise, canonic imitation, harmonic transposition and recollection of short ornamental figures. Harmonically mobile passages alternate with extended fields of stability, notably bars 97–112. The contrast between the two procedures shapes the movement’s proportions more decisively than constant chromatic change would.
Orchestration and the role of the soloist
The distribution of material changes with its formal role. Flute and Violin I carry successive versions of Theme B; Theme C’s first statement includes a two-part horn counterline; its climax gives the melody to the lower strings while the piano develops independent figuration. In the second rotation the soloist is paired canonically with oboe and flute. These changes make instrumental dialogue part of the thematic development.
Proportion and performance
The principal climax occupies bars 51–62, leaving a long span of recollection and gradual withdrawal. The sustained harmonies at bars 97–112 and the expanded progression at bars 113–128 may consequently place particular demands on pacing, balance and articulation. Whether the second half registers as a deepening of the argument or a loss of momentum is partly a matter of performance, and cannot be settled from the score alone.
The movement’s place in the concerto
The Canzonetta’s chief contribution is an alternative scale of expression. Its climactic transformation of Theme C depends on orchestration and counterpoint more than harmonic recomposition, while the two codettas display a close formal and tonal correspondence. Its final pages return to the sound-world of Theme A without erasing the more impassioned episode heard earlier.
11. The Canzonetta within the three-movement design
Between the outer movements, the Canzonetta substitutes a more intimate pattern of dialogue for sustained dramatic confrontation. Its formal tensions arise through changes in harmonic pace, contrapuntal density and instrumental colour rather than through the return of the Hero or Waldeinsamkeit themes.
The contrasting statements of Theme C show how closely related harmonic material can produce different expressive results when transferred to another register and orchestration. The first movement uses comparable changes of context to alter the role of an already familiar melody. This is a relationship of compositional method, not a claim that the slow movement shares the outer movements’ themes.
The soloist moves between leading a phrase, providing accompaniment and taking part in independent counterpoint. Such exchanges sustain concerto identity even where conventional virtuoso display recedes, and prepare the listener for the fuller contrapuntal integration of piano and orchestra in the finale.
Analytical appendix — principal harmonic roadmap
Bars | Summary |
1–18 | Opening theme: B♭/F7; chromatic and fifth-related harmonic travel; G7 prepares C |
19–30 | Theme 2: C/Cm, A♭/D7; G/Gm, A, with characteristic flattened-sixth decoration |
31–38 | E♭–A♭7–D♭–A | D–G7–C–A♭ |
39–50 | D♭–C7–D♭–B–F7–B♭–F♯7–B–G7–C–A♭7 |
51–62 | Corresponding root succession, with altered chord qualities and orchestral expansion |
63–78 | C♯–A♯ø7–C♯–A7; repeated, then C♯/A alternation; general pause |
79–96 | Theme 1 transposed upwards by a minor third |
97–112 | A♭ major/C pedal (8 bars); E major/B pedal (8 bars); piano–wind canons |
113–128 | G–C7–F–D♭–F♯–B7–E–C7, each harmony spanning two bars |
129–144 | F–Dø7–F–D♭7; repeated, then F/D♭ alternation; general pause |
145–153 | F (145) – Gø7 (146–150) – F (151–153) |
Supplementary harmonic comparison — Theme 3 (bars 39–62)
The following table records harmonic correspondences in the two statements of Theme C. It is intended as a reference to the score; the main prose concerns the change in register, instrumentation and contrapuntal activity.
Bar(s) | First statement, 39–50 | Second statement, 51–62 |
39 / 51 | D♭ | D♭ |
40 / 52 | C7 | C-major sonority / altered seventh colouring |
41 / 53 | D♭ | D♭ |
42 / 54 | B | B |
43 / 55 | F7 | F7 |
44 / 56 | B♭ | B♭ |
45 / 57 | F♯7 | F♯-major sonority |
46 / 58 | B | B |
47 / 59 | G7 | G-major sonority |
48 / 60 | C | C |
49–50 / 61–62 | A♭7 | A♭-centred harmony, richly decorated |
Scherzo-Finale
Third movement · Thematic transformation, humour and final affirmation
The movement at a glance
The 397-bar Scherzo-Finale begins with five short episodes arranged in an interlocking sequence and contrasts them with a lyrical second subject. Repeated minor-third transpositions, chromatically diverted cadences, flattened-sixth appoggiaturas and French augmented-sixth harmonies connect the apparently diverse material. The second subject later passes through contrasting stylistic treatments before returning in rhythmic augmentation.
In the final stages, Waldeinsamkeit and the Hero theme return from the first movement. Their placement after the transformation of the second subject makes the finale at once a local conclusion and a continuation of the concerto’s earlier argument. The expressive interpretation offered here distinguishes features observable in the score from intentions described by the composer.
1. Formal architecture
The finale consists of two unequal rotations of scherzo and second-subject material followed by a concluding span in which earlier themes reappear. The opening rotation introduces five scherzo episodes and the lyrical second subject. The second rotation abbreviates the scherzo material, subjects it to further development and presents the second subject as a Hoedown. From bar 292 its melody is augmented and combined with more active contrapuntal layers. Waldeinsamkeit and the Hero then return, placing the movement’s earlier rhythmic and harmonic play in a larger thematic context.
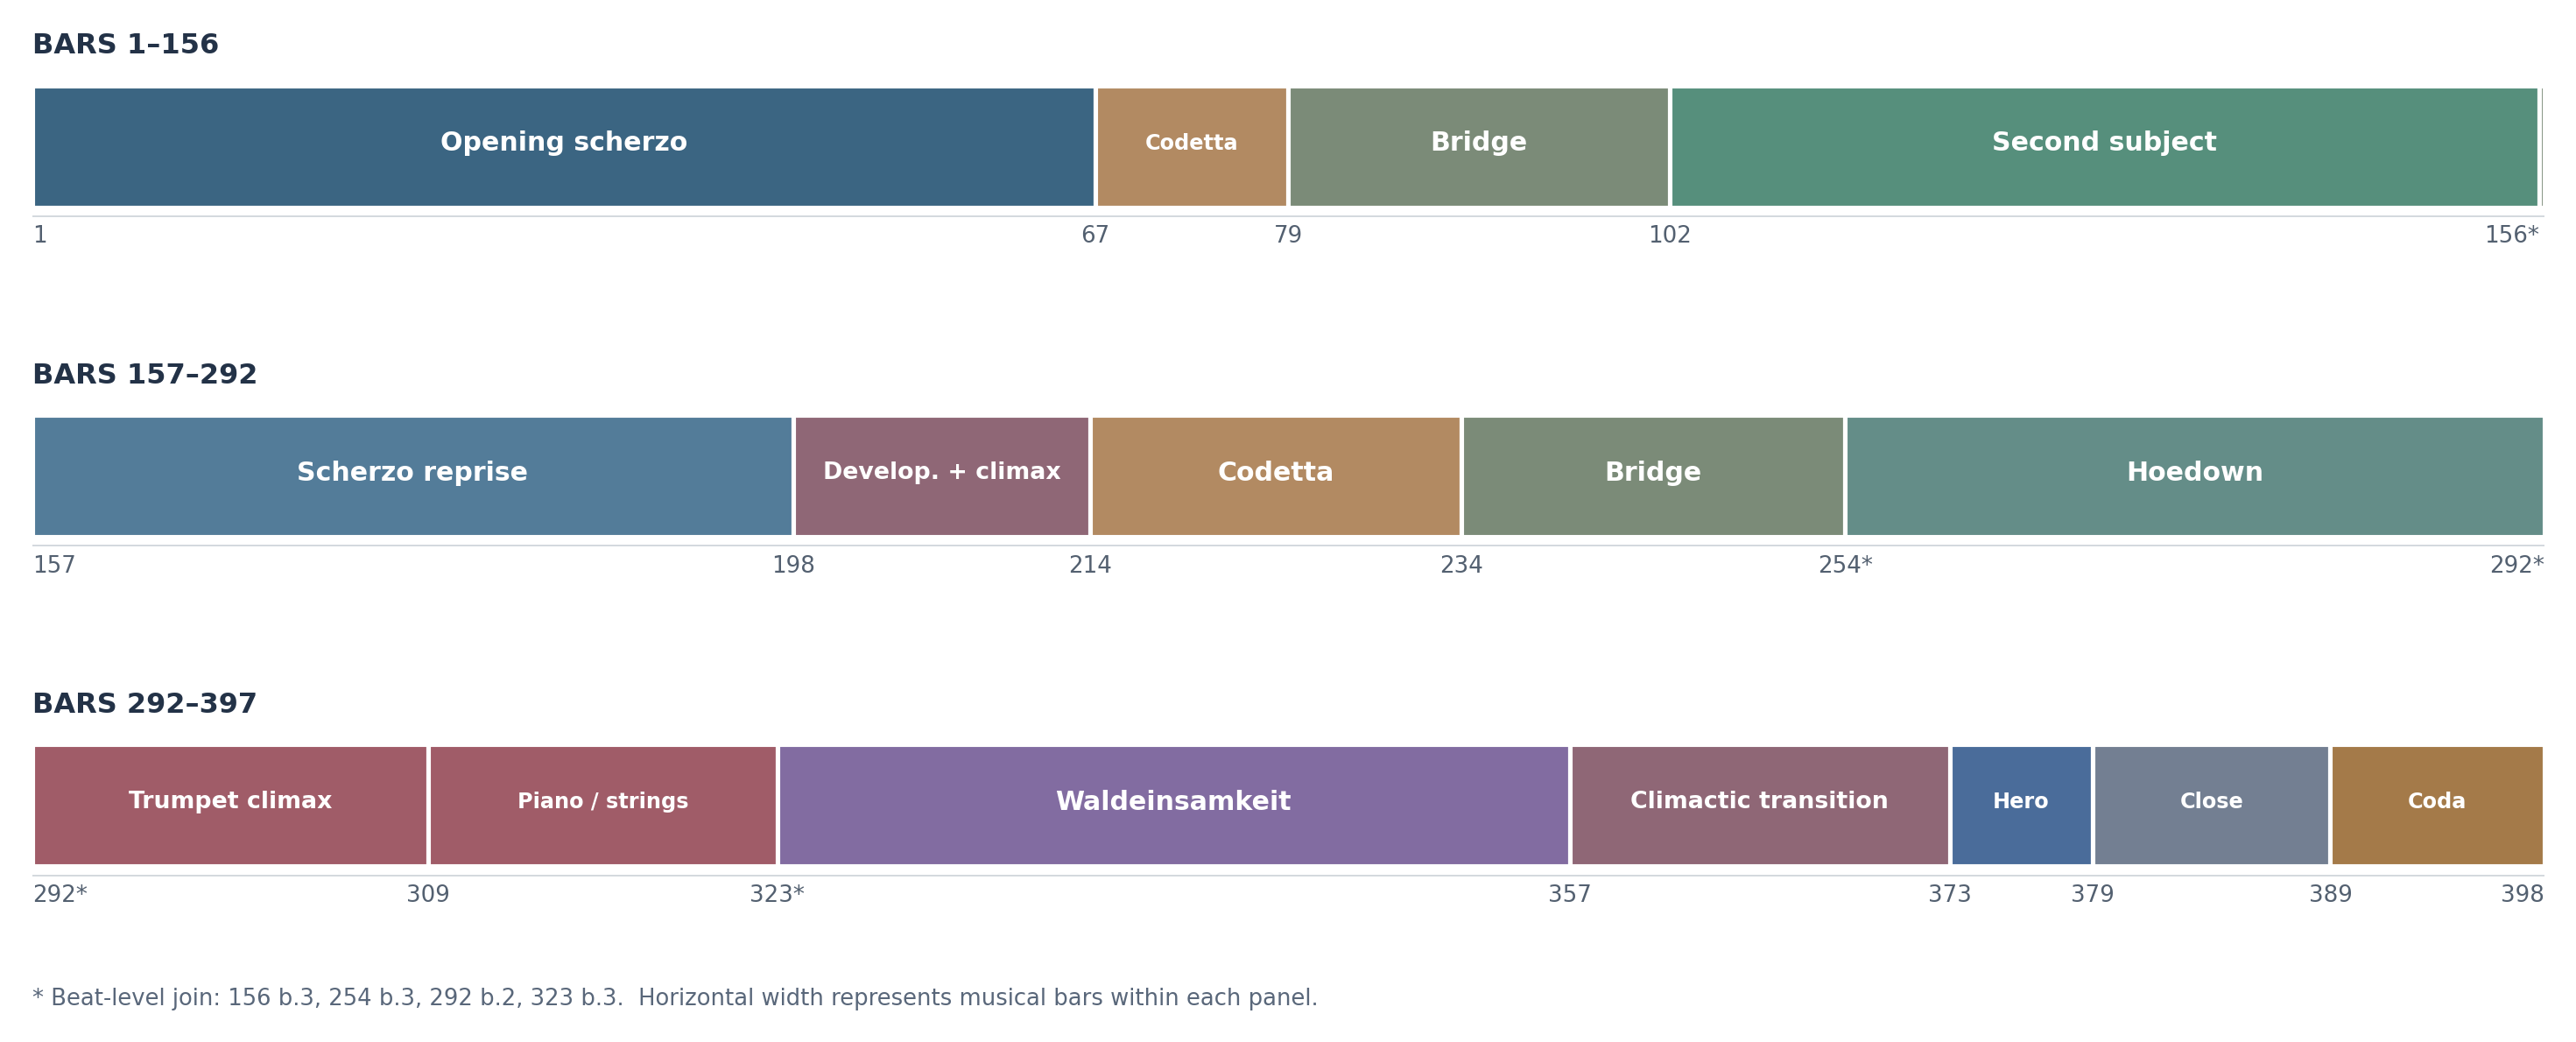
Figure 1. Proportional overview of the finale. Labels in this overview round certain beat-level joins to the nearest bar; the precise boundaries appear in the tables and prose below.
Principal span | Bars / entry | Formal function |
Opening scherzo and codetta | 1–78 | Episodes 1–5 and their returns; first scherzo codetta |
Bridge and lyrical subject | 79 – 156, beat 2 | Bridge, main and middle themes, two virtuoso variations |
Scherzo reprise, development and codetta | 157–233 | Transposed episodic reprise, dramatic climax, ironic codetta |
Second bridge and Hoedown | 234 – 292, beat 1 | Bridge transposed up a minor third; comic recharacterisation |
Augmented romantic statement | 292, beat 2 – 322 | Trumpet declaration followed by piano-and-strings response |
Waldeinsamkeit and ascending transition | 323–372 | Tender cyclical recollection; growing major-triad sequence |
Hero theme and final coda | 373–397 | Heroic restatement, final chromatic interruption and F-major close |
The movement's metrical organisation reinforces its formal divisions. The opening scherzo is written in 4/4, while the change to 3/4 at bar 79 introduces the first bridge and prepares the contrasting lyrical second subject. The return to 4/4 at bar 157 marks the scherzo reprise, before 3/4 is re-established at bar 234 for the second bridge and the subsequent transformations of the second subject. At bar 391, the final return to 4/4 accompanies the concluding scherzo-derived coda. Particularly significant is the superimposition of broader melodic phrases, perceived in 3/2, upon the prevailing 3/4 metre during the great Romantic statement from bar 292 and the ascending harmonic sequence from bar 357. These rhythmic relationships contribute to the music's increasing symphonic breadth, allowing expansive melodic lines to unfold above more animated contrapuntal textures.
2. The opening scherzo: five episodes (bars 1–66)
The opening scherzo presents Episodes 1–5 in the order 1–2–3–1–2–4–5–3–1. The early episodes establish distinct rhythmic and harmonic signatures; the first returns of Episodes 1 and 2 are transposed down a minor third. Episodes 4 and 5 introduce further material structured by symmetrical transposition, before abbreviated versions of Episodes 3 and 1 lead towards the first codetta. Recognition depends as much on retained harmonic and rhythmic patterns as on melody.

Figure 2. Opening scherzo episode map. Beat-level joins include the fourth-beat entrances at bars 32, 40 and 56.
Material | Original span | Subsequent span(s) | Principal relationship |
Episode 1 | 1–6 | 20–25; 62–66 | C major → A major → A♭ major; final return shortened/recomposed |
Episode 2 | 7–13 | 26–32, beat 3 | G♭ → E♭; transposition down a minor third |
Episode 3 | 14–19 | 56, beat 4 – 61 | Returns a semitone lower, with abbreviated initial lead-in |
Episode 4 | 32, beat 4 – 40, beat 3 | 163, beat 4 – 171, beat 3 | Symmetrical rising minor-third cycle of major triads |
Episode 5 | 40, beat 4 – 56, beat 3 | 171, beat 4 – 187, beat 3 | Two four-bar phrases repeated down a minor third |
Episodes 1–3 and their transposed returns
Episode 1 (bars 1–6) combines sharply articulated rhythms with rapid harmonic change above a largely C-centred bass. The progression introduces D7/C and G/C, then B♭7, coloured by an augmented fifth. Bar 4 passes through E♭, A♭ and F major, and bar 5 through G major to B♭7. Continued through bar 6, the latter chord seems to promise E♭ major; Episode 2 instead begins in G♭ major at bar 7. The deviation from an expected cadence becomes a recurring means of linking otherwise contrasting sections.
Episode 2 (bars 7–13) moves through D♭, A♭, E♭ and B♭ major with frequent chromatic diminished-seventh chords. Its rhythmic figure is more readily recognisable than a single stable harmonic centre. The episode contributes material to the first codetta (67–78) and, in a transformed context, to the later codetta from bar 218.
Episode 3 (bars 14–19) begins with four chords in bar 14—C–A7–D–B7—leading to E major at bar 15, immediately juxtaposed with B♭ major, a tritone away. Bar 16 returns to E major before D7/G and G major; bar 17 passes through D♭ and G to F7/B♭, preparing B♭ major at bar 18. The episode ends in G♭ major at bar 19. At bar 56 a shortened statement returns a semitone lower, retaining its principal harmonic relationships.
At bar 20 Episode 1 returns a minor third lower, in A major; its characteristic B♭7–G♭ evasion becomes G7–E♭ at bars 25–26. Episode 2 likewise returns a minor third lower at bar 26, preserving its rhythmic pattern and much of its harmonic order until its third-beat ending at bar 32. Episode 4 begins on the fourth beat. These transpositions make extended segments of harmony and rhythm recognisable even though their absolute pitch levels have changed.
Episode 4: flattened-submediant appoggiaturas and minor-third symmetry
Episode 4 (bar 32, beat 4, to bar 40, beat 3) arranges four major triads in ascending minor thirds: G–B♭–D♭–E. Each contains a flattened-submediant appoggiatura resolving chromatically to the fifth: E♭–D, G♭–F, A–A♭ and C–B respectively. The short–long Scotch-snap figures occur in trumpet and in augmentation in the piano. Displaced dominant-seventh chords intervene—A♭7–G, B7–B♭, D7–D♭ and F7–E—so that local chromatic friction accompanies the symmetrical cycle. The flattened-sixth colouring also occurs in the Canzonetta, but here it is organised as a conspicuous repeating pattern.
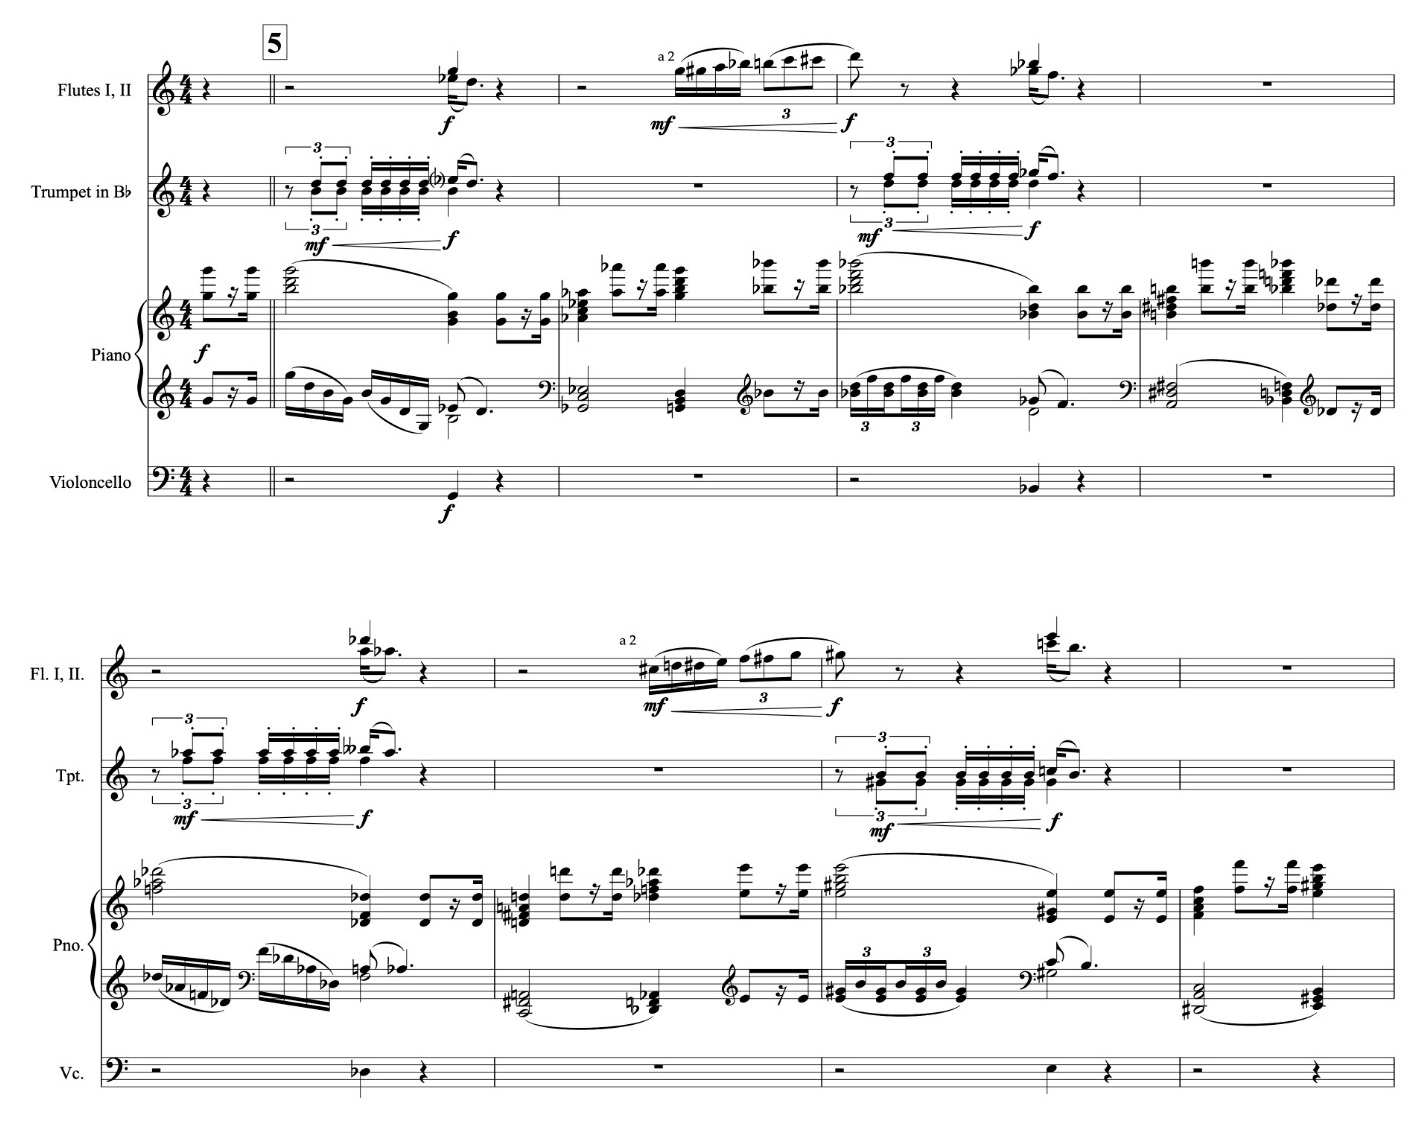
Musical example 1. Episode 4 (bars 32–40): trumpet Scotch-snap appoggiaturas and their augmentation in the piano.
Bars | Principal harmony and colour | Response and next tonal level |
32, beat 4 – 34 | G major; E♭–D ♭6–5 appoggiatura | A♭7 → G → implied B♭ |
35–36 | B♭ major; G♭–F appoggiatura | B7 → B♭ → implied D♭ |
37–38 | D♭ major; A–A♭ appoggiatura | D7 → D♭ → implied E |
39–40 | E major; C–B appoggiatura | F7 → E → implied A (Episode 5) |
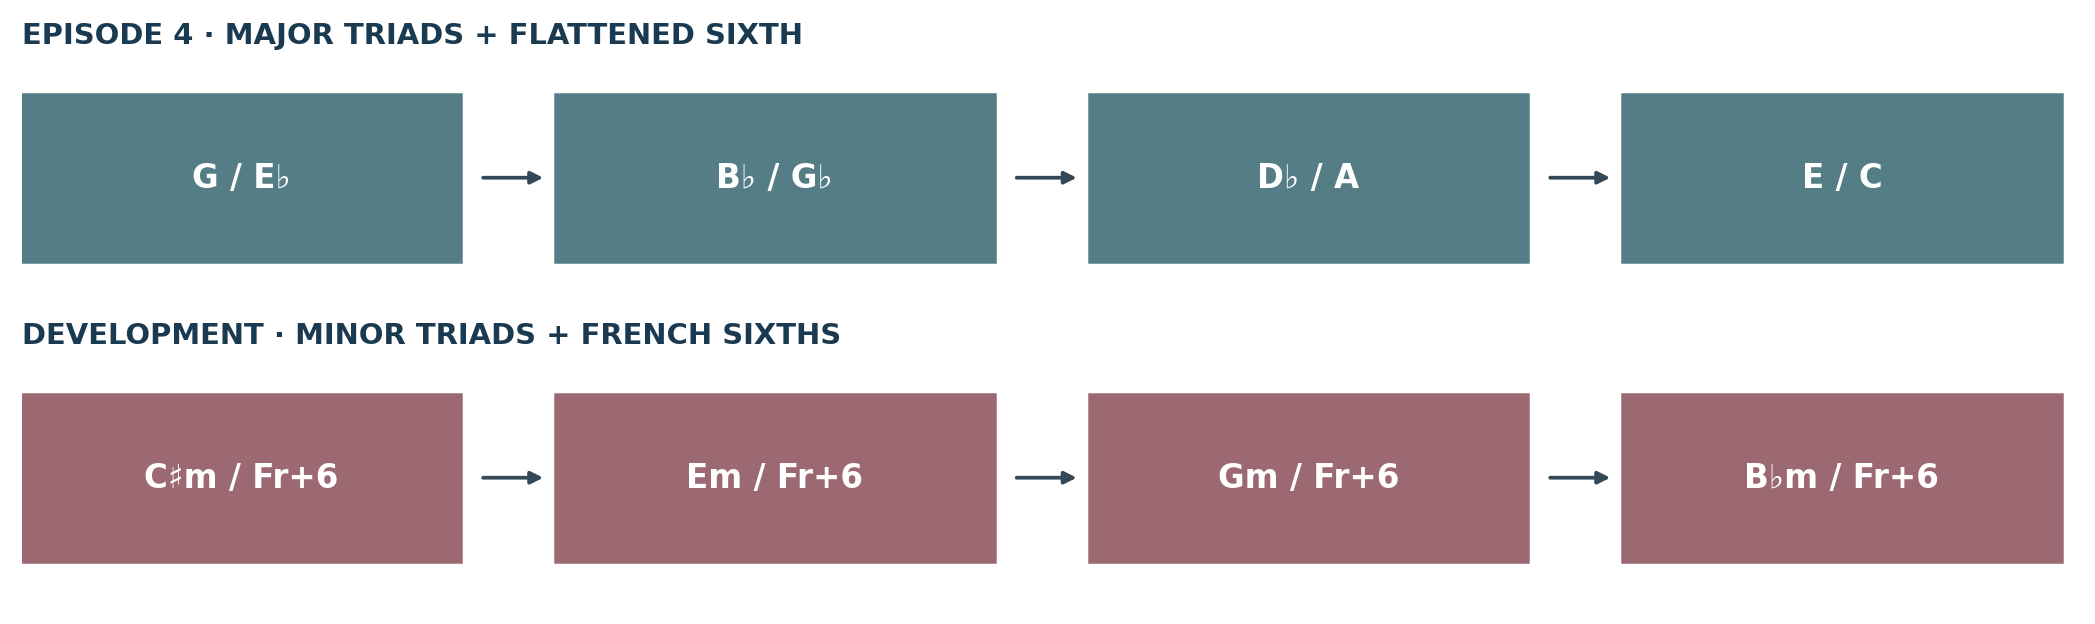
Figure 3. Two related symmetrical procedures: Episode 4 uses major chords coloured by the flattened sixth; the later development recasts the minor-third cycle in minor mode and French augmented-sixth sonorities.
Episode 5: phrase construction and development
Episode 5 (bar 40, beat 4, to bar 56, beat 3) comprises two contrasting four-bar phrases, repeated a minor third lower. The first begins in A major and moves through B7, G major and A7 at a relatively broad harmonic pace. Phrase B, beginning on the fourth beat of bar 44, changes chord more rapidly: C♯ and F♯ diminished sevenths appear in bar 45, F7–B♭7 in bar 46, and E♭–D7–C7 in bar 47. The eight-bar unit returns at bar 48, beat 4, a minor third lower. Phrase B later provides material for bars 226–229, allowing the scherzo’s opening network to be recognised within a different context.
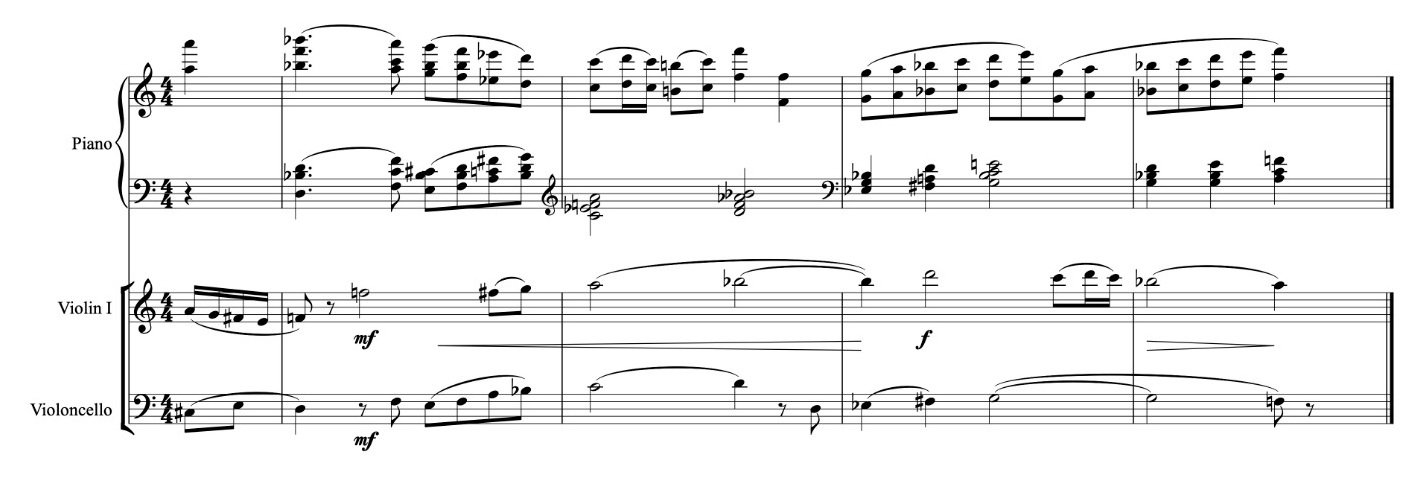
Musical example 2. Episode 5, Phrase B (bars 44–48): the source of later scherzo-codetta material.
Abbreviated returns of Episodes 3 and 1 close the scherzo. Episode 3 resumes on the fourth beat of bar 56 and continues with a semitone-lower version of its earlier harmonic progression. Its terminal G♭ harmony becomes F at bar 61, leading by minor third to A♭ at bar 62, where Episode 1 returns transposed down a major third. Its final bar is recomposed rather than copied, preparing E major and the first codetta at bar 67.
3. The scherzo codetta and bridge (bars 67–102)
The scherzo codetta (bars 67–78) introduces a broader harmonic rhythm, contrasting with the rapid chromatic changes of the preceding episodes. Its rhythmic figuration draws particularly upon Episode 2, while the underlying harmony moves through a descending whole-tone succession of major triads: E major (bars 67–70), D major (bars 71–74) and C major (bars 75–76). Bars 77–78 introduce a striking chromatic juxtaposition, alternating A♭ major with D major above an A♭ bass. The resulting tritone relationship creates harmonic tension before A♭ assumes a more clearly defined dominant function. At bar 79, the change from 4/4 to 3/4 coincides with a reduction in orchestral activity, while the implied A♭ harmony is sustained through bar 81. The passage concludes with a perfect cadence to D♭ major at bar 82, establishing a moment of tonal stability before the harmonically adventurous bridge to the second subject. The codetta therefore combines rhythmic recollection with a broadening of harmonic movement, preparing a change of character without abandoning the scherzo's characteristic chromatic vocabulary.
The bridge to the second subject (bars 82–102) begins with a prolonged D♭-major harmony, briefly coloured by E♭7/D♭ in bar 83. From bar 85, the music moves through a succession of increasingly remote harmonic regions: A major, E major, C major and F♯7, the latter resolving conventionally to B major at bar 89. This harmony is prolonged until bar 92, where an unexpected F-major chord precedes a return to B major and a perfect cadence to E major at bar 93. The following four bars alternate E and C major, establishing a characteristic chromatic-mediant relationship before F major governs bars 97–98. The subsequent progression through B♭, F♯ and B major leads to F major at bar 101, preparing the final perfect cadence into B♭ major at bar 102. The lyrical second subject enters on the third beat of that bar. The bridge thus combines adventurous chromatic root relationships with unmistakably functional points of arrival, its successive harmonic diversions ultimately directed towards the establishment of the second subject's tonal foundation.
4. The second subject: Classical elegance and thematic transformation (bars 102–156)
Original and transposed lyrical statements
The second subject enters on the third beat of bar 102 in B♭ major. Flowing piano triplets, upper-string harmony, pizzicato lower strings and ornamental woodwinds give it a lighter, classically inflected character than the scherzo. For six bars B♭ and F7 alternate. At bar 108, however, the expected return to B♭ is diverted to G♭ major, followed by D♭. C7, briefly coloured by a suspended fourth, leads to F major at bar 110, where the second statement begins. The contrast between graceful phrase design and chromatically diverted cadences underlies the theme’s later stylistic transformations.
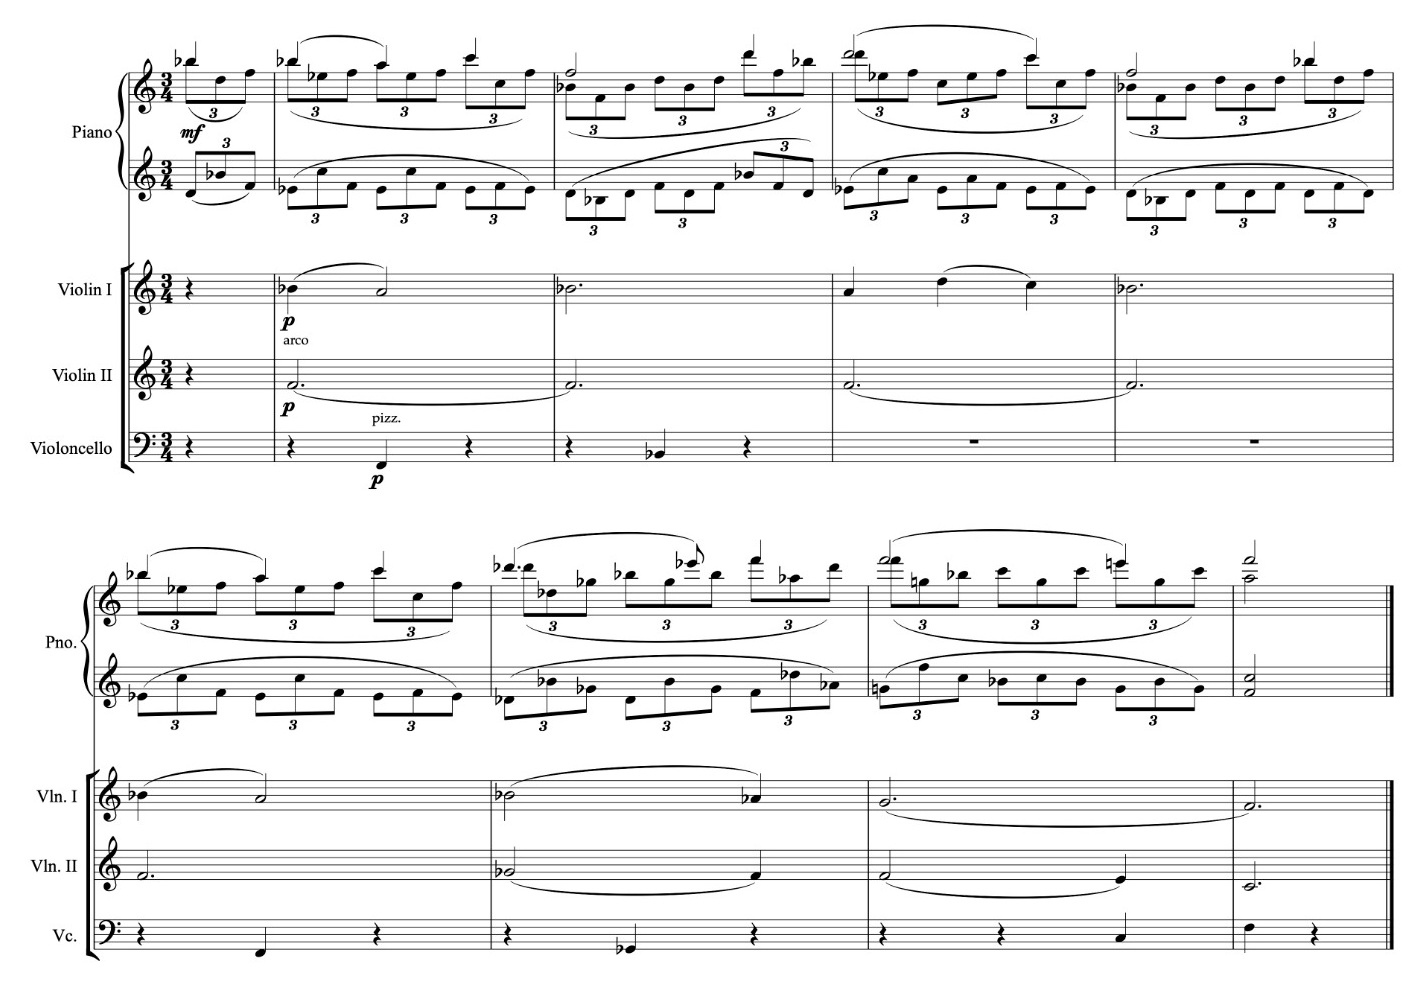
Musical example 3. Lyrical second subject (bars 102–110): piano triplets, string harmony and pizzicato bass.
Beginning on the third beat of bar 110, the melody is transposed down a perfect fourth to F major, with fuller clarinet figuration but largely retained piano material. The original tonic–dominant alternation becomes F–C7. At bar 116 the resolution to F is again deflected, this time towards D♭ and A♭ major; G7–C then completes the statement at bar 118, beat 2. The transposition preserves not only the tune but the earlier cadential evasion.
The contrasting middle melody and Scotch-snap appoggiaturas
A contrasting middle melody begins on the third beat of bar 118: an eight-bar phrase in C major is followed by an abbreviated six-bar version a minor third higher. Suspended dominants and the flattened-submediant A♭ chord at bar 120 enrich the harmonies. Its Scotch-snap figures place accented chromatic appoggiaturas immediately before their resolutions, recalling Episode 4 in a gentler context. At bar 126, beat 3, the melody returns in E♭ major; the former A♭ harmony becomes B major at bar 128. F♯ major at bar 132 diverts the expected resolution and leads into a preparatory passage. These figures return in the development and scherzo codetta.
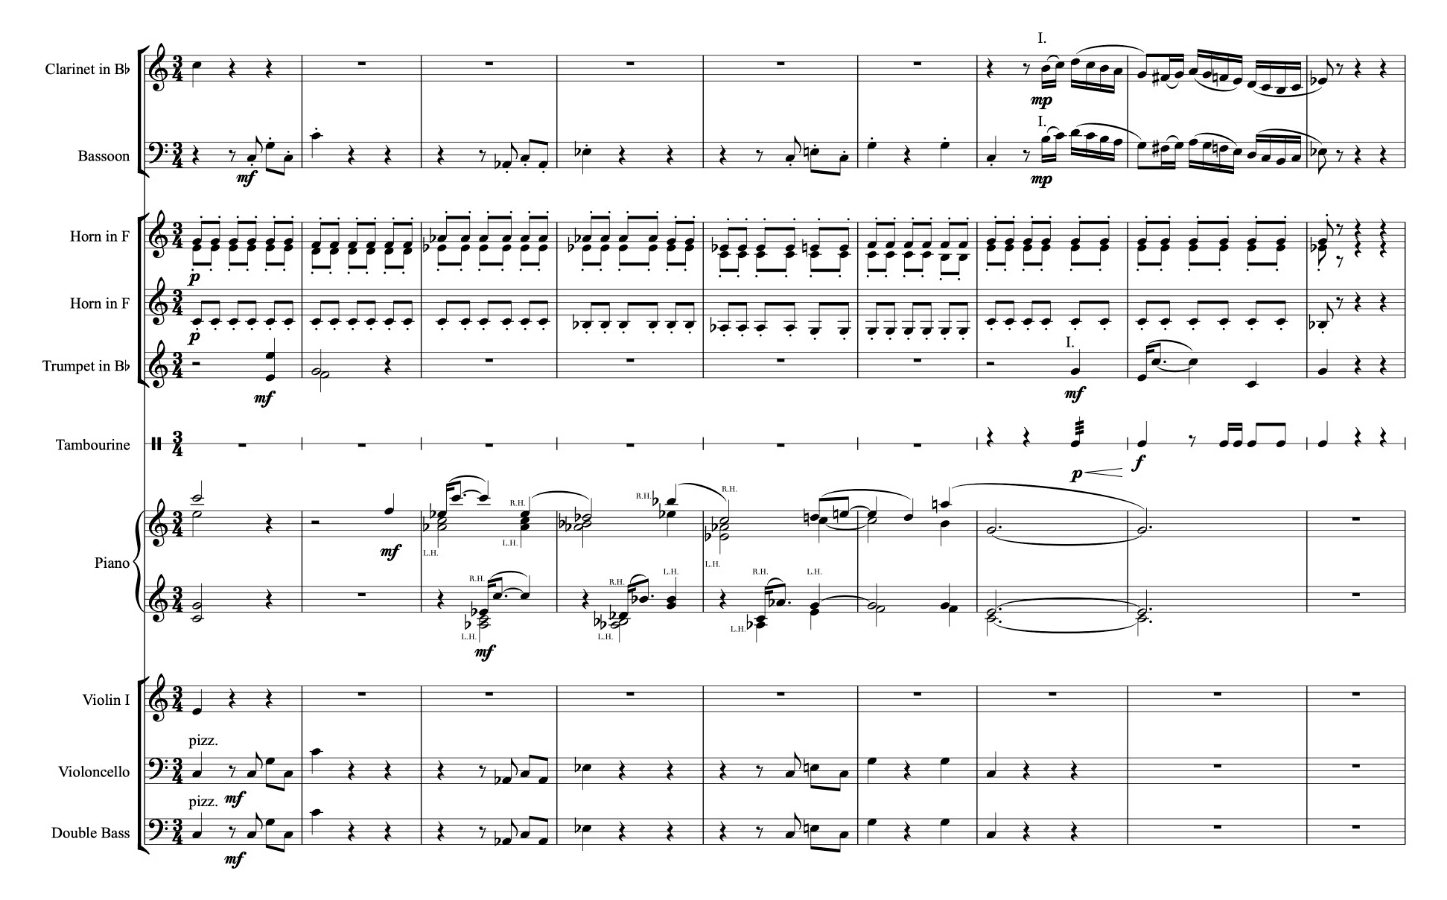
Musical example 4. Second-subject middle melody (bars 118–132): Scotch-snap figures and transposed reprise.
Preparation for the virtuoso variations
The eight-bar preparatory passage beginning at bar 132, beat 3, introduces a succession of chromatically enriched harmonies, including several prominent augmented-triad sonorities. F augmented in bar 133, G augmented in bar 135 and its return in bar 137 all exploit the flattened-sixth relationship that has already emerged as a characteristic feature of the concerto's harmonic vocabulary. These harmonies are interspersed with major triads and chromatic alterations, including C major at bar 134, E♭ major at bar 135 and A♭ major at bar 136. The piano's exposed octave writing contrasts with reiterated harmonic figures in the horns, lending particular clarity to the underlying progression. From bar 138, the harmony becomes increasingly directed towards B♭ major, moving through F7 and the chromatically intensified F7(♯11) sonority of bar 139. The anticipated B♭-major arrival occurs at bar 140, immediately before the first virtuoso variation of the second subject enters on the third beat. The passage thus transforms a succession of chromatically coloured harmonies into a clearly articulated dominant preparation, providing a transition between the contrasting middle melody and the return of the principal second-subject material.
Two virtuoso variations
The two virtuoso variations (bars 140–156) preserve the basic harmonic course while changing the piano’s texture and register. The first begins on the third beat of bar 140 in B♭ major, transferring the tune into rapid triplet passagework and retaining the diversion to G♭ and D♭ at bar 146 before C7–F at bar 148. The second begins in F major on the third beat of bar 148, often an octave higher, with the corresponding diversion to D♭ at bar 154. Its final G7 does not resolve to C at bar 156: rising woodwind semiquavers lead instead to A♭ at bar 157 as the scherzo returns in 4/4.
5. The scherzo reprise and development (bars 157–213)
The transposed scherzo reprise, bars 157–197
From bar 157 the scherzo reproduces much of bars 26–66 a perfect fourth higher, following the sequence 2–4–5–3–1. Episode 4’s cycle G–B♭–D♭–E becomes C–E♭–G♭–A, retaining its appoggiaturas and displaced dominants. Episode 5’s contrasting phrases also preserve their relative transpositions. Changes of orchestral distribution vary the texture without obscuring the correspondence. At bar 198 the expected continuation is abandoned in favour of a more chromatic developmental passage.
Chromatic intensification and Scotch-snap appoggiaturas, bars 198–201
The scherzo development begins at bar 198 with a striking intensification of the movement's chromatic language. The opening A-major harmony gives way to F♯ half-diminished seventh, followed by D♯ half-diminished seventh in bar 199. Bar 200 returns briefly to A major before reintroducing D♯ half-diminished seventh, while G♯ half-diminished seventh governs bar 201. Against these increasingly unstable harmonies, the piano presents descending Scotch-snap figures whose accented dissonances function as appoggiaturas to the underlying chords. The distinction between structural harmony and melodic ornamentation is particularly important here: the chromatic appoggiaturas momentarily complicate the vertical sonorities without necessarily altering their fundamental harmonic identities. The resulting combination of rhythmic insistence, accented dissonance and successive half-diminished harmonies generates a mounting sense of unease, preparing the more systematic and dramatically intensified harmonic sequence beginning at bar 202.
The symmetrical French-sixth sequence, bars 202–209
Bars 202–209 arrange a sequence of minor triads alternating with French augmented-sixth sonorities, rising by minor thirds. C♯ minor at bar 202 is followed by the collection C–E–F♯–A♯; the two-bar process then continues from E minor (204), G minor (206) and B♭ minor (208). Episode 4’s earlier major-triad cycle is thus reworked in the minor mode, with French-sixth harmonies heightening the chromatic pressure. Ascending piano octaves and increasing orchestral activity intensify the sequence towards the climax at bars 210–213. The sonority also appears in the first movement, where a French sixth is heard in the oboes above the introductory D pedal.
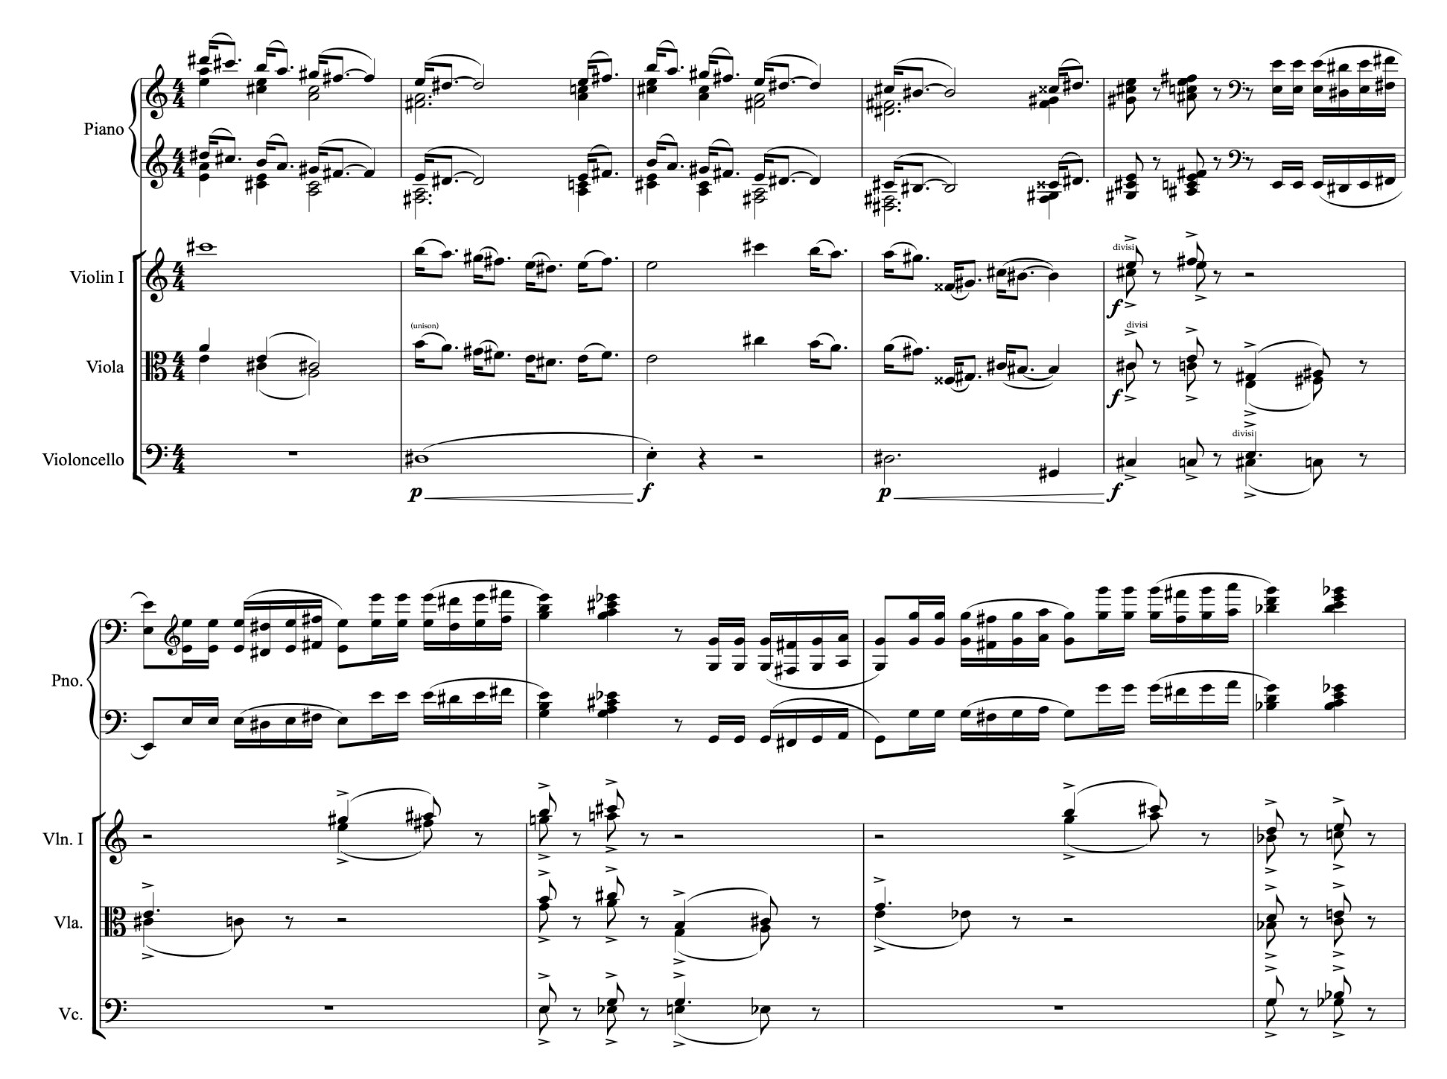
Musical example 5. Scherzo development (bars 198–209): minor-third sequence and French augmented-sixth harmonies.
Bar | Minor triad | French augmented-sixth collection |
202 | C♯ minor | C–E–F♯–A♯ |
204 | E minor | E♭–G–A–C♯ |
206 | G minor | G♭–B♭–C–E |
208 | B♭ minor | A–D♭–E♭–G (enharmonic French sixth) |
The dramatic climax, bars 210–213
Bars 210–211 alternate D♭ major and D♭ augmented, moving chromatically between A♭ and A natural. At bar 212 B♭ minor gives way to G7(♭5), reiterated in bar 213; C major at bar 214 releases the tension and begins the codetta. The change in texture and rhythmic character is abrupt: material associated with the scherzo returns in a setting that gradually makes room for humour after the development’s severity.
6. The scherzo codetta: humour and thematic synthesis (bars 214–233)
Episode 1 bass and Scotch-snap appoggiaturas, bars 214–217
The codetta begins at bar 214 with a bass figure derived from Episode 1, now prolonged around a C pedal. Above it, the piano’s Scotch-snap figures introduce accented appoggiaturas. The chords move from C to A♭/C (214), F minor/C and A♭/C (215), F minor/C and D diminished/C (216), and G7/C followed by D diminished/C (217). Retention of the bass and rhythmic material connects the passage to the scherzo even as its surface character changes.
Episode 2 rhythm and chromatic harmonic motion, bars 218–225
Episode 2’s rhythmic figuration returns in the piano at bar 218, above the Episode 1-derived C pedal. The upper harmonies shift from C to F7/C (218), B♭7/C and G7/C (219), A♭/C and D half-diminished seventh/C (220), B diminished/C and D diminished/C (221), then G7/C and D half-diminished seventh/C (222–223). Harmonic rhythm accelerates in bar 224—C, F♯/C, A♭/C and F/C—and the bass descends chromatically C–B–B♭–A at bar 225. The release of the pedal prepares the return of Episode 5 material at bar 226.
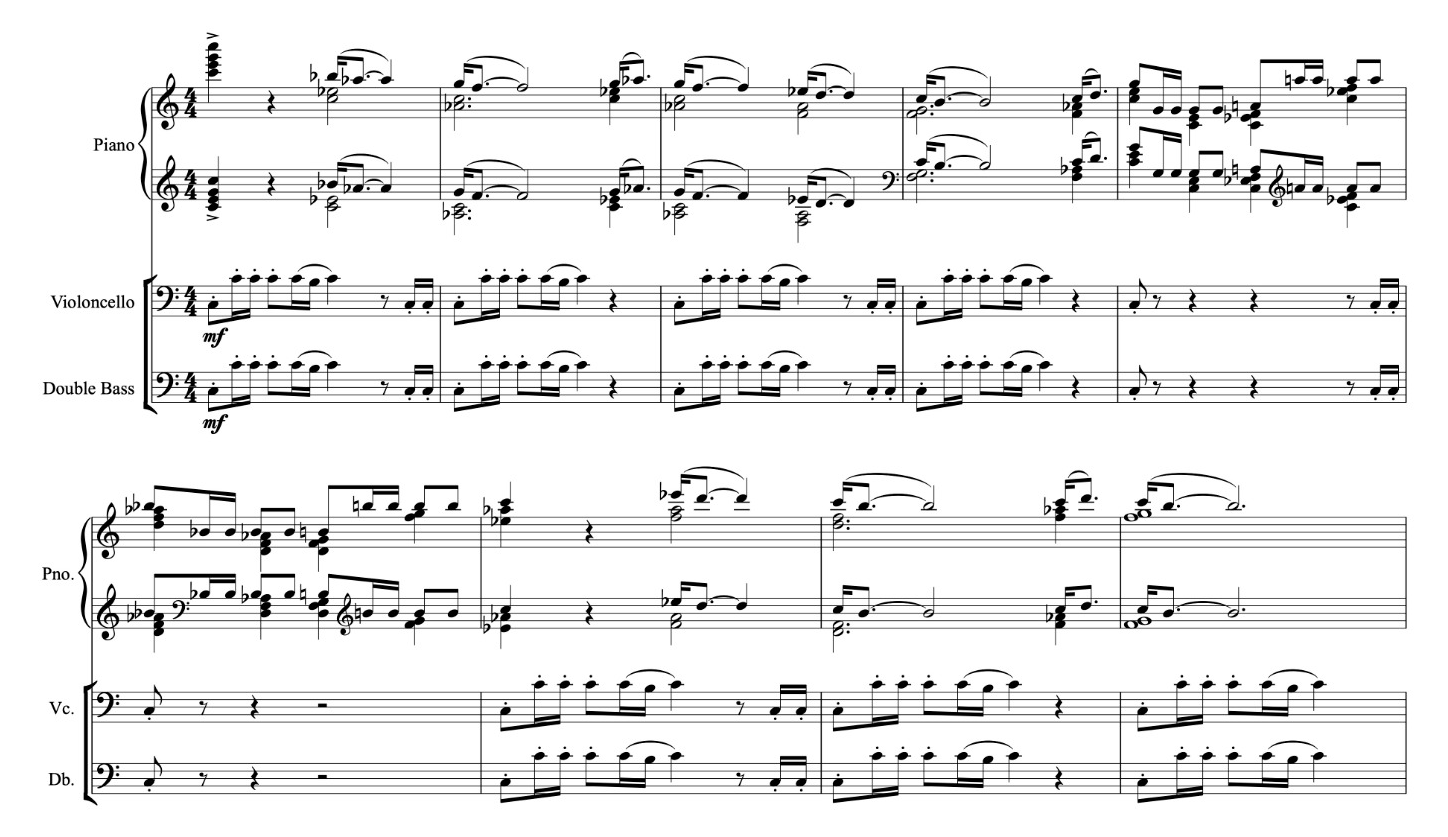
Musical example 6. Scherzo codetta (bars 214–225): Episode 1 bass, Episode 2 rhythms and Scotch-snap appoggiaturas.
Bars | Underlying harmonies / treatment | Thematic layer |
214–217 | C–A♭/C; Fm/C–A♭/C; Fm/C–Ddim/C; G7/C–Ddim/C | Descending Scotch-snap appoggiaturas; Episode 1-derived bass |
218–223 | C–F7/C; B♭7/C–G7/C; A♭/C–Dø7/C; Bdim/C–Ddim/C; G7/C; G7/C–Dø7/C | Episode 2 rhythmic variation above the C pedal |
224–225 | C–F♯/C–A♭/C–F/C; B/C–F/B–F♯/A♯–D♯ø7/A | Four-chord rhythm and chromatic bass release |
226–227 | Transposed transformations of bar 45, Episode 5 Phrase B | Rapid diminished-seventh sequences |
228–229 | Freer melodic extension and F♯7 prolongation | Sequential play and fragmentation |
230–233 | Long-delayed B-to-E dominant–tonic destination | Ever-widening melodic intervals; crescendos and comic turn |
Episode 5, Phrase B, and sequential development, bars 226–229
At bar 226 Phrase B of Episode 5, first heard at bar 45, returns in the piano a tritone lower with corresponding lower-string writing. The statement at bar 227 lies a semitone below the original, with an altered chromatic detail. Bars 228–229 extend the figure through E and A major towards F♯7. The passage leads from the scherzo’s earlier thematic network into the deliberately delayed cadence that follows.
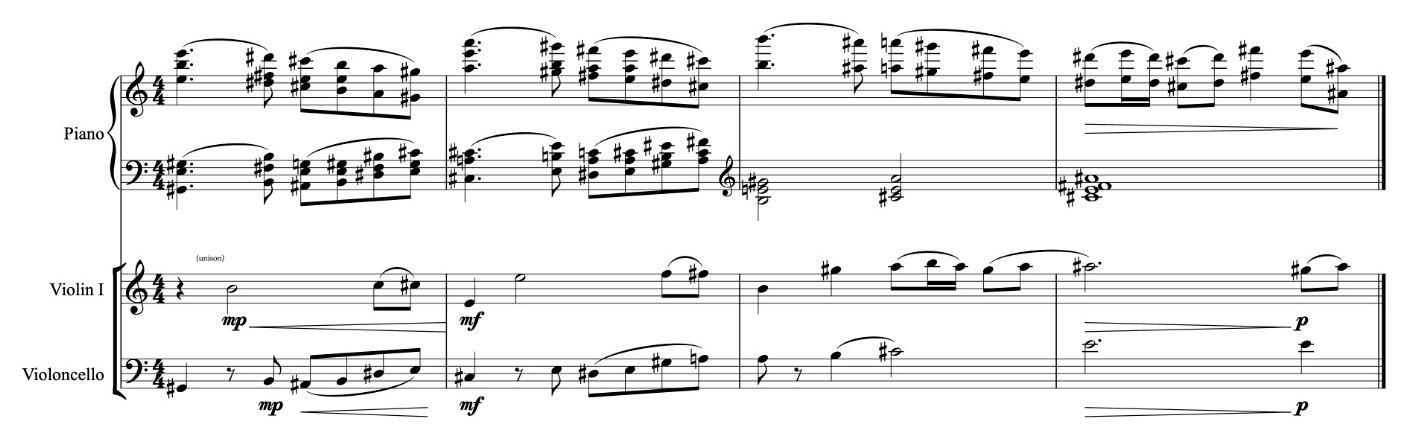
Musical example 7. Episode 5, Phrase B (bars 226–229): sequential transpositions.
The humorously delayed perfect cadence, bars 230–234
At bars 230–234 a tonal expectation becomes a musical joke. The piano repeatedly alternates B with successively higher notes—C, C♯, D and D♯—as crescendos amplify the approach to E major. Rather than resolving immediately, the passage diminishes suddenly to an exposed turn figure, E–D♯–C♯–D♯, before the E-major cadence at bar 234. The humour depends upon disproportion: an ordinary arrival has been prepared with an almost theatrical insistence.
The violin writing has a further connection with Waldeinsamkeit. The first movement’s closing eight-note figure alternates a recurring A with rising upper pitches; here B serves the same function against C, C♯, D and D♯. This is an analogy of intervallic construction, not a literal quotation. A melodic procedure associated earlier with vulnerability is therefore heard in an unexpectedly comic context.
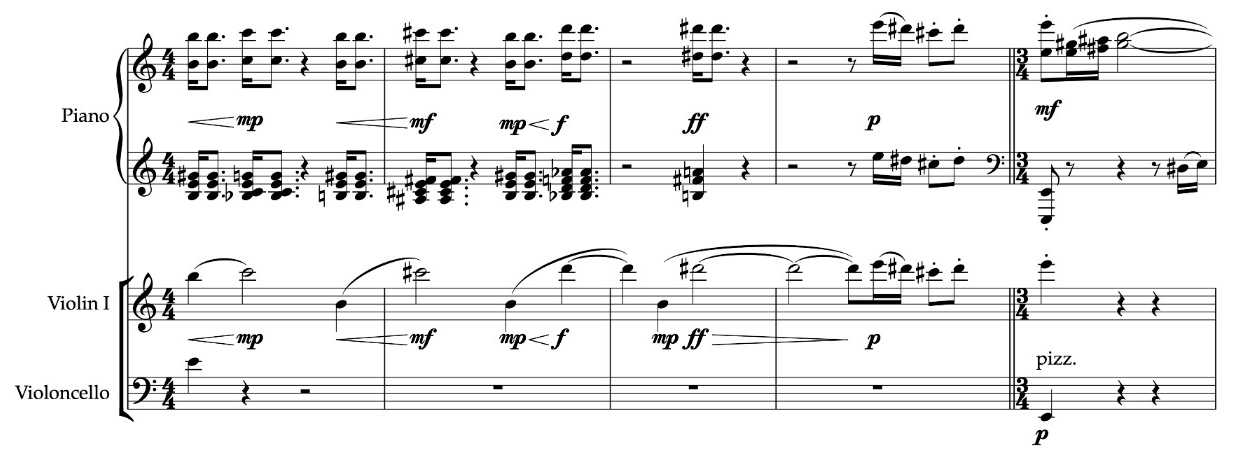
Musical example 8. Humorous delayed cadence (bars 230–234): widening intervals and the final turn figure.
7. The second bridge and the Coplandesque Hoedown (bars 234–291)
The transposed bridge, bars 234–254
The bridge at bar 234 closely transposes the earlier passage at bars 82–102 a minor third higher. D♭ major becomes E; B–E at bars 92–93 becomes D–G at 244–245; and the original F–B♭ preparation becomes A♭–D♭ at bars 253–254. The correspondence creates an expectation of the same lyrical second subject, but the melody instead enters on the third beat of bar 254 in a sharply different guise. The nearly repeated bridge thereby becomes the hinge of a genuine transformation.
The Hoedown: rhythm, orchestration and humour, bars 254–291
At bar 254 the lyrical second subject becomes a Hoedown. Detached quavers, percussive piano chords, fiddle-like string writing and bright woodwind and tambourine accents evoke an American country dance, with an orchestral manner recalling Aaron Copland’s Rodeo. Horn repetitions and pizzicato lower strings reinforce the dance character from bar 270. The underlying subject remains recognisable in this 3/4 setting, including its contrasting middle melody. The contrast between the earlier restrained presentation and the new rhythmic treatment is central to the passage’s humour; the musical reference is an affinity of style, not a quotation.
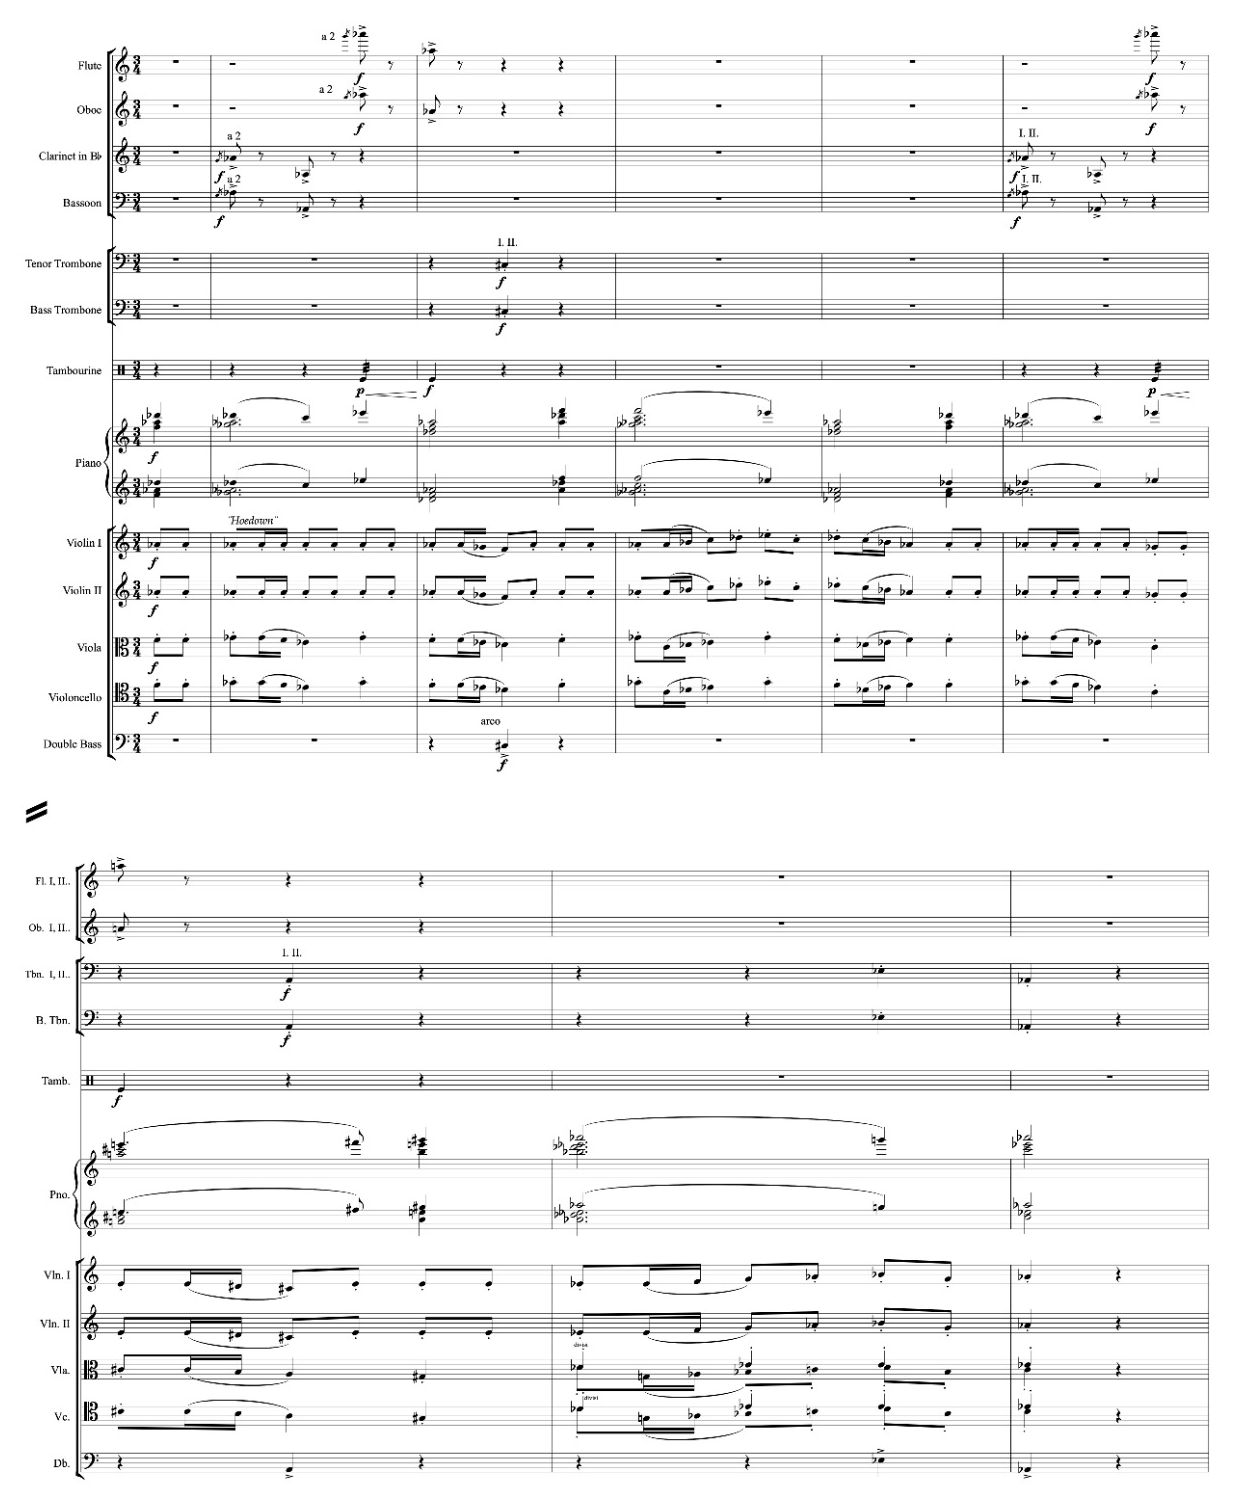
Musical example 9. Hoedown transformation (bars 254–269): rhythm, instrumental exchanges and percussion.
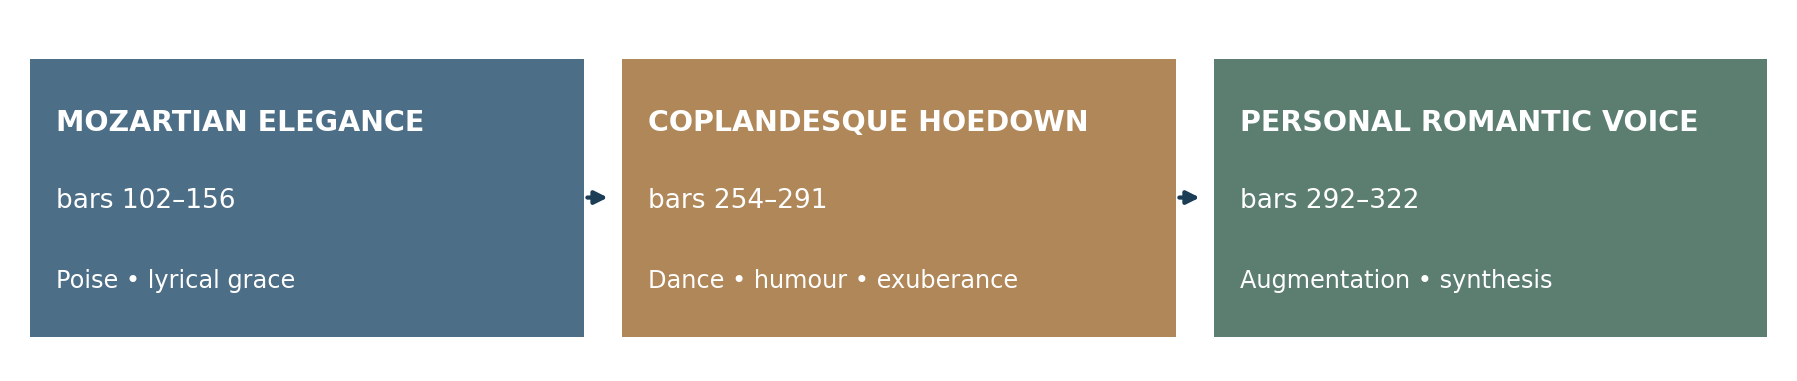
Figure 4. Three presentations of the second subject: Classical lyricism, Hoedown and augmented orchestral statement.
The second subject across three characters
The second subject’s successive appearances can be heard as a change of historical and expressive perspective: a classically proportioned melody at bar 102, a Hoedown at bar 254, and a broad, rhythmically augmented statement at bar 292. The links are demonstrable in the retained melodic outline and harmonic relationships. Terms such as “Mozartian” and “Coplandesque” describe audible stylistic affinities; they need not imply imitation of particular passages. The changing contexts allow the same melody to bear contrasting characters without ceasing to function as the same theme.
8. The augmented second subject (bars 292–322)
Thematic augmentation and contrapuntal synthesis
At bar 292, beat 2, the second-subject melody returns in the trumpets, transposed upwards a minor third from B♭ to D♭ and with its note values doubled. Its phrases suggest 3/2 across the prevailing 3/4 metre. String triplets move beneath the line; piano and woodwind semiquavers draw on material from the scherzo development. The simultaneous rhythmic layers give the familiar theme an enlarged span without requiring new melodic material. Here the three stylistic treatments of the second subject culminate in a densely contrapuntal texture.
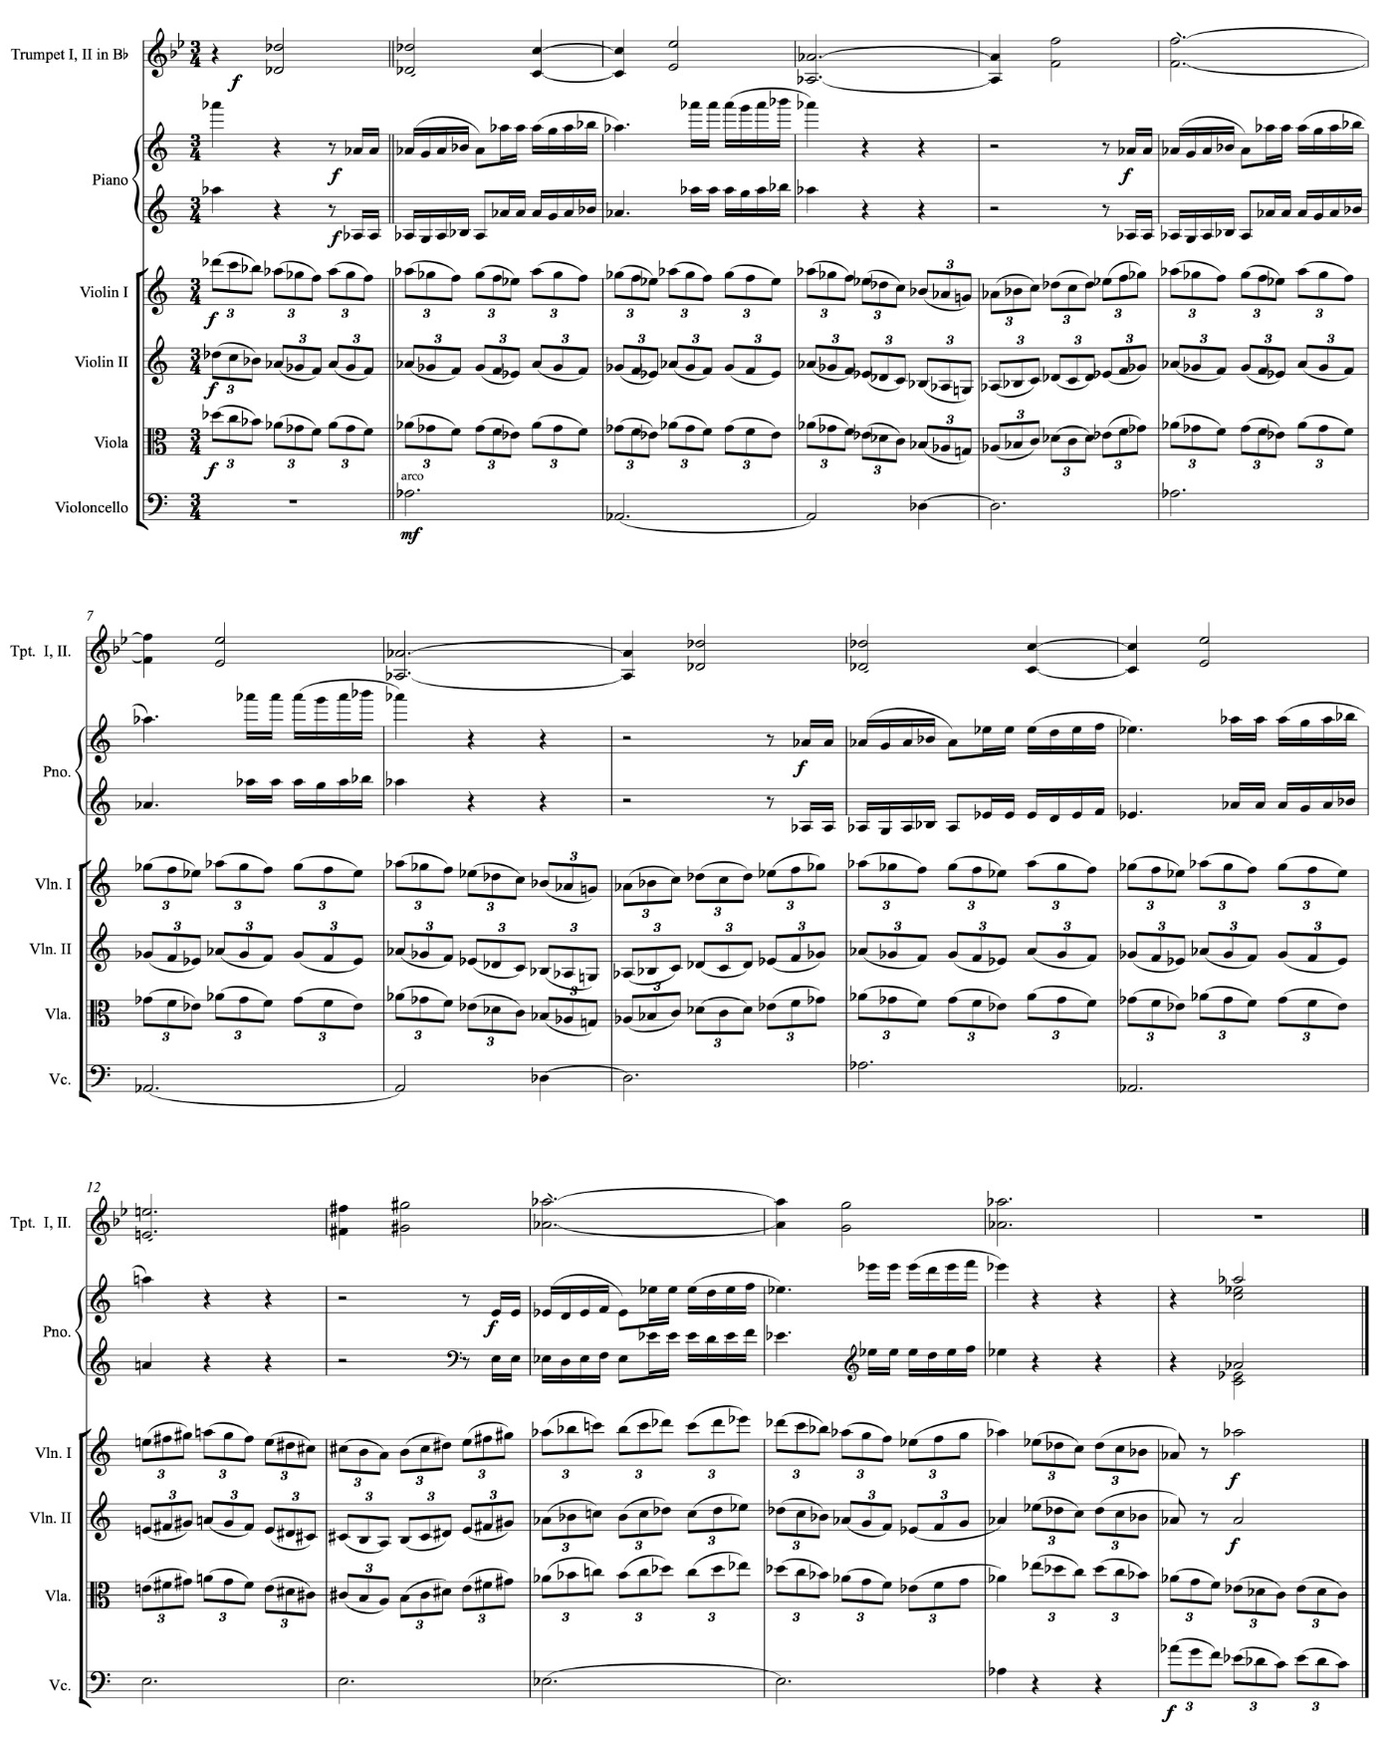
Musical example 10. Augmented second subject (bars 292–308): trumpet melody, piano figuration and string triplets.
The second augmented statement and orchestral counterpoint
At bar 308, beat 2, the augmented melody passes from trumpets to piano and upper strings in A♭ major. This corresponds to the original second statement, first heard in F major, transposed a minor third higher. Its broader 3/2 phrasing continues above the 3/4 metre. The triplet figuration moves into violas and cellos, while woodwinds and brass carry additional active lines. The modified ending avoids a conventional cadence, making room for the return of Waldeinsamkeit at bar 323.
9. Waldeinsamkeit: tenderness and reassurance (bars 323–356)
The cyclical return of Waldeinsamkeit
Waldeinsamkeit returns in the piano at bar 323, beat 3, after the augmented second subject. Widely spaced octaves, a sustained B♭ pedal and gently moving lower strings replace the preceding density. Around bar 325 the sonority can be reduced analytically to B♭11, although the held notes and passing motion are integral to its sound. The composer associates the passage with tenderness and reassurance; musically, this reading is supported by the prolonged harmonic field and by the exchange between piano and woodwinds rather than by the volume of the orchestration.
The piano introduces its ten-note theme with a two-note anacrusis at bar 323; flutes and oboes answer with the complete ten-note idea from bar 331, beat 3. A further piano statement begins at bar 339, beat 3, and the woodwinds reply from bar 347, beat 3. Unlike the shorter, more freely developed cells of the first-movement recapitulation, these replies preserve the full contour of the opening idea. The repeated act of answering gives the passage its conversational character.
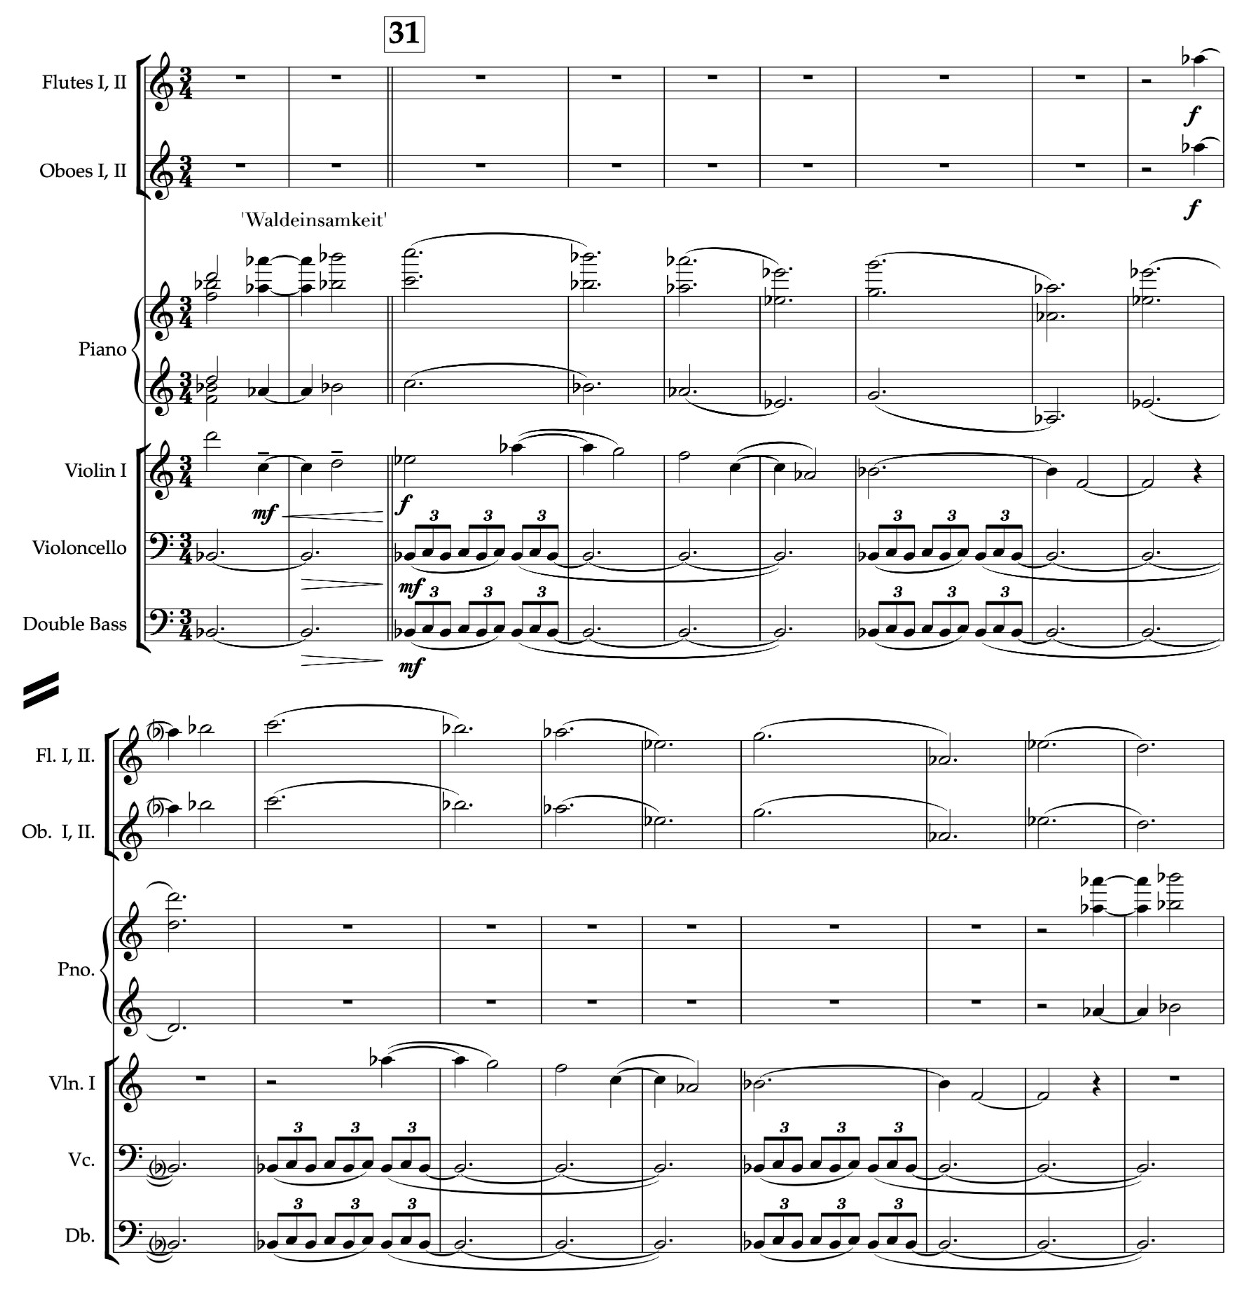
Musical example 11. Waldeinsamkeit (bars 323–340): piano statement, ten-note woodwind response and moving lower strings.
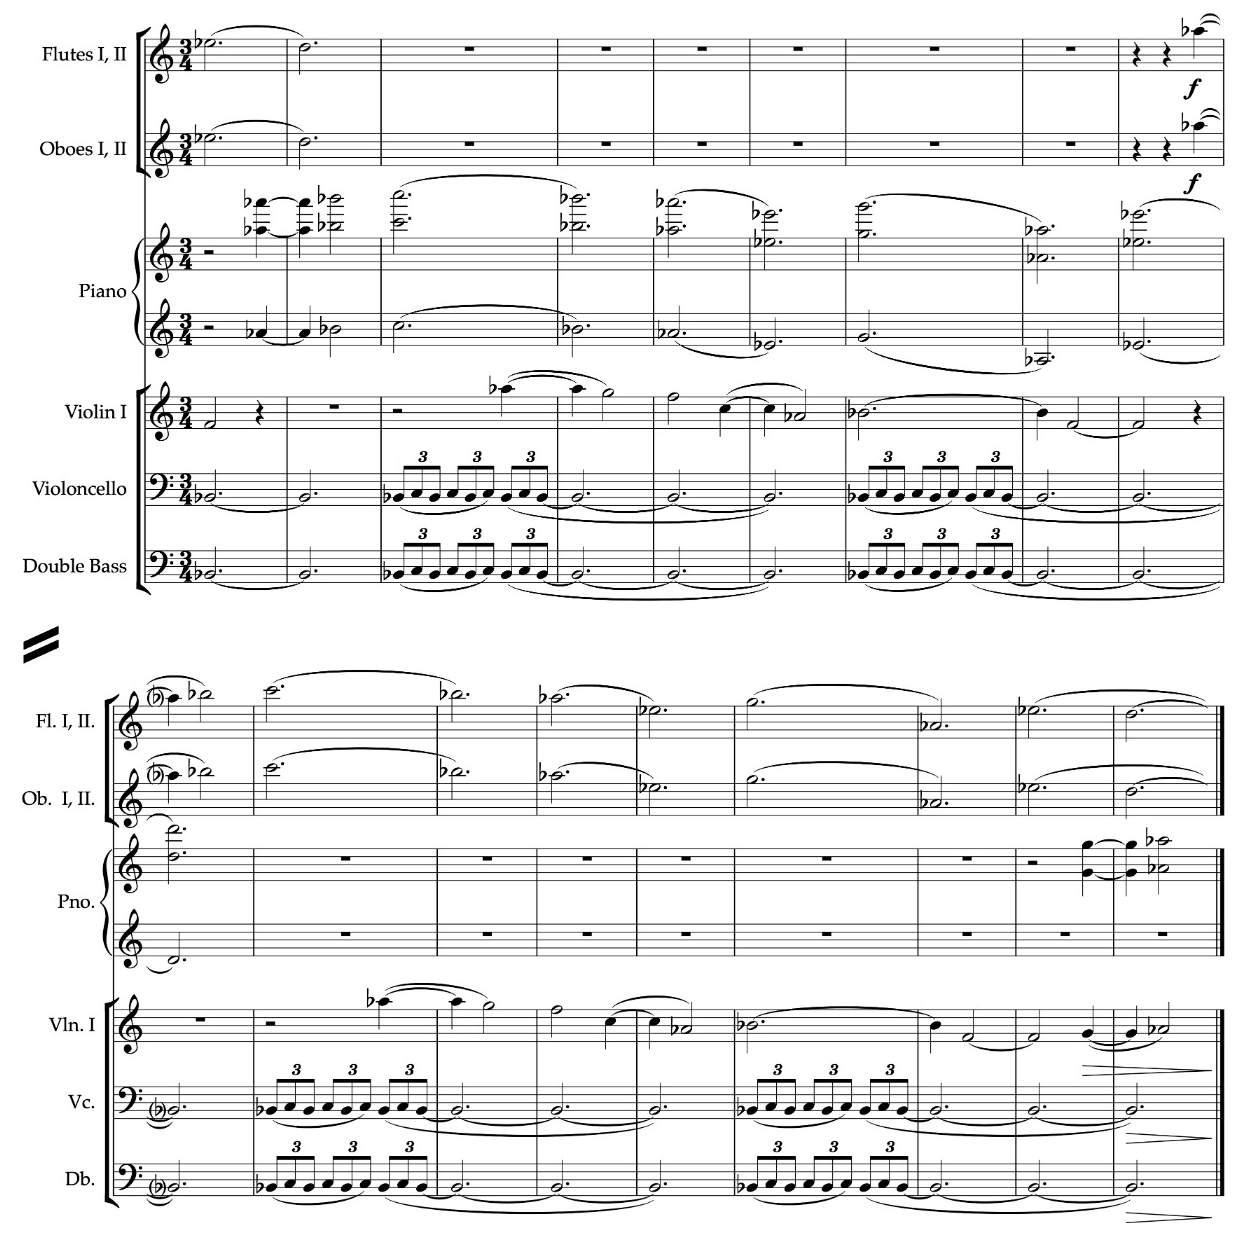
Musical example 11a. Waldeinsamkeit (bars 339–356): second piano–woodwind exchange.
Orchestral texture and Mahler’s Ninth Symphony
The oscillating lower-string texture recalls the sextuplet writing around bar 47 of the first movement of Mahler’s Ninth Symphony, a passage the composer has identified as an orchestral inspiration. The relationship is textural, not a melodic quotation. In the present concerto it supports a sustained B♭ harmony and a sequence of piano–woodwind exchanges; no farewell programme is implied. This is one instance of an established orchestral technique taking on a different expressive function in a new work.
10. From reassurance to renewed affirmation (bars 355–372)
Ascending harmonic sequence and rhythmic counterpoint
A two-note close to Waldeinsamkeit at bar 355 leads into a sequence of major triads rising by whole tones: D (357–360), E (361–364), F♯ (365–368) and A♭ (369–372), each over its dominant pedal. The piano and upper strings present broad six-note patterns that suggest 3/2 across the prevailing 3/4, while descending lower-string figures, horn crotchet triplets and displaced woodwind lines intensify the texture. Increasing dynamics lead directly to the Hero theme at bar 373. The transition connects two contrasting expressive states through a continuous growth in harmony and orchestration.
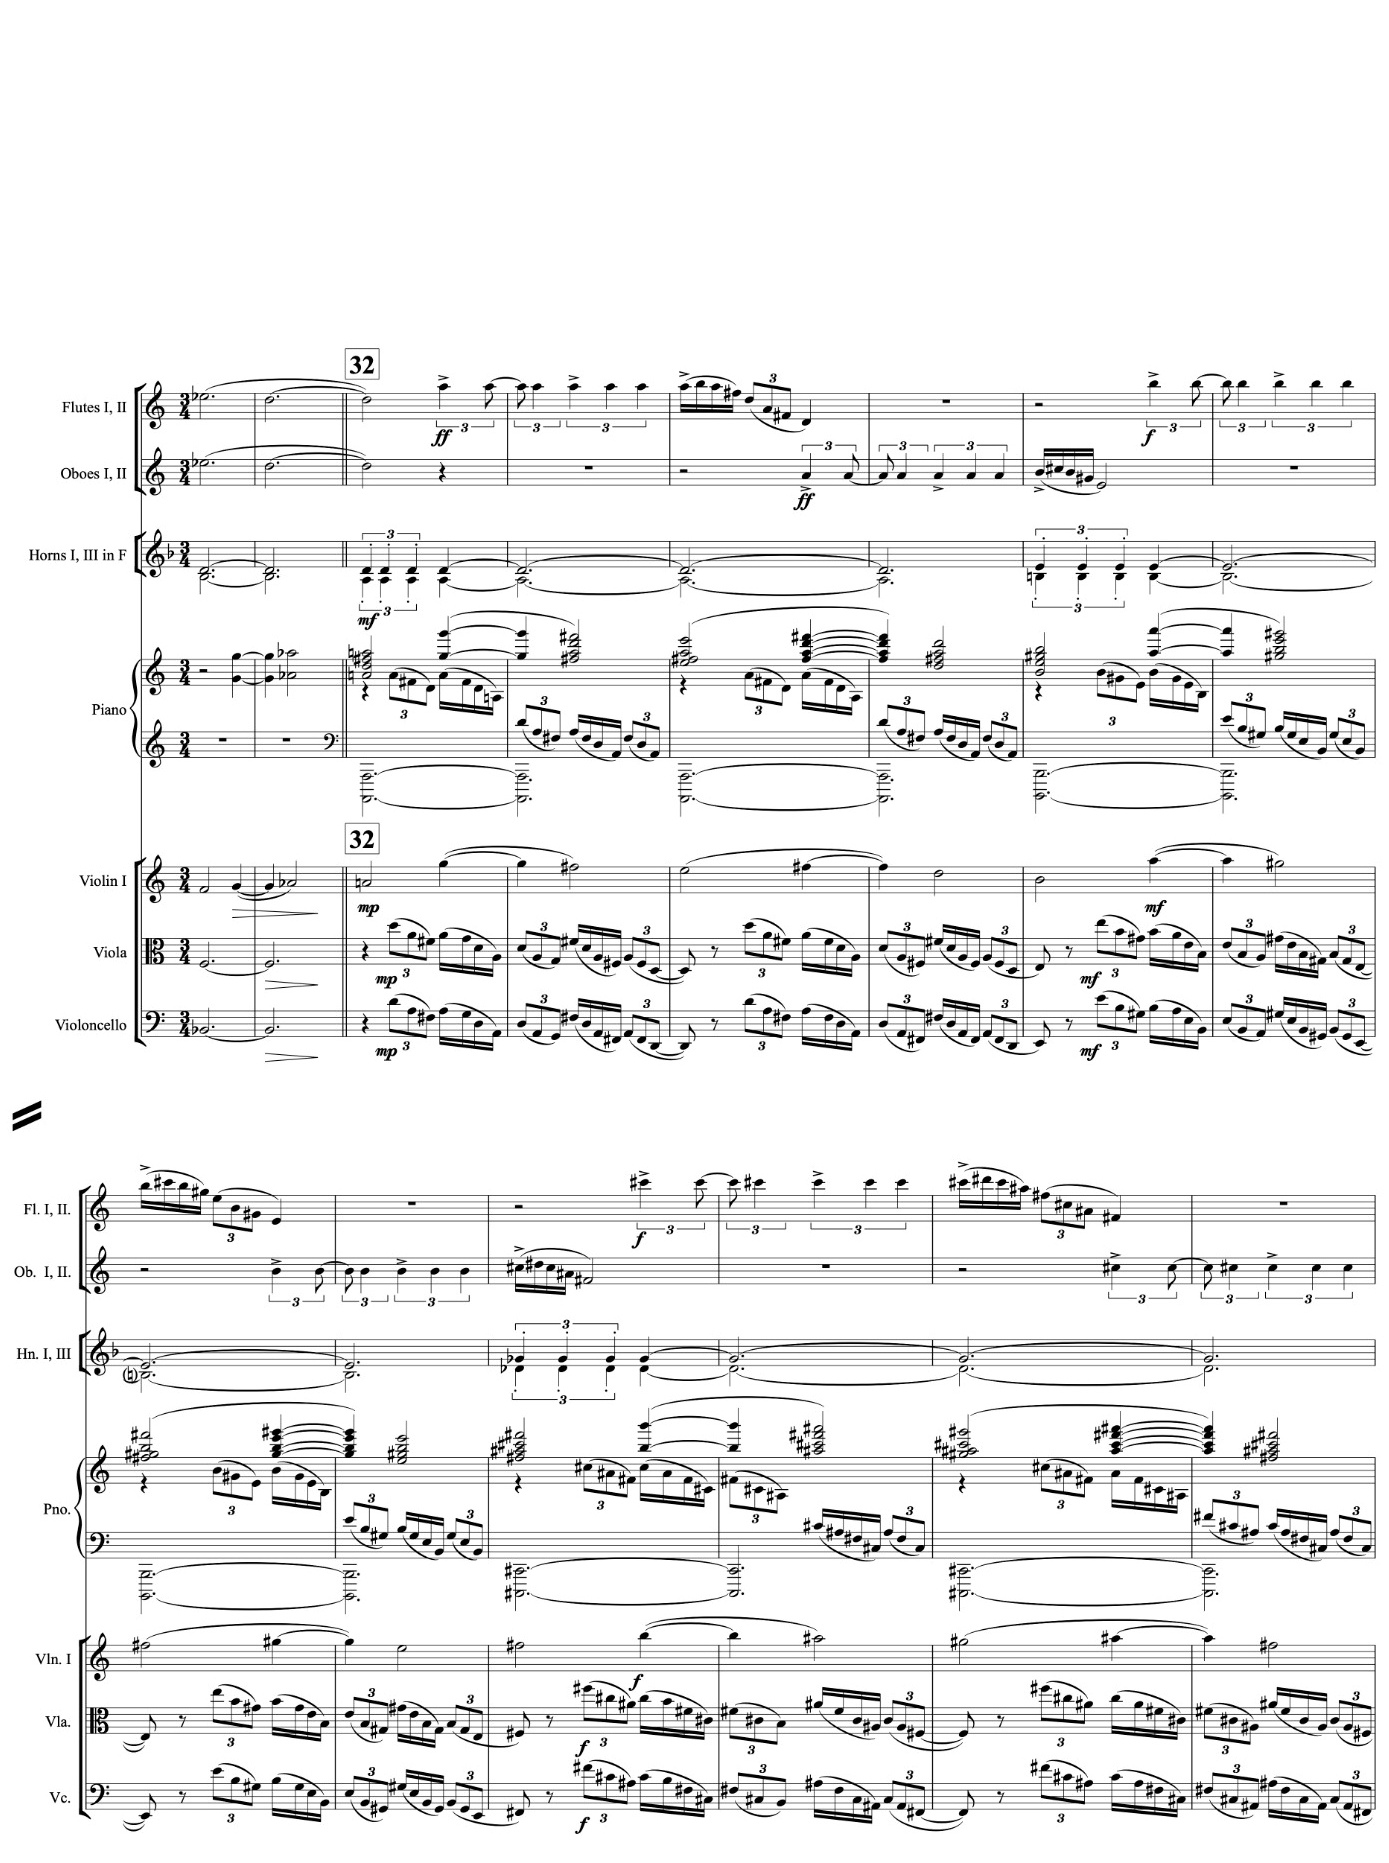
Musical example 12, part 1. Rising harmonic sequence: broad melodic line and contrasting rhythmic layers.
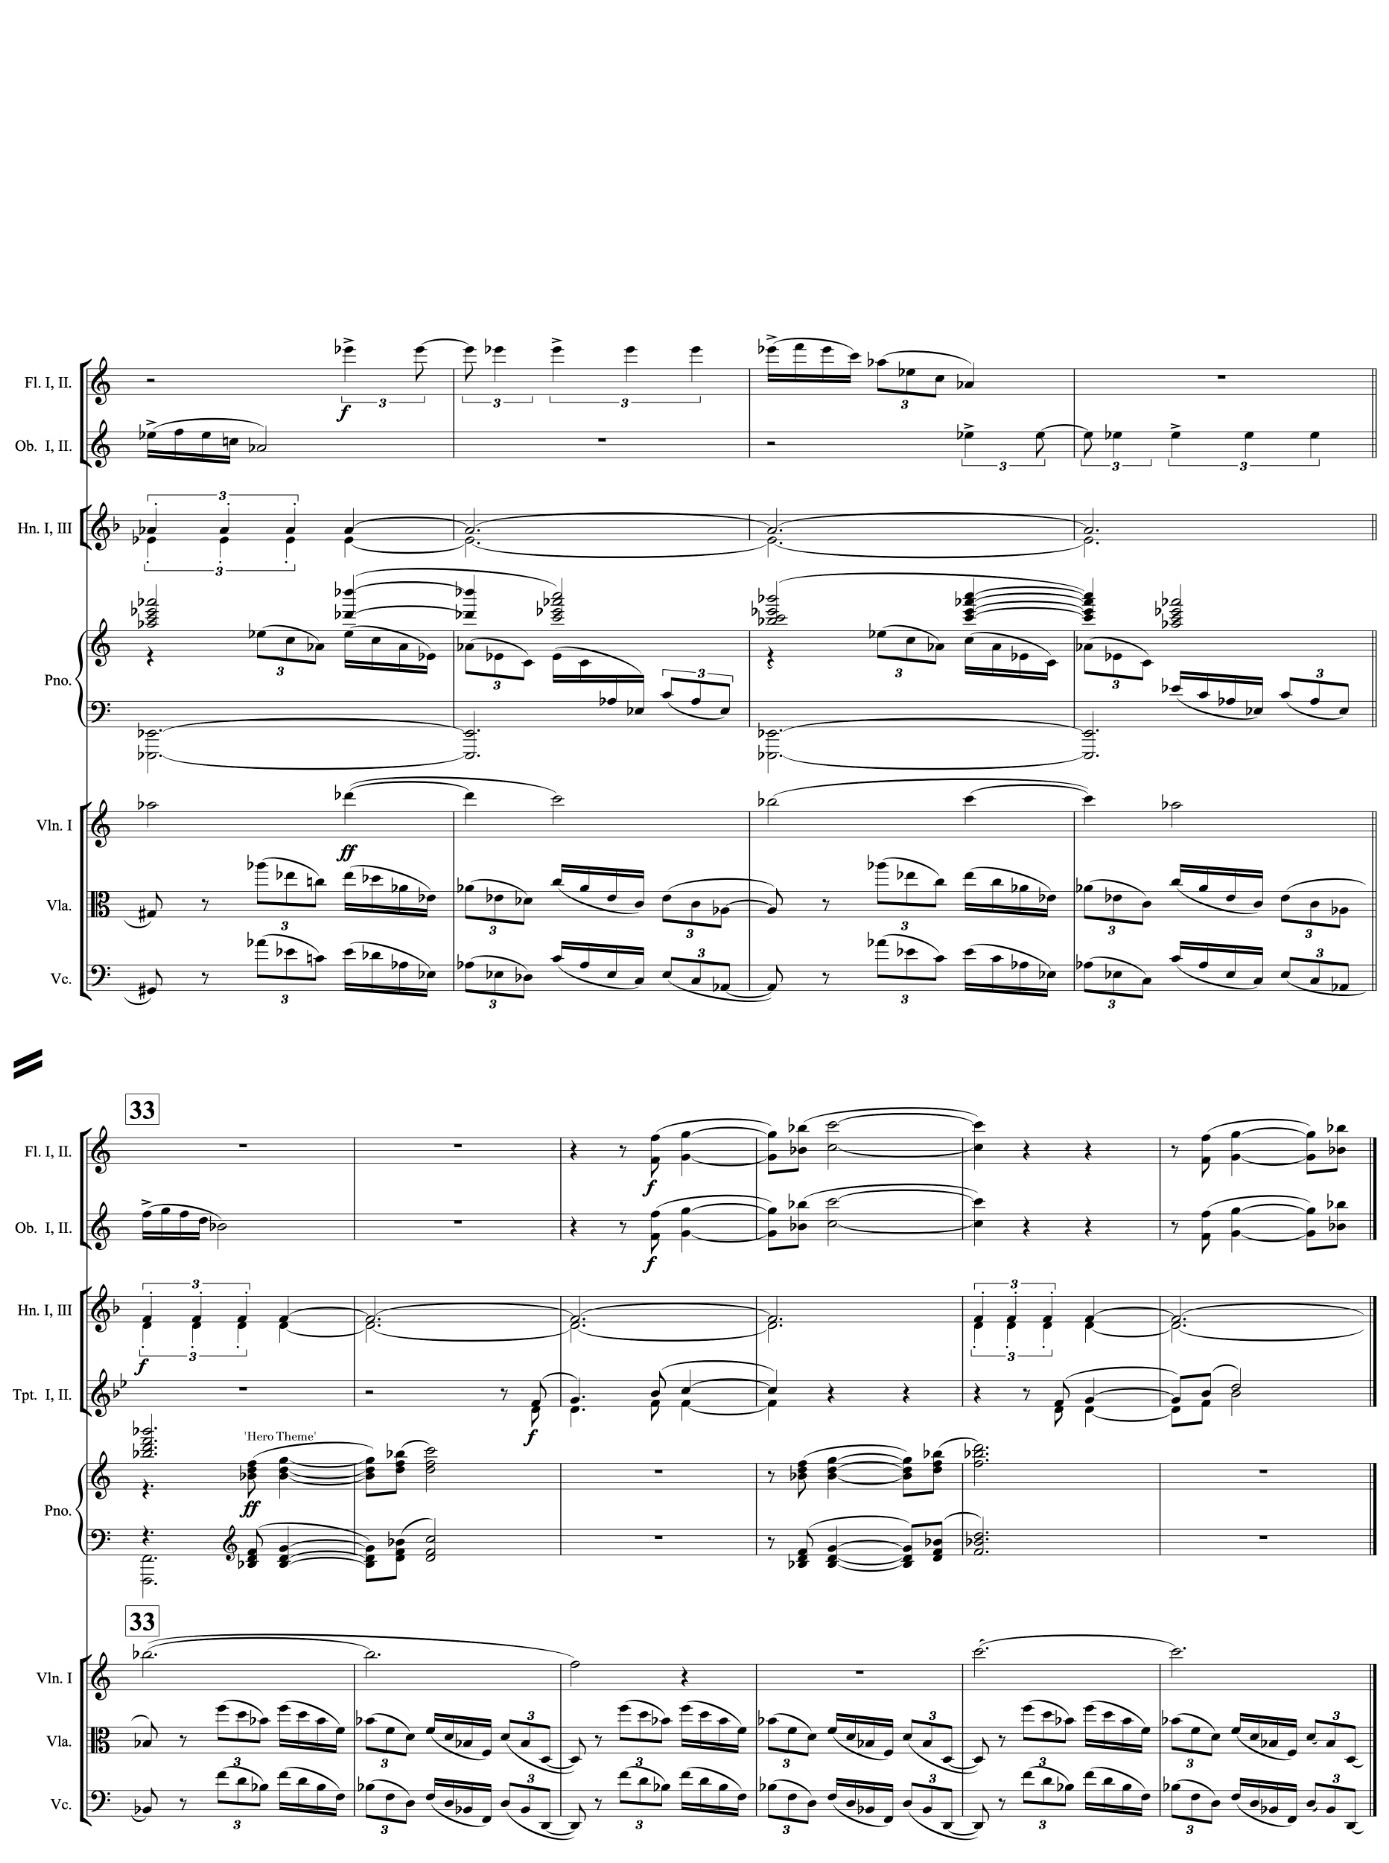
Musical example 12, part 2. The sequence continues towards the Hero theme at bar 373.
Bars | Harmony / bass | Broad melodic outline | Expressive role |
357–360 | D / A | A–G–F♯–E–F♯–D | Initial expansion |
361–364 | E / B | B–A–G♯–F♯–G♯–E | Rising intensity |
365–368 | F♯ / C♯ | C♯–B–A♯–G♯–A♯–F♯ | Orchestral growth |
369–372 | A♭ / E♭ | E♭–D♭–C–B♭–C–A♭ | Fortissimo culmination |
373 | B♭ / F | Hero theme enters | Renewed affirmation |
11. The final affirmation (bars 373–397)
The return of the Hero theme, bars 373–388
At bar 373 the Hero theme returns fortissimo in the piano and is answered by trumpets, trombones and woodwinds. An F pedal supports these imitative entries, providing continuity beneath the increasingly active counterpoint. A descending figure at bar 379 also resembles material associated with the first movement’s second subject, although that relationship remains suggestive rather than definitive. From bar 385, ritardando and diminuendo prepare an expected F–B♭ cadence; the arrival is deferred once more at bar 389.
The final scherzo coda and harmonic surprise, bars 389–397
The anticipated B♭ major at bar 389 is displaced by G♭, after which scherzo-derived figures from Episodes 3 and 2 reanimate the coda. An accelerando begins at bar 391 and Tempo I returns at bar 395. At bar 396, D♭ major gives way to a French augmented-sixth collection, D♭–F–G–B, before the final F-major chord at bar 397. The unexpected penultimate sonority preserves the movement’s habit of deflecting cadences; the closing tonic nevertheless supplies an unambiguous conclusion.
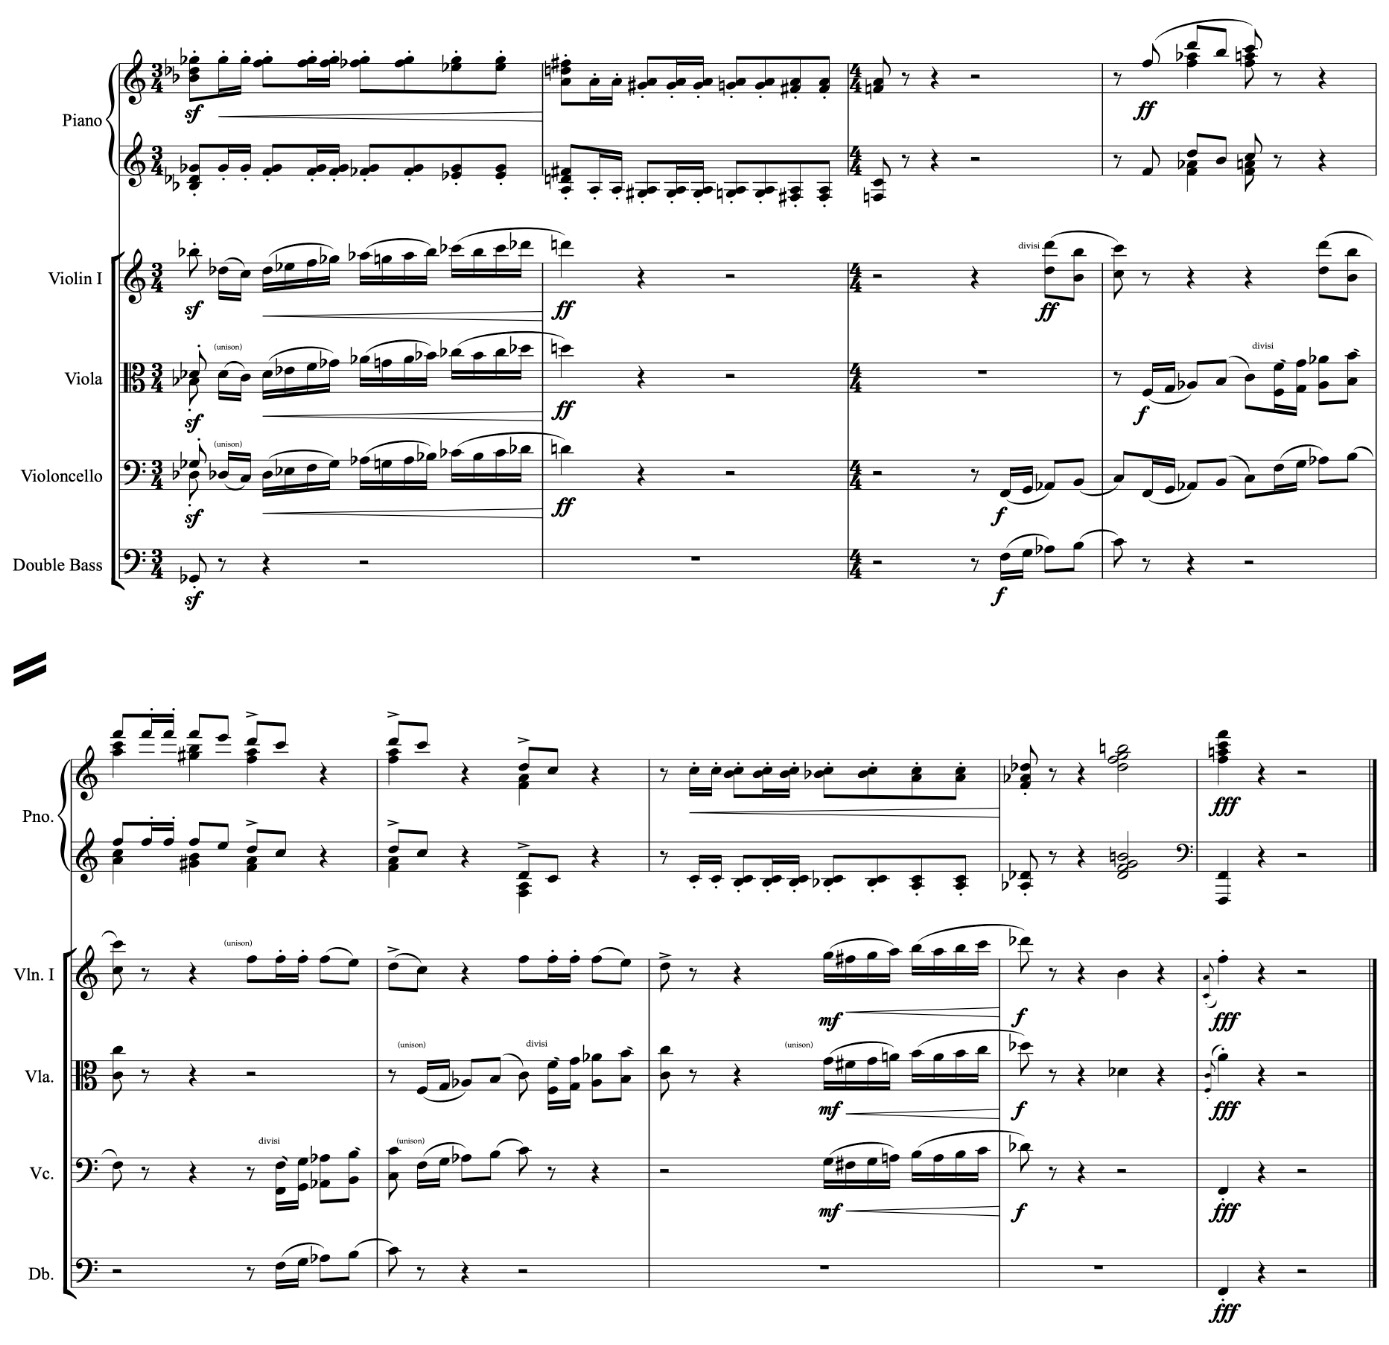
Musical example 13. Finale coda (bars 389–397): French augmented sixth at bar 396 and closing F-major chord.
12. The finale in retrospect
The finale’s initial scherzo procedures—transposition, chromatic cadential displacement and rearrangement of familiar episodes—remain active after the contrasting second subject appears. The same melody is successively presented as a lyrical theme, a Hoedown and an augmented orchestral statement. The identities of those passages depend on melodic continuity, while differences of pace, articulation and orchestration account for their markedly different characters.
The return of Waldeinsamkeit and the Hero links these local transformations with the concerto’s first movement. The ten-note melody first heard in relative isolation is answered here in full by the woodwinds; the Hero returns after a rising four-stage harmonic sequence. These changes in context form the basis for hearing the finale as a conclusion to the three-movement work rather than simply as a brilliant closing movement.
Comparative plate: transformations of Waldeinsamkeit
The following extracts place the recurring ten-note idea alongside two later appearances and a related intervallic procedure in the humorous cadence. The last connection is analogous rather than a literal quotation.
A. Original ten-note melody — Movement I, bars 40–45

The initial two-note anacrusis and the characteristic ten-note melodic outline.
B. Second incarnation — Movement I, bars 501–514
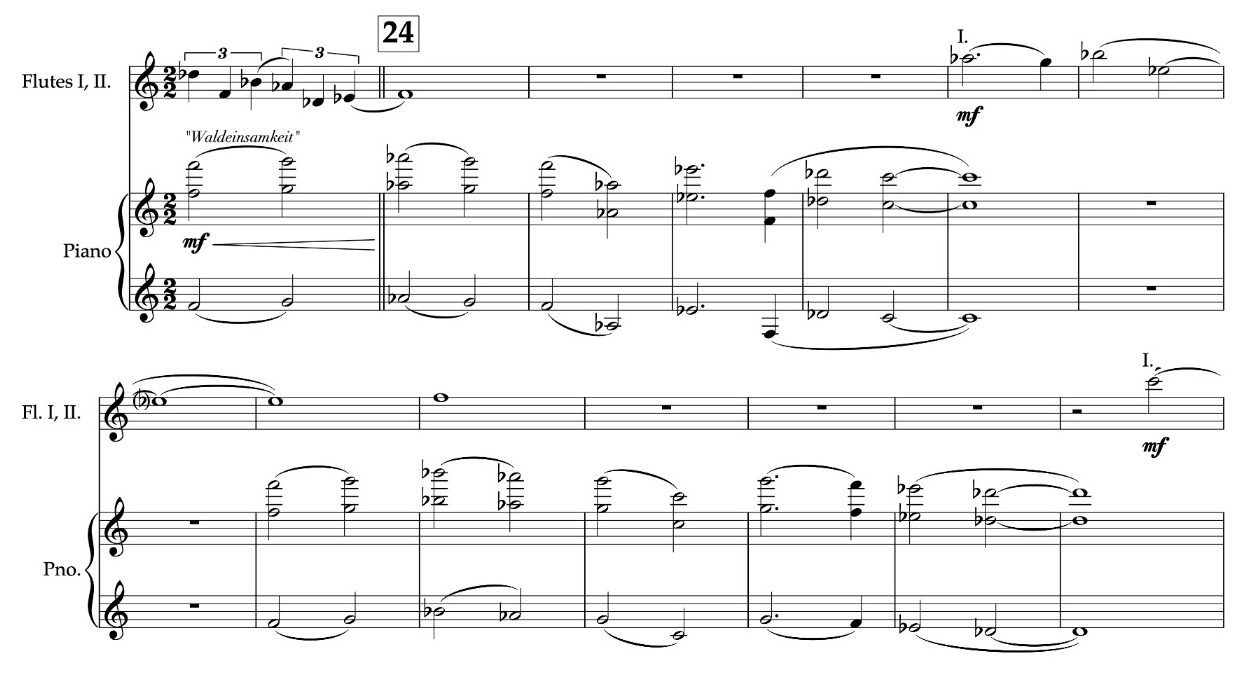
Piano restatement of the ten-note idea, preparing its broader development and exchange with the flute.
C. Finale: the ten-note answer — Movement III, bars 323–340
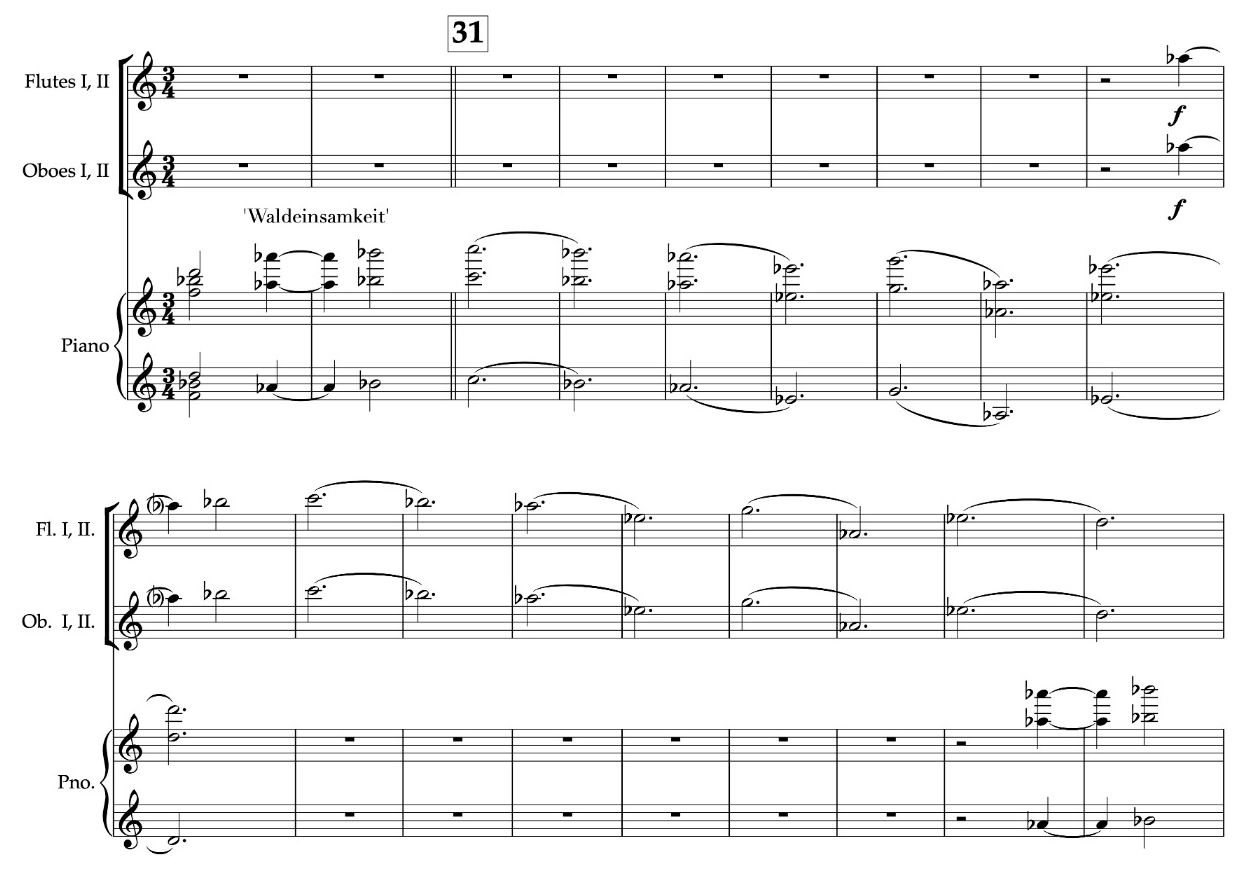
The original thematic identity returns in the piano and is answered in full by the woodwinds.
D. Humorous transformation — Movement III, bars 230–234
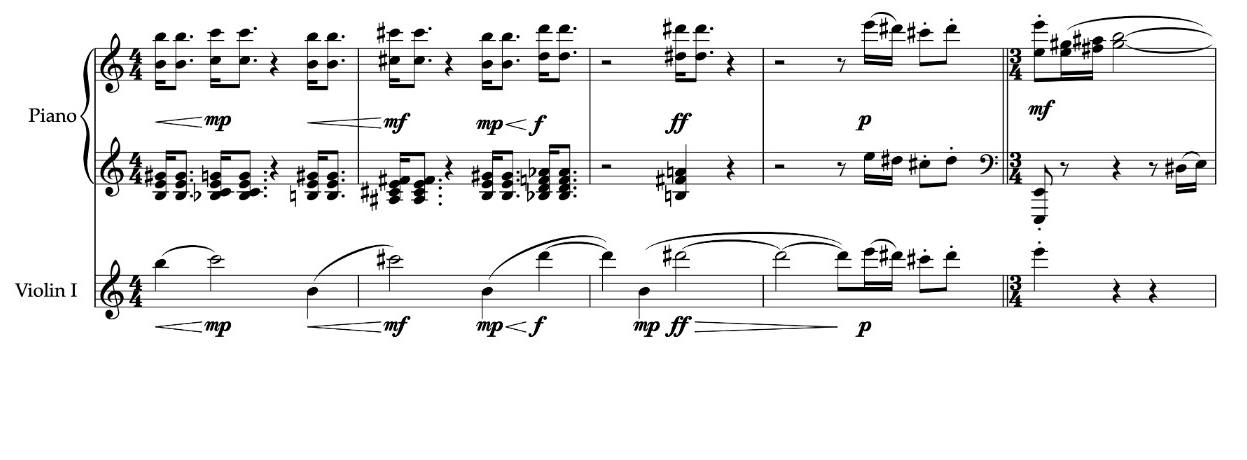
An analogous alternation of a recurring pitch with ascending upper notes now exaggerates the approach to a cadence.
Conclusion: Symphonic architecture, harmonic rhythm and artistic unity
The concerto’s movements share ways of transforming familiar material rather than a single, continuous tonal plan. Themes change pitch level, instrumentation and rhythmic setting; expected cadences are displaced; sustained pedals permit counterpoint to carry the sense of motion. These procedures connect movements whose immediate characters differ considerably.
Form and recurrence
The first movement returns to the introductory Waldeinsamkeit melody inside its recapitulation; at bar 480, a general pause arrests what might otherwise have been a straightforward formal return. In the Canzonetta the opening theme comes back largely intact, while Theme B is developed through imitation and rhythmic expansion. The finale’s short scherzo episodes reappear in related transpositions, and its lyrical second subject survives contrasting stylistic treatments. The three movements thus explore return as reconsideration, recollection and transformation.
Harmonic rhythm and the management of expectation
The speed of harmonic change is central to these distinctions. The first movement’s D-pedal introduction supports chromatic activity; its A-major ending suggests, but does not provide, resolution to D. The Canzonetta sets the mobile harmony of bars 7–10 against the two eight-bar fields of A♭/C and E/B at bars 97–112. In the finale, rapid chromatic shifts in the scherzo contrast with the prolonged B♭ support of Waldeinsamkeit (323–356), before the ascending D–E–F♯–A♭ sequence (357–372) prepares the Hero’s return.
The listener consequently encounters two kinds of movement: changing harmony supported by familiar rhythmic figures, and stable harmony enlivened by exchanges between instruments. Neither process depends upon constant acceleration.
The concerto principle
The piano’s role changes throughout: it introduces Waldeinsamkeit alone, announces the Hero at bar 67 and joins combinations of the subject groups. At bar 501 the flute answers a melody formerly heard in isolation. The Canzonetta alternates piano leadership, accompaniment and imitation; in the finale, the augmented second subject passes from trumpets to piano and strings, while woodwinds answer Waldeinsamkeit in full. The changing distribution of musical agency is part of the concerto’s form.
Reference, intention and interpretation
The finale’s Classical inflections, Coplandesque Hoedown and augmented orchestral statement offer contrasting frames for the same second-subject melody. Mahler’s Ninth provides a textural point of reference at the return of Waldeinsamkeit, not a farewell programme. These affinities describe compositional choices without conferring artistic merit by association.
The composer associates the outer movements’ recurring themes with solitude, resilience and reassurance. The score supports such a reading through contrast of placement, harmonic pace and instrumental exchange; no particular interpretation can be guaranteed in performance. Balance, proportion and the experienced duration of the slower harmonic spans remain open to the listener.
The more firmly demonstrable conclusion is musical: identifiable themes undergo systematic harmonic and contrapuntal transformations and return with altered formal functions. Each movement tests that process differently. The concerto’s unity lies not simply in the recurrence of motifs but in the changing relationships between them, from its unsettled opening to the final F-major chord.
Analytical appendix: finale harmonic and thematic roadmap
Bars | Principal material | Tonal / harmonic landmark |
1–19 | Opening Episodes 1–3 | C, G♭; rapid chords; displaced B♭7 expectation |
20–32 | Episodes 1–2 transposed | C→A; G♭→E♭; predominantly minor-third transposition |
32–40 | Episode 4 | G–B♭–D♭–E with ♭6–5 appoggiaturas |
40–56 | Episode 5 | A–B7–G–A7; active Phrase B; whole span repeated down m3 |
56–66 | Episodes 3 and 1 returns | Semitone-lower Episode 3; Episode 1 begins A♭ |
67–82 | Scherzo codetta, bridge begins | E–D–C–A♭; A♭–D♭ cadence |
82–102 | Bridge | D♭–A–E–C–F♯7–B; F–B♭ cadence |
102–118 | Main second subject | B♭–F7; G♭ diversion; transposed return in F |
118–132 | Middle melody | C with A♭/♭VI; E♭ transposition with B/♭VI |
132–156 | Preparation and variations | Augmented colours; F7–B♭; G7→A♭ interruption |
157–197 | Scherzo reprise | Up P4 from 26–66; episodes 2–4–5–3–1 |
198–213 | Development and climax | Half-diminished chords → minor/Fr+6 sequence |
214–233 | Scherzo codetta | Episode 1 bass; Scotch snaps; E2/E5; delayed B–E cadence |
234–254 | Second bridge | Earlier bridge up m3; E arrival → D♭ subject |
254–291 | Hoedown | Coplandesque rhythmic / orchestral transformation |
292–322 | Augmented second subject | Trumpet D♭; piano/strings A♭; 3/2 against 3/4 |
323–356 | Waldeinsamkeit | B♭11; eight-bar piano/wind dialogue; reassurance |
357–372 | Ascending transition | D–E–F♯–A♭ over dominant pedal fifths |
373–388 | Hero and concluding material | B♭/F; prolonged F pedal |
389–397 | Last scherzo coda | F expected B♭ → G♭; Fr+6 → F major |
Sources and analytical conventions
The analytical material is based on the orchestral scores of the three movements of Piano Concerto, Op. 7, together with clarifications supplied by the composer. Bar numbers identify the relevant movement. Harmonic names represent functional and colouristic reductions of the scored sonorities; passing tones, suspensions and pedal notes are not always represented as separate chords. Form diagrams summarise primary thematic functions rather than displaying every contrapuntal event. The interpretations of expressive character are offered as readings of musical evidence and composer testimony, not as assertions of an objectively fixed programme.
 s
 English (UK)
 简体中文